
Migrate to Zoho Books from QuickBooks Online
Zoho Books is your one-stop solution for your business’s accounting needs. This page will guide you on how to migrate from QuickBooks Online to Zoho Books. Read on to know about the step-by-step process to switch over to Zoho Books easily.
Note:
If you need help migrating data from your previous accounting software to Zoho Books, email us at migration@zohobooks.com for assistance.
Pre-requisites for Migration
Before you migrate any data, you’ll have to make sure that you complete the following two steps:
Set Up Your Zoho Books Organization
You’ll need to set up your organization in Zoho Books and make sure all the required details are saved. Here’s how you can do it:
- Log in to your Zoho Books account.
- Click Settings on the top right corner of the page.
- Click Profile under Organization.
- Fill in your organization details.
- Click Save at the bottom of the page.
Read more about setting up your organization profile.
Another important step while setting up your organization in Zoho Books is to add all the taxes that you deal with in your business.
To add taxes in Zoho Books:
- Click Settings on the top right corner of the page.
- Click Taxes under Taxes & Compliance.
- In the Taxes pane, click Tax Rates.
- Click + New Tax on the top right corner of the page.
- Enter the Tax Name and Tax Rate.
- Select a Tax Authority from the drop down or type in the box to add it.
- Click Save.
Similarly, you can create new Tax Groups (multiple taxes grouped as a single tax), add Tax Exemptions and Tax Authorities as per your business requirements.
After this, you have to export certain reports from QuickBooks Online to import them later into Zoho Books.
Export Data from QuickBooks Online
After you have set up your organization in Zoho Books, you can start migrating data from QuickBooks Online to Zoho Books.
General Reports
First, you have to export all the necessary reports from QuickBooks Online. While importing into Zoho Books, ensure that:
- All the fields in the import file follow the given order.
- All the mandatory fields are included in the import file.
Insight: Though few fields are not mandatory for importing (marked as Not necessary for import), you still have to create a column for them (in the given order) and choose to leave these fields empty.
The list of reports to be exported from QuickBooks Online are given below:
- Accounts List: List of all accounts through which you transact in QuickBooks Online.
| QuickBooks Online | Zoho Books | Comments |
|---|---|---|
| Account # | Account Code | Not necessary for import |
| Account | Account Name | Mandatory |
| Type | Account Type | Mandatory |
| Detail type | Parent Account | Not necessary for import |
| Description | Description | Not necessary for import |
| Balance | Can be brought as custom field | |
| Currency | Currency | Mandatory |
- Customer Contact List: List of all the customers in your business.
| QuickBooks Online | Zoho Books | Comments |
|---|---|---|
| Customer | Display Name | Mandatory |
| Phone Numbers | Mobile Phone | Not necessary for import |
| Email ID | Not necessary for import | |
| Full Name | Customer/Vendor Name | Not necessary for import |
| Billing Address | Billing Address | Not necessary for import |
| Shipping Address | Shipping Address | Not necessary for import |
| Last Modified | Last Modified Time | Not necessary for import |
| Create Date | Created Time | Not necessary for import |
| Last Modified By | Not necessary for import | |
| Website | Website | Not necessary for import |
| Delivery Method | Not necessary for import | |
| Other | Not necessary for import | |
| Tax Rate | Tax Rate | Mandatory |
| Taxable | Taxable | Mandatory |
| Resale # | Custom field | |
| Credit Card # | Custom field | |
| Terms | Payment Terms | Not necessary for import |
| CC Expires | Custom field | |
| Payment Method | Custom field | |
| Customer Type | Custom field | |
| Billing Street | Billing Street2 | Not necessary for import |
| Billing City | Billing City | Not necessary for import |
| Billing State | Billing State | Not necessary for import |
| Billing ZIP | Billing Code | Not necessary for import |
| Billing Country | Billing Country | Not necessary for import |
| Shipping Street | Shipping Street2 | Not necessary for import |
| Shipping State | Shipping State | Not necessary for import |
| Shipping City | Shipping City | Not necessary for import |
| Shipping Country | Shipping Country | Not necessary for import |
| Last Name | Last Name | Not necessary for import |
| First Name | First Name | Not necessary for import |
| Shipping ZIP | Shipping Code | Not necessary for import |
| Currency | Currency Code | Mandatory |
- Vendor Contact List: List of all the vendors from whom you buy your products or services.
| QuickBooks Online | Zoho Books | Comments | Fields in Zoho Books which are not available in QB |
|---|---|---|---|
| Vendor | Vendor Display Name | Mandatory | Customer/Vendor ID |
| Email ID | Not necessary for import | Taxable | |
| Address | Billing Address | Not necessary for import | Tax Percentage |
| Account # | Not necessary for import | Tax Type | |
| First Name | First Name | Not necessary for import | Exemption ReasonState |
| Website | Website | Not necessary for import | Customer/Vendor Name |
| Create Date | Created Time | Not necessary for import | Salutation |
| Tax ID | Not necessary for import | Skype Identity | |
| Country | Billing Country | Not necessary for import | |
| Created By | Not necessary for import | ||
| Terms | Payment Terms | Not necessary for import | Credit Limit |
| Company Name | Company Name | Not necessary for import | Price List |
| City | Billing City | Not necessary for import | Notes |
| Street | Billing Street2 | Not necessary for import | Customer/Vendor Address ID |
| Currency | Currency Code | Mandatory | Billing Attention |
| Not necessary for import | Billing Phone | ||
| Not necessary for import | Billing Fax | ||
| Not necessary for import | Shipping Attention | ||
| Not necessary for import | Shipping Address | ||
| Not necessary for import | Shipping Street2 | ||
| Not necessary for import | Shipping City | ||
| Not necessary for import | Shipping State | ||
| Not necessary for import | Shipping Country | ||
| Not necessary for import | Shipping Code | ||
| Not necessary for import | Shipping Phone | ||
| Not necessary for import | Shipping Fax | ||
| Not necessary for import | Source | ||
| Not necessary for import | Last Sync Time | ||
| Not necessary for import | Status |
- Products/Services List: List of all the items you buy or sell in your business.
| QuickBooks Online | Zoho Books | Comments | Fields in Zoho Books which are not available in QB |
|---|---|---|---|
| Product/Service | Item Name | Mandatory/ Description | Item ID |
| Type | Product Type | Not necessary for import | Taxable |
| Description | Description | Not necessary for import | Exemption Reason |
| Price | Rate | Mandatory | Reference ID |
| Cost | Purchase Rate | Mandatory | Source |
| Taxable | Taxable | Not necessary for import | Last Sync Time |
| Purchase Description | Purchase Description | Not necessary for import | Item Type |
| Expense Account | Purchase Account | Mandatory | Usage unit |
| Cost | Purchase Rate | Mandatory | Inventory Account |
| Expense Account | Purchase Account | Mandatory | Initial Stock |
| Preferred Vendor | Vendor | Not necessary for import | Initial Stock Rate |
- Inventory Valuation Detail: Closing stock of your items.
The Inventory Valuation Detail report is used to get the closing stock of your items in QuickBooks Online. While importing the products or services into Zoho Books (Items list), you can use this closing stock to update the opening stock of items in Zoho Books.
- Trial Balance: Closing balances of all the accounts in your organization.
After you import the Accounts List report, you’ll have a list of accounts to import into Zoho Books. You can get the balances for each of these accounts using the Trial Balance report to update them in Zoho Books.
- Sales by Product Service: Sales transactions (such as invoices) that you create for your customers.
| QuickBooks Online | Zoho Books | Comments | Fields in Zoho Books which are not available in QB |
|---|---|---|---|
| Date | Invoice Date | Mandatory | Invoice ID |
| Num | Invoice Number | Mandatory | Quote Number |
| Customer | Customer Name | Mandatory | Invoice Status |
| Qty | Quantity | Not necessary for import | Customer ID |
| Sales Price | Item Price | Not necessary for import | Is Inclusive Tax |
| Amount | Total | Not necessary for import | Invoice Level Tax |
| Balance | Balance | Not necessary for import | Invoice Level Tax % |
| Product/Service | Item Name | Not necessary for import | Invoice Level Tax Type |
| SKU | Not necessary for import | Invoice Level Tax Exemption Reason | |
| Taxable | Not necessary for import | Invoice Level Tax Authority | |
| Create Date | Not necessary for import | Due Date | |
| Last Modified | Not necessary for import | Expected Payment Date | |
| Created By | Not necessary for import | Purchase Order | |
| Last Modified By | Not necessary for import | Template Name | |
| Client/Vendor Message | Not necessary for import | Discount Type | |
| Payment Method | Not necessary for import | Is Discount Before Tax | |
| A/R Paid | Not necessary for import | Entity Discount Percent | |
| Open Balance | Not necessary for import | Entity Discount Amount | |
| Tax Name | Item Tax | Not necessary for import | Product ID |
| Foreign Net Amount | Not necessary for import | Usage unit | |
| Foreign Tax Amount | Not necessary for import | Discount | |
| Foreign Amount | Not necessary for import | Discount Amount | |
| Not necessary for import | Expense Reference ID | ||
| Not necessary for import | Sales Order Number | ||
| Not necessary for import | Tax ID | ||
| Not necessary for import | Item Tax % | ||
| Not necessary for import | Item Tax Type | ||
| Not necessary for import | Item Tax Authority | ||
| Not necessary for import | Item Tax Exemption Reason | ||
| Not necessary for import | Item Total | ||
| Not necessary for import | Custom Charges | ||
| Not necessary for import | Shipping Bill# | ||
| Not necessary for import | Shipping Bill Date | ||
| Not necessary for import | Shipping Bill Total | ||
| Not necessary for import | PortCode | ||
| Not necessary for import | Shipping Charge | ||
| Not necessary for import | Adjustment | ||
| Not necessary for import | Adjustment Description | ||
| Not necessary for import | Round Off | ||
| Not necessary for import | Sales person | ||
| Not necessary for import | Payment Terms | ||
| Not necessary for import | Payment Terms Label | ||
| Not necessary for import | Last Payment Date | ||
| Not necessary for import | Notes | ||
| Not necessary for import | Terms & Conditions | ||
| Not necessary for import | Recurrence Name | ||
| Not necessary for import | PayPal | ||
| Not necessary for import | Authorize.Net | ||
| Not necessary for import | Google Checkout | ||
| Not necessary for import | Payflow Pro | ||
| Not necessary for import | Stripe | ||
| Not necessary for import | 2Checkout | ||
| Not necessary for import | Braintree | ||
| Not necessary for import | CSG Forte | ||
| Not necessary for import | Payments Pro | ||
| Not necessary for import | Square | ||
| Not necessary for import | Razorpay | ||
| Not necessary for import | GoCardless | ||
| Not necessary for import | Partial Payments | ||
| Not necessary for import | Billing Address | ||
| Not necessary for import | Billing City | ||
| Not necessary for import | Billing State | ||
| Not necessary for import | Billing Country | ||
| Not necessary for import | Billing Code | ||
| Not necessary for import | Billing Phone | ||
| Not necessary for import | Billing Fax | ||
| Not necessary for import | Shipping Address | ||
| Not necessary for import | Shipping City | ||
| Not necessary for import | Shipping State | ||
| Not necessary for import | Shipping Country | ||
| Not necessary for import | Shipping Code | ||
| Not necessary for import | Shipping Fax | ||
| Not necessary for import | Shipping Phone Number |
- Purchases by Product Service: Purchase Transactions (such as bills) that you receive from your vendors.
| QuickBooks Online | Zoho Books | Comments | Fields in Zoho Books which are not available in QB |
|---|---|---|---|
| Date | Bill Date | Mandatory | Bill ID |
| Num | Bill Number | Mandatory | PurchaseOrder |
| Vendor | Vendor Name | Mandatory | Bill Status |
| Qty | Quantity | Not necessary for import | Due Date |
| Balance | Balance | Not necessary for import | Item Name |
| Customer | Customer Name | Not necessary for import | Product ID |
| Taxable | Not necessary for import | Quantity | |
| Last Modified | Not necessary for import | Usage unit | |
| Last Modified By | Not necessary for an import | Purchase Order Number | |
| Ref # | Not necessary for import | Item Total | |
| Account | Account | Not necessary for import | SubTotal |
| Client/Vendor Message | Not necessary for import | Is Discount Before Tax | |
| A/P Paid | Not necessary for import | Entity Discount Percent | |
| Payment Method | Not necessary for import | Entity Discount Amount | |
| Currency | Currency Code | Not necessary for import | Discount Account |
| Exchange Rate | Exchange Rate | Not necessary for import | Adjustment |
| Tax Amount | Not necessary for import | Adjustment Description | |
| Foreign Tax Amount | Not necessary for import | Vendor Notes | |
| Taxable Amount | Not necessary for import | Terms & Conditions | |
| Payment Terms | |||
| Payment Terms Label | |||
| Is Billable | |||
| Is Landed Cost | |||
| Project Name |
To view and export the above reports:
- Log in to your QuickBooks Online account.
- Go to the Reports module.
- Select the report you want to export.
- Click the Export icon on top of the page and select Export to PDF or Export to Excel.
If you are migrating at the beginning of a financial year, then export the Trial Balance and the Inventory Valuation Detail reports as on the starting date of the current financial year.
For example, let’s say you begin your accounting on 1st April 2019, and the last date of the previous accounting period is 31st March 2019. In this case, you would need to export the above two reports with the last date being 31st March 2019.
Reports for Customer/Vendor Balances
Let’s see how opening balances for customers and vendors are stored in QuickBooks Online and Zoho Books.
In QuickBooks Online The opening balance of a customer is the total value of two major entities:
- Outstanding Invoices: Amount that you are yet to receive from your customers
- Customer Advances: Amount that you have already received from your customers
In QuickBooks Online, both these entities are tracked under a single account, i.e. the Accounts Recivable (A/R) account.
Similarly, the opening balance of a vendor is the total value of two major entities:
- Outstanding Bills: Amount that you owe your vendors
- Vendor Advances: Amount that you have already paid your vendors
Both these entities are tracked under a single account, i.e. the Accounts Payable (A/P) account in QuickBooks Online.
In Zoho Books However, in Zoho Books both the outstanding invoices and the advance payments of customers are tracked under two different accounts:
- Outstanding Invoices: Accounts Receivable (A/R)
- Customer Advances: Unearned Revenue
Similarly, both the outstanding bills and advance payments of vendors are tracked under two different accounts:
- Outstanding Bills: Accounts Payable (A/P)
- Vendor Advances: Prepaid Expenses
Now that we have understood this, let’s see how we can export customer and vendor balances from QuickBooks Online.
Export Customer Balances As we saw earlier, you need to import into Zoho Books two major entities for your customers:
- Outstanding Invoices
- Customer Advances
These entities can be obtained from the Accounts Receivable (A/R) account.
To export the Accounts Receivable (A/R) report:
- Log in to your QuickBooks Online account.
- Go to the Reports module.
- Select the Trial Balance report.
- Click the value in the Accounts Receivable (A/R) field.
- Select Transaction Type in the Group By filter.
- Click the Run report button.
- Click the Export icon on top of the page and select Export to PDF or Export to Excel.
When you filter this report based on the Transaction Type, you can see two different types of transactions:
Invoices: The transactions listed here will contain all the Outstanding Invoices of the customer.
Payments: The transactions listed here will contain all the Customer Advances of each customer.
Export Vendor Balances As mentioned earlier, you need to import into Zoho Books two major entities for your vendors:
- Outstanding Bills
- Vendor Advances
These can be obtained from the Accounts Payable (A/P) account.
To export the Accounts Payable (A/P) report:
- Go to the Reports module in QuickBooks Online.
- Select the Trial Balance report.
- Click the value in the Accounts Payable (A/P) field.
- Select Transaction Type in the Group By filter.
- Click the Run report button.
- Click the Export icon on top of the page and select Export to PDF or Export to Excel.
When you filter this report based on the Transaction Type, you can see two different types of transactions:
Bills: The transactions listed here will contain all the Outstanding Bills of the vendor.
Payments: The transactions listed here will contain all the Vendor Advances of each vendor.
Foreign Customers/Vendors
If you deal with your overseas customers/vendors and have created transactions for them in different currencies in QuickBooks Online, you can import their opening balances as well.
Overseas Customers To get the outstanding invoices and advance payments of your overseas customers:
- Go to the Reports module in QuickBooks Online.
- Select the Trial Balance report.
- Click the value in the Accounts Receivable (A/R) field.
- Click the Settings icon in the top right corner of the report.
- Select the Foreign Amount and Exchange Rate fields.
- Select Transaction Type in the Group By filter.
- Click the Run report button.
- Click the Export icon on top of the page and select Export to PDF or Export to Excel.
For each currency, the A/R report will be created separately. You can save these reports based on the currency name. For example, if you are exporting Dirhams (AED), then you can save the report as A/R in AED.
After doing this, you will be able to view all the outstanding invoices and advance payments done by your overseas customers. For any currency that you deal with, you would have to calculate the average of all its exchange rates over a period of time. This will be used as your exchange rate for that particular customer in Zoho Books.
When you import the balances of your overseas customers into Zoho Books, you’ll need to convert them into their base currency by taking the average exchange rate for each currency. In Zoho Books, all these currencies will be tracked under one account, irrespective of their currencies.
The customers and vendors will be grouped as per their currency in the Accounts Receivable (A/R) account.
Overseas Vendors You can follow similar steps for getting the balances of your overseas vendors.
- Go to the Reports module in QuickBooks.
- Select the Trial Balance report.
- Click the value in the Accounts Payable (A/P) field.
- Click the Settings icon in the top right corner of the report.
- Select the Foreign Amount and Exchange Rate fields.
- Select Transaction Type in the Group By filter.
- Click the Run report button.
- Click the Export icon on top of the page and select Export to PDF or Export to Excel.
For each currency, the A/P report will be created separately. You can save these reports based on the currency name. For example, if you are exporting Dirhams (AED), then you can save the report as A/P in AED. However, when importing them into Zoho Books, all these foreign currency amounts will be tracked under one account, irrespective of their currencies.
After doing this, you will be able to view all the outstanding bills and advance payments for your vendors. Calculate the average exchange rate of all the exchange rates of any currency, and this would be used as your exchange rate for the particular vendor in Zoho Books.
Migration Process
After you’ve exported all the required data from QuickBooks Online, you can begin the migration process.
Migration from QuickBooks Online to Zoho Books can be done in two ways:
- Import Transactions of the Current Financial Year (Recommended)
- Import Historical Data
Import Transactions of the Current Financial Year (Recommended) In this method, you would have to enter the opening balance date as the date on which you began the current financial year (i.e. 1st October) and bring in your current transactions, as well as the transactions before the opening balance date.
You would have to enter the accounts’ closing balances as on that date and import the corresponding open transactions into Zoho Books.
We recommend that you use this approach to import data into Zoho Books. In this help document, we’ll be following this approach.
Import Historical Data You can choose to enter the opening balance date as the date on which you actually started your business and bring in all the transactions you have created since this date.
For example, let’s say you have started your business on 21st February 2011. You can enter the opening balance date as 21st February 2011 and import all the open transactions you have carried out from that date until the current date.
Migration Steps
In Zoho Books, we have different modules which consist of data related to your business. For example, the Chart of Accounts module consists of all the accounts in your organization, or the Items module consists of all the products and services you buy or sell in your business.
We will now look at how you can import all the data exported from QuickBooks Online into the modules in Zoho Books based on the reports that you’ve exported earlier.
For a smooth migration process, you would have to follow the steps in the order mentioned in this page.
Import Chart of Accounts
The Chart of Accounts refers to the list of accounts that are used in a company’s general ledger. The first step in migration involves importing the Chart of Accounts into Zoho Books.
The Accounts List report (exported this report in earlier steps) in QuickBooks Online is the equivalent of the Chart of Accounts module in Zoho Books. The accounts in the Accounts list need to be imported into Zoho Books.
The Chart of Accounts in Zoho Books consists of a list of predefined accounts, most of which will be similar to the accounts in QuickBooks Online. So, when you’re importing these accounts into Zoho Books, you can skip the duplicate accounts and import just any additional accounts that you have.
Before Migration…
Before you migrate your accounts into Zoho Books, you might want to check upon a few things:
Sub-Accounts If you have sub-accounts, make sure to include the parent accounts first followed by the child accounts in the import file.
Note: Some account types in QuickBooks Online vary from those in Zoho Books. So, before importing the Chart of Accounts, you need to make some changes in the import file.
| Accounts in QuickBooks Online | Accounts in Zoho Books |
|---|---|
| Accounts Receivable | Accounts Receivable |
| Accounts Payable | Accounts Payable |
| Inventory Asset | Inventory Asset |
| Cost of Sales | Cost of Goods Sold |
| Sales of Product Income | Sales |
| Undeposited Funds | Undeposited Funds |
Migration Process
To import the chart of accounts into Zoho Books:
- Log in to your Zoho Books account.
- Go to the Accountant module in the left sidebar.
- Select Chart of Accounts.
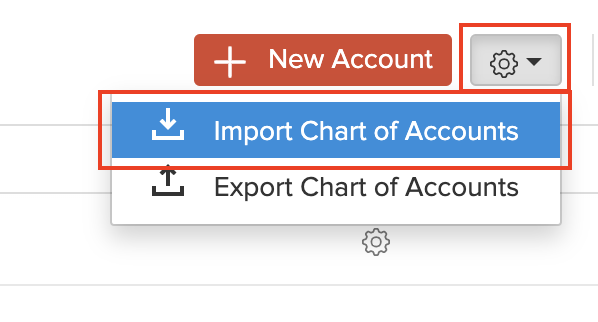
- Click the More button in the top right corner of the pager.
- Select Import Chart of Accounts.
- Click Choose File and upload the import file from your system (refer the Accounts List report). Click the sample file to download and view the format of import file to make the necessary changes in the file before uploading it.
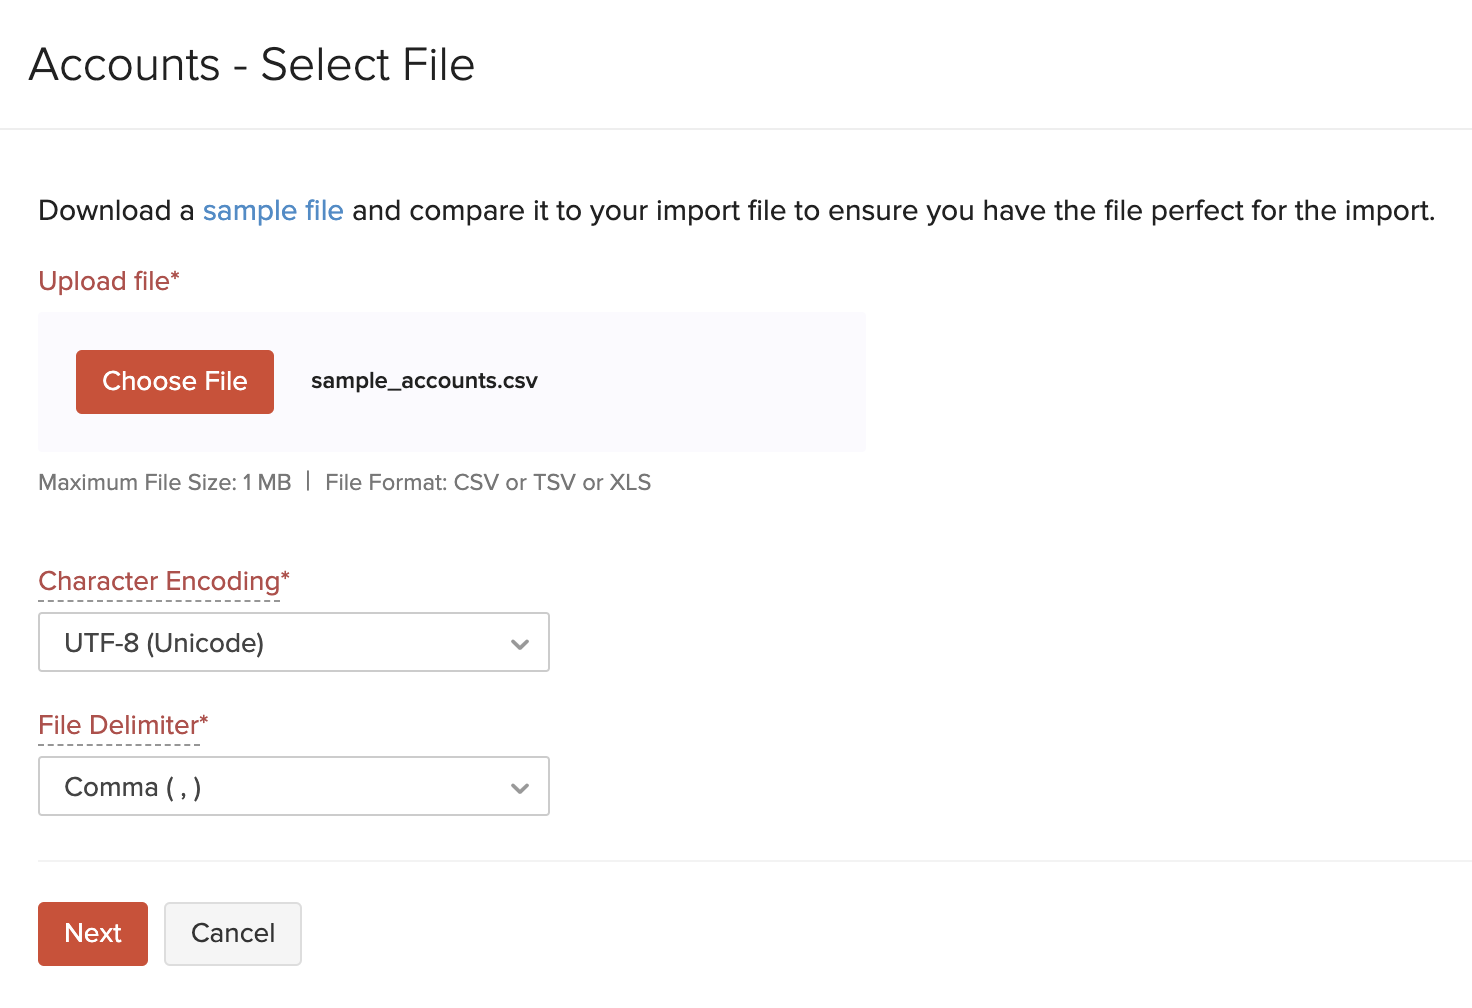
- Click Next.
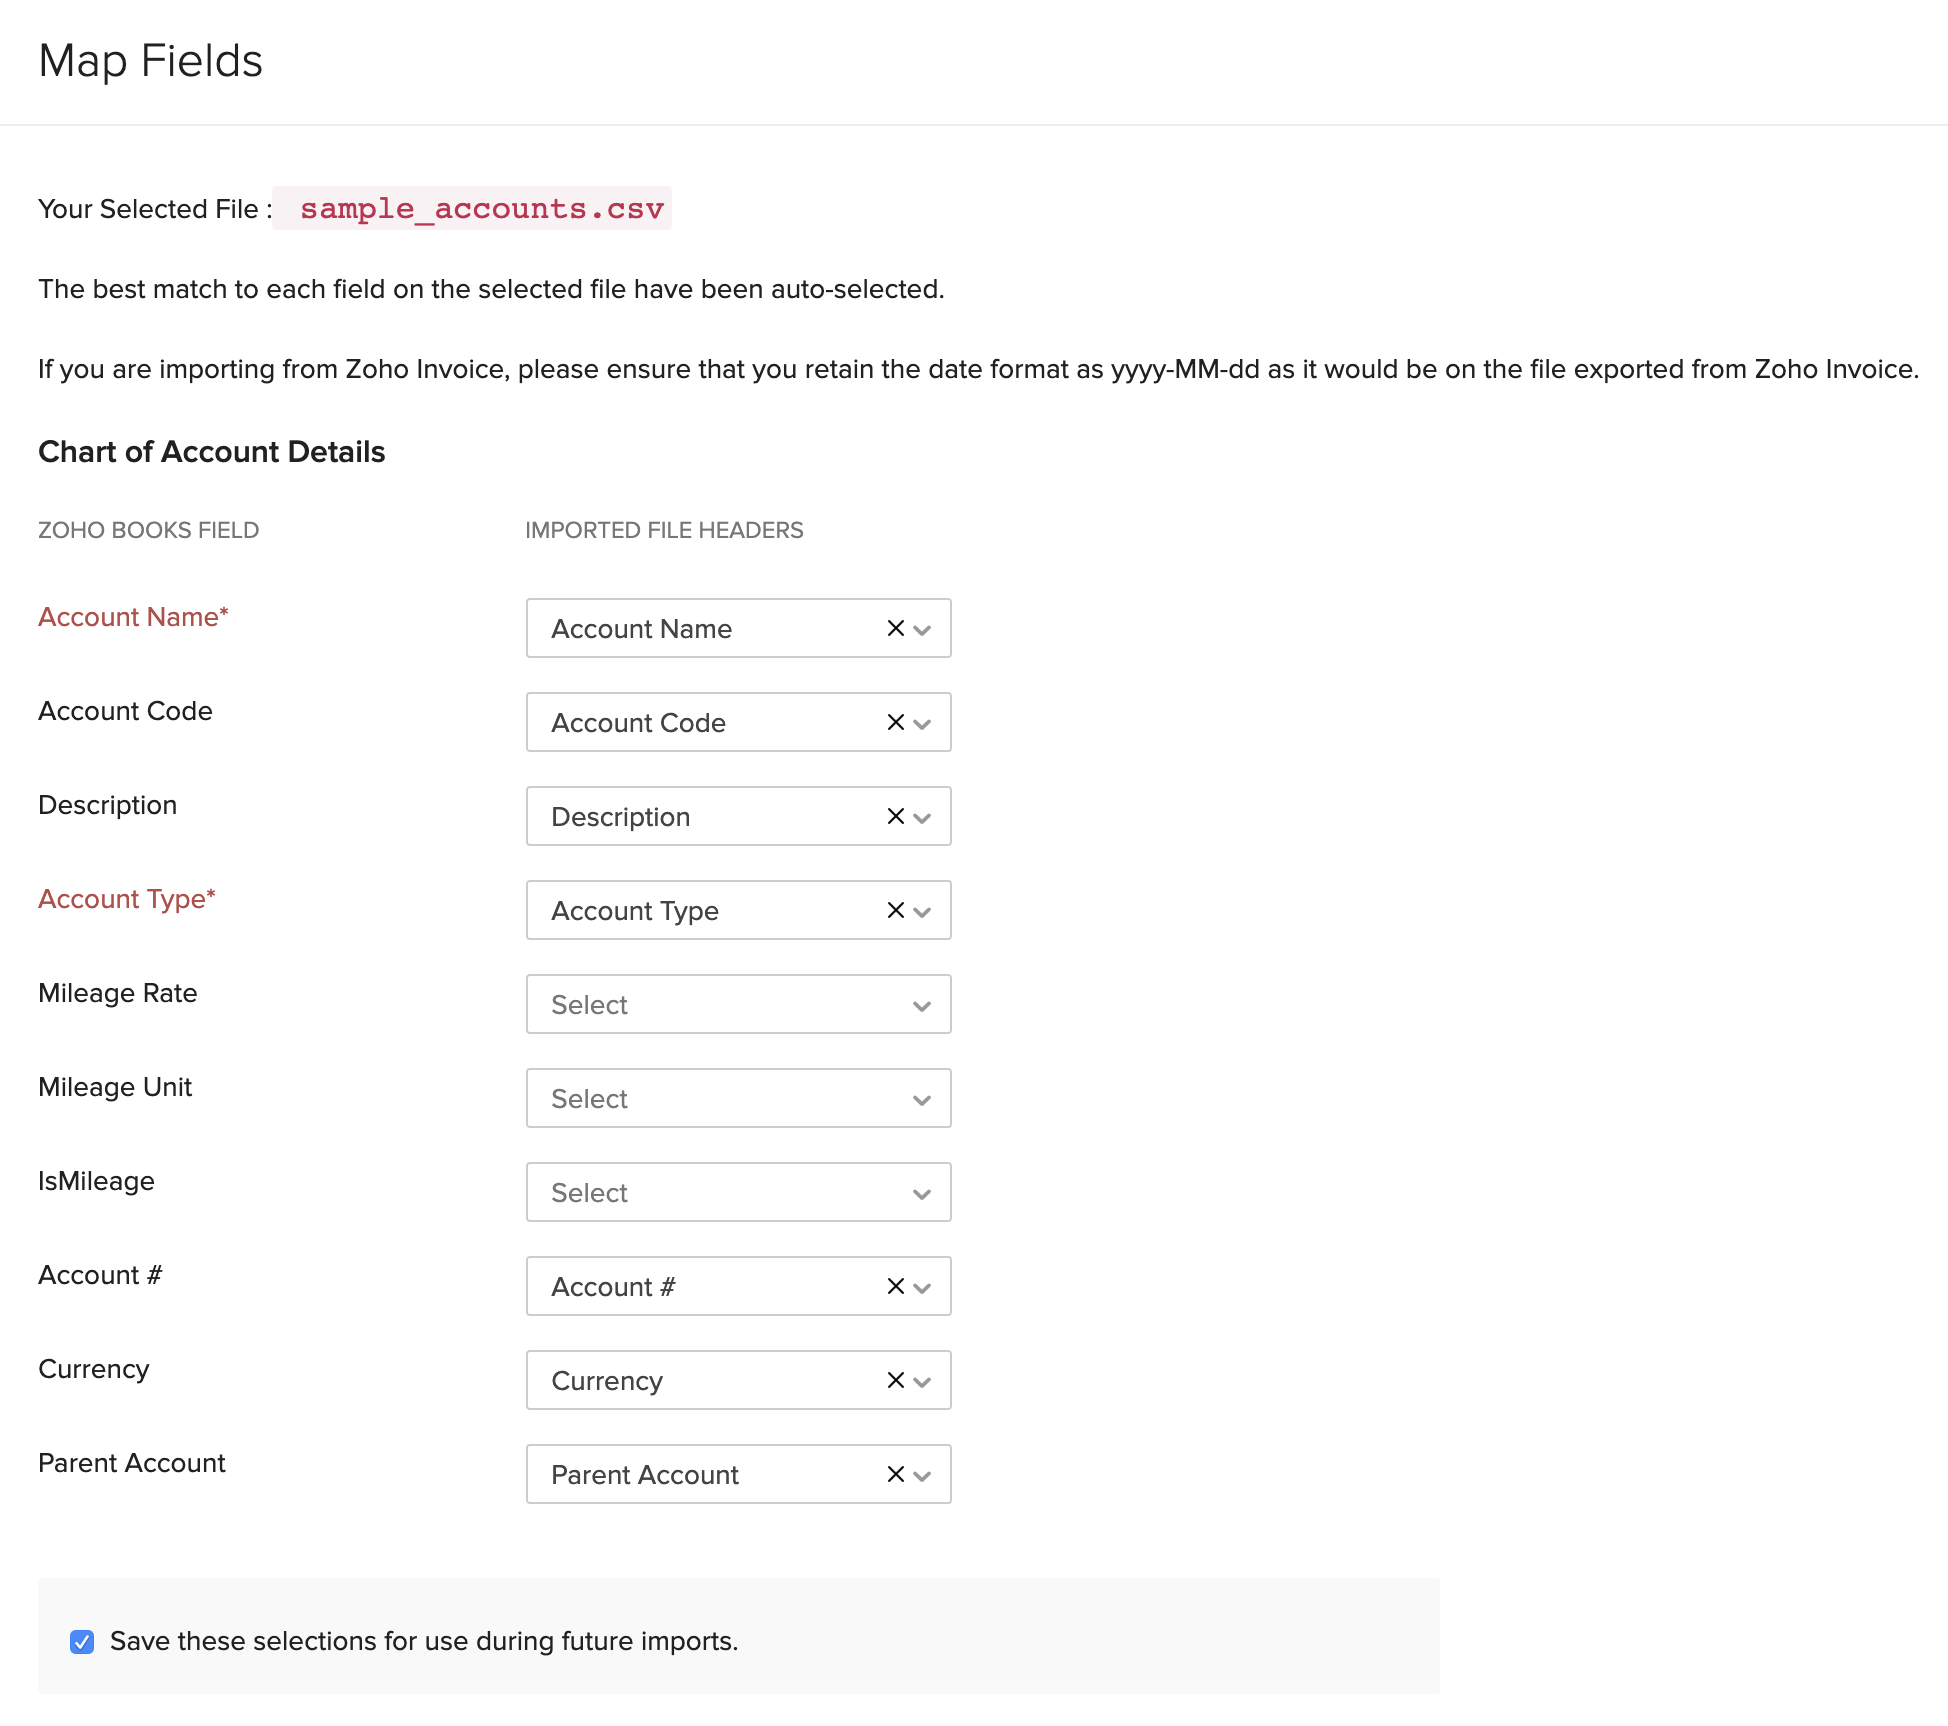
- In the Map Fields page, make sure that the fields in Zoho Books are mapped to the corresponding fields in your import file.
- If you wish to Save these selections for use during future imports to use similar format for imports in the future, mark the corresponding box.
- Click Next.
- Click Import.
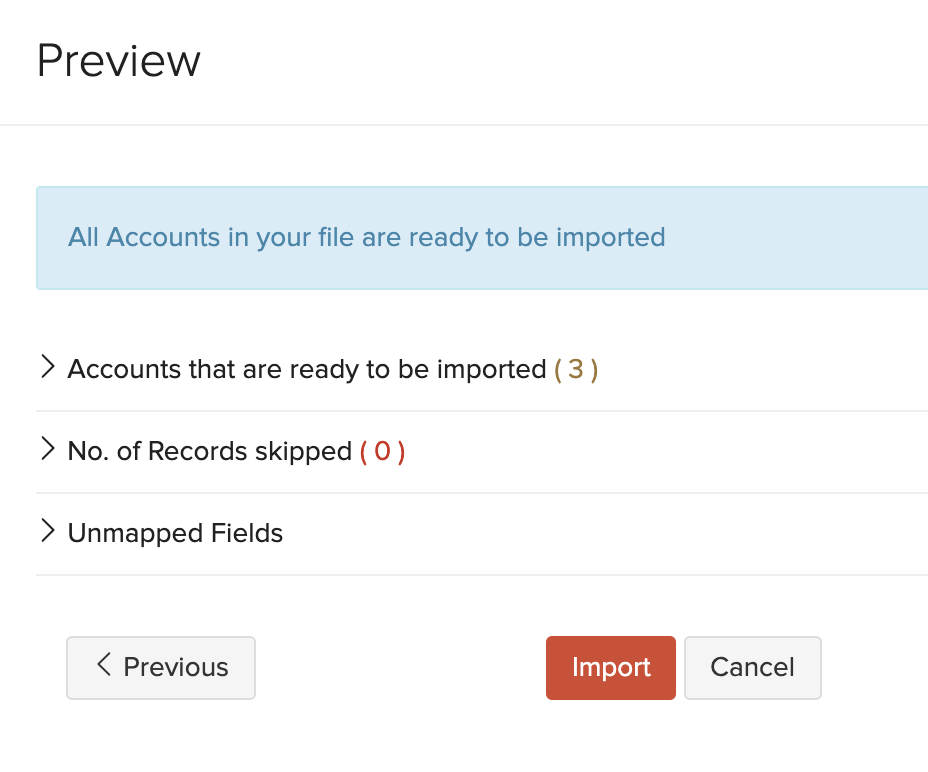
After this, you would have successfully imported the Chart of Accounts into Zoho Books.
Pro Tip: Once you’ve imported the Chart of Accounts, ensure that your bank accounts have been imported properly. This is important because you won’t be able to enter the opening balances unless you do so. You can also add your bank or credit card accounts manually if needed.
Configure Settings
You can use the Settings section in Zoho Books to customize your organization to suit your business requirements. To access Settings, click the Gear icon (image) in the top-right corner of the page. Here, ensure that you configure the following:
Enable Required Modules
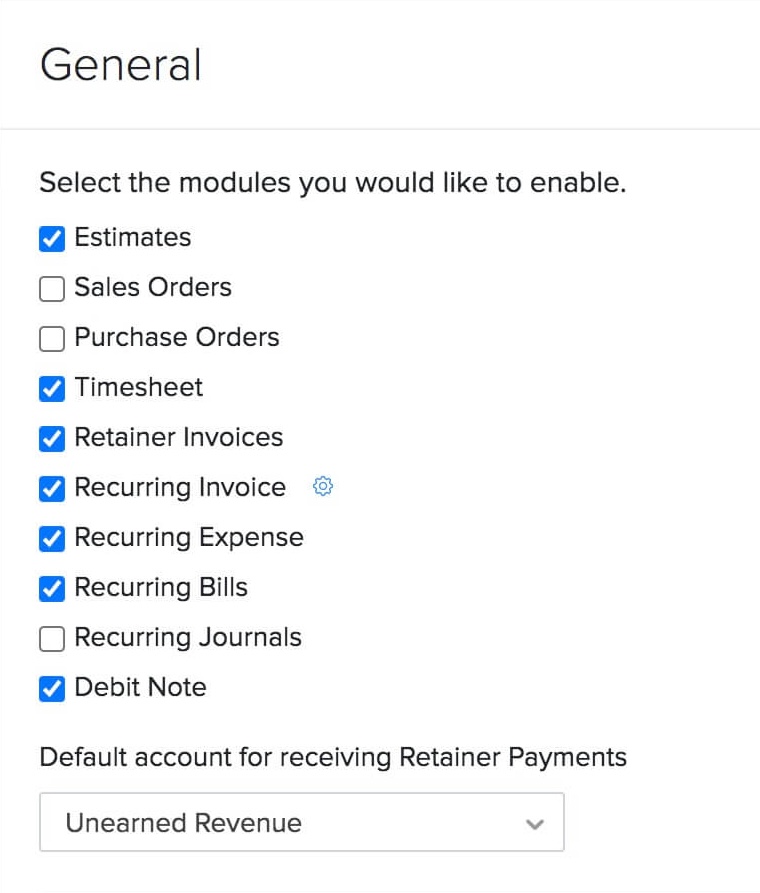
Zoho Books has various modules such as Quotes, Timesheet, Recurring Bills, and Debit Note to manage transactions easily. You can enable the ones that are needed for your business. Here’s how:
- Click Settings on the top right corner of the page.
- Click General under Preferences.
- Mark the modules that you require under the Select the modules you would like to enable option.
Zoho Books already has features like Stock Adjustments and Inventory Tracking to manage your stock. But if you want an advanced inventory management option that lets you create shipments and manage warehouses, you can enable the Zoho Inventory add-on. Read more about how you can benefit from this add-on.
In this same page, you can also choose how you want to provide discounts (if any) or apply taxes to your transactions.
Once you’ve configured all the details, click Save.
Choose your Module Preferences
Now that you have enabled the modules needed for your business, you can proceed to configure their preferences. You can customize each module to suit your business needs. To do this:
- Click Settings on the top right corner of the page.
- Select the module that you want to customize.
For each module, there will be many options available that you can customize. You can read about customizing modules from the help document for preferences.
Insight: If you have certain fields in your previous system that you cannot find in Zoho Books, you can create custom fields for them in Zoho Books.
Import Customers and Vendors
In any business, you would deal with customers and vendors. After importing your Chart of Accounts, you need to import your customers and vendors into Zoho Books.
The Customer Contact List and the Vendor Contact List reports in QuickBooks Online is the equivalent of the Customers and Vendors module in Zoho Books (you would have already exported these reports in earlier steps). Customers and vendors in these lists need to be imported into Zoho Books.
Before Migration…
Mandatory Fields There are a few mandatory fields for Customers and Vendors in Zoho Books. While importing them, make sure you include the following mandatory fields in the import file:
- Customer/Vendor Display Name
- Tax Name
- Tax Authority
- Tax Percentage
If you have enabled sales tax for your Zoho Books organization, these fields will be available in the import file. In case you are not able to find these fields in the sample file in Zoho Books, then add them as custom fields in Zoho Books after which, they will appear in the sample file.
You can also include additional fields for your customers/vendors by creating custom fields in Zoho Books and mapping these fields to the fields in the import file (Map Fields page).
Migration Process
You can either choose to manually add your customers and vendors into Zoho Books, or you can choose to import them.
To manually add customers and vendors into Zoho Books:
- Log in to your Zoho Books account.
- Go to Sales > Customers (for customers) and Purchases > Vendors (for vendors) .
- Click the + New button in the top right corner of the page.
- Enter all the details of your customer/vendor.
- Fill in the Opening Balance field. For foreign customers, you can select the Currency and enter the corresponding Exchange Rate.
- Click Save at the bottom of the page.
To import your customers and vendors into Zoho Books:
- Log in to your Zoho Books account.
- Go to Sales > Customers (for customers) and Purchases > Vendors (for vendors).
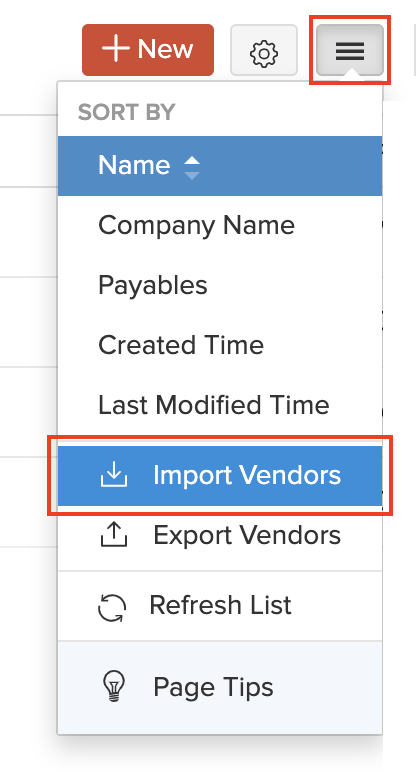
- Clcik the More icon in the top right corner of the page.
- Select Import Customers or Import Vendors.
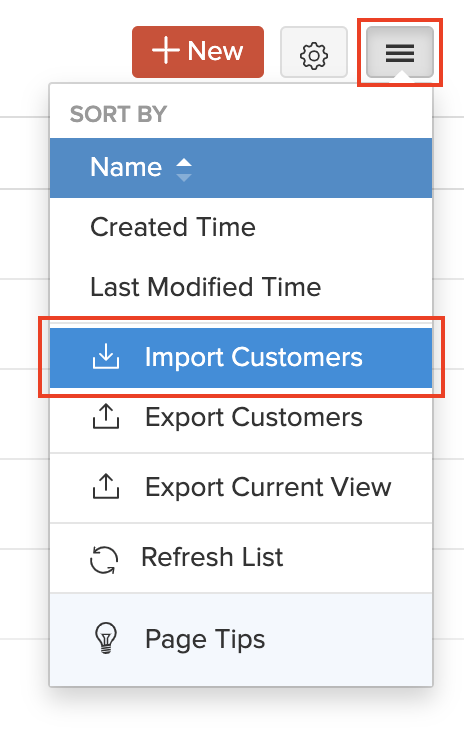
- For the Customers module, select Customers and click Continue.
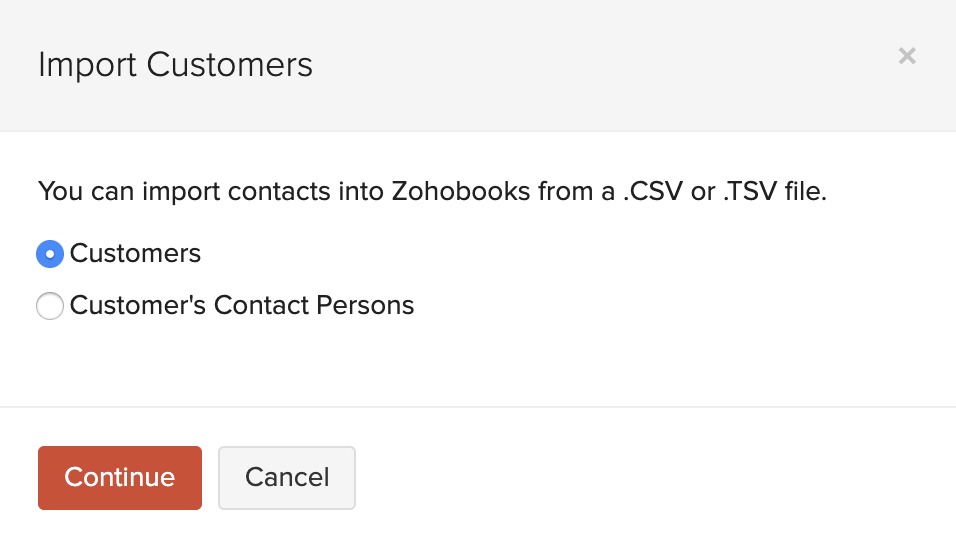
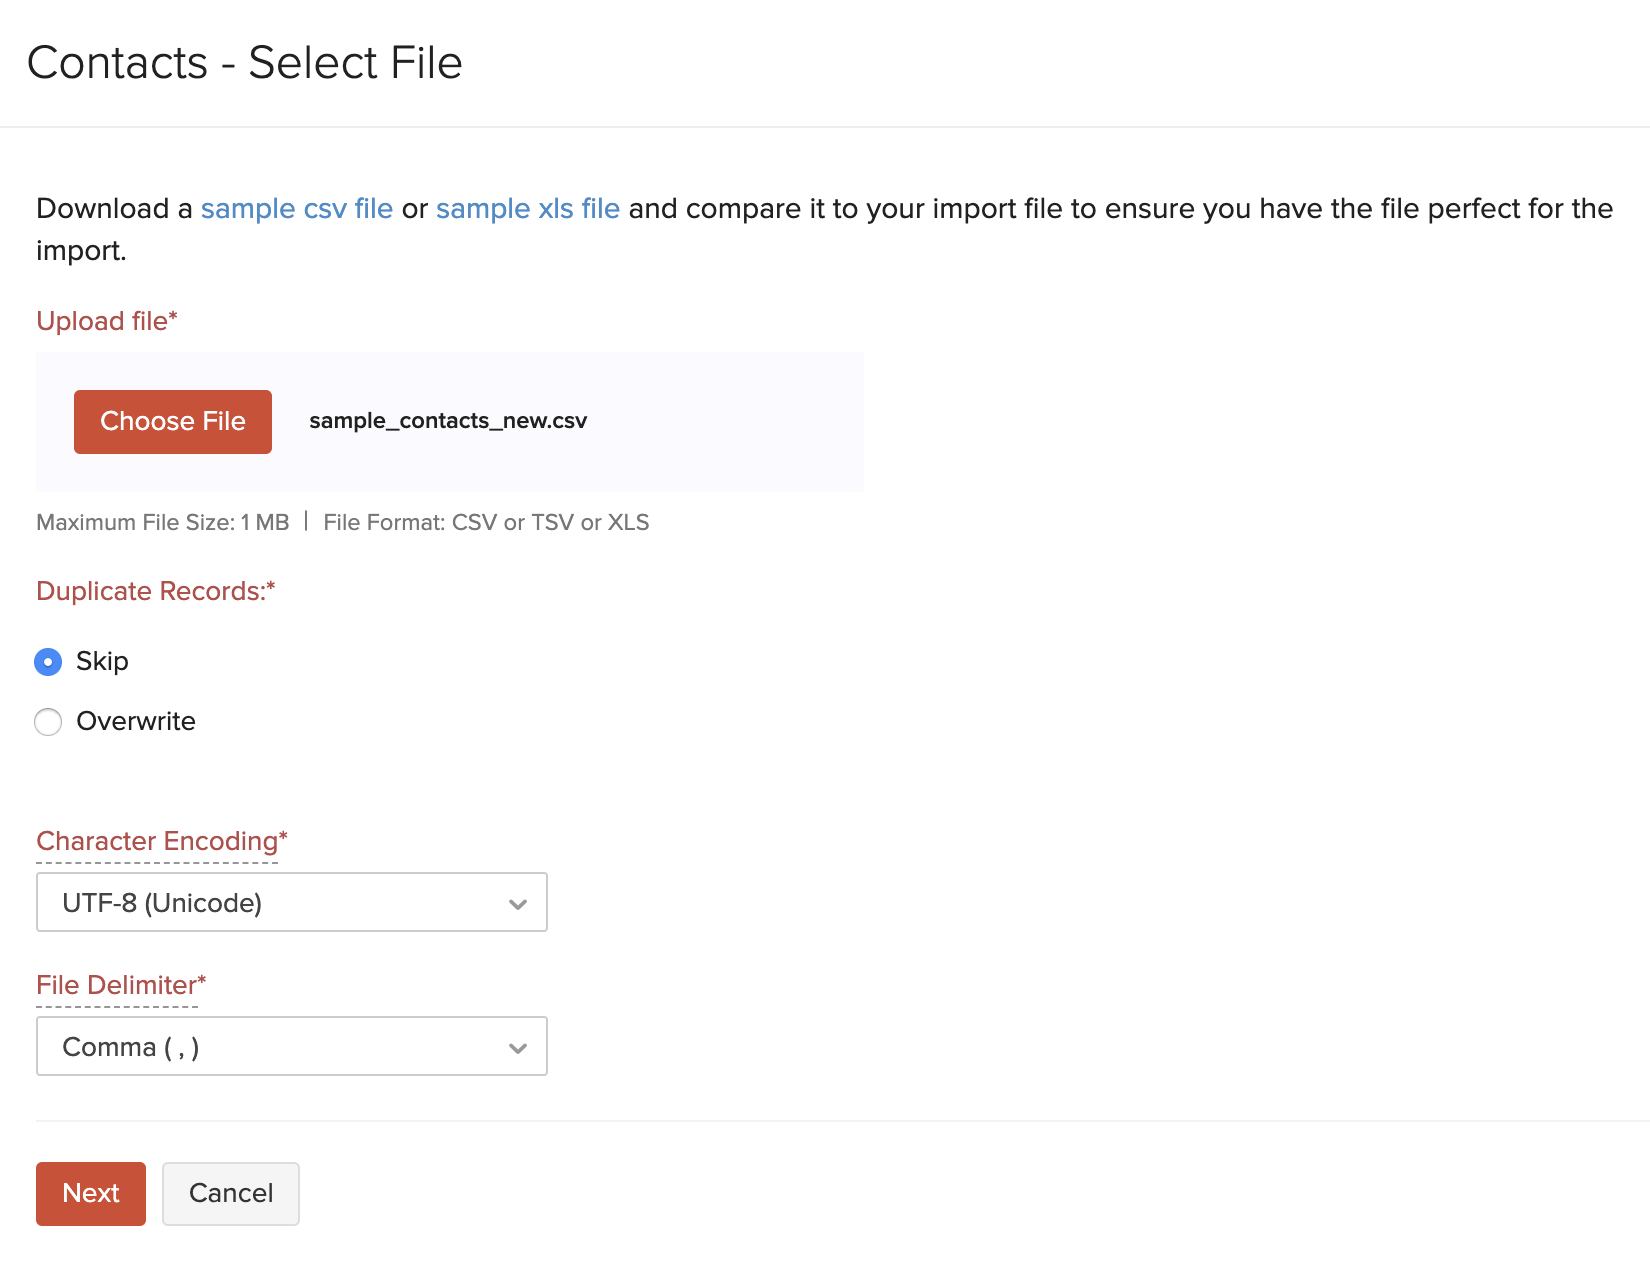
- Click the Choose File button to upload the import file (refer to the Customer Contact List report). You can download a sample csv file or a sample xls file to view the format of the import. You can also choose to Skip or Overwrite the Duplicate Records.
- Click Next.
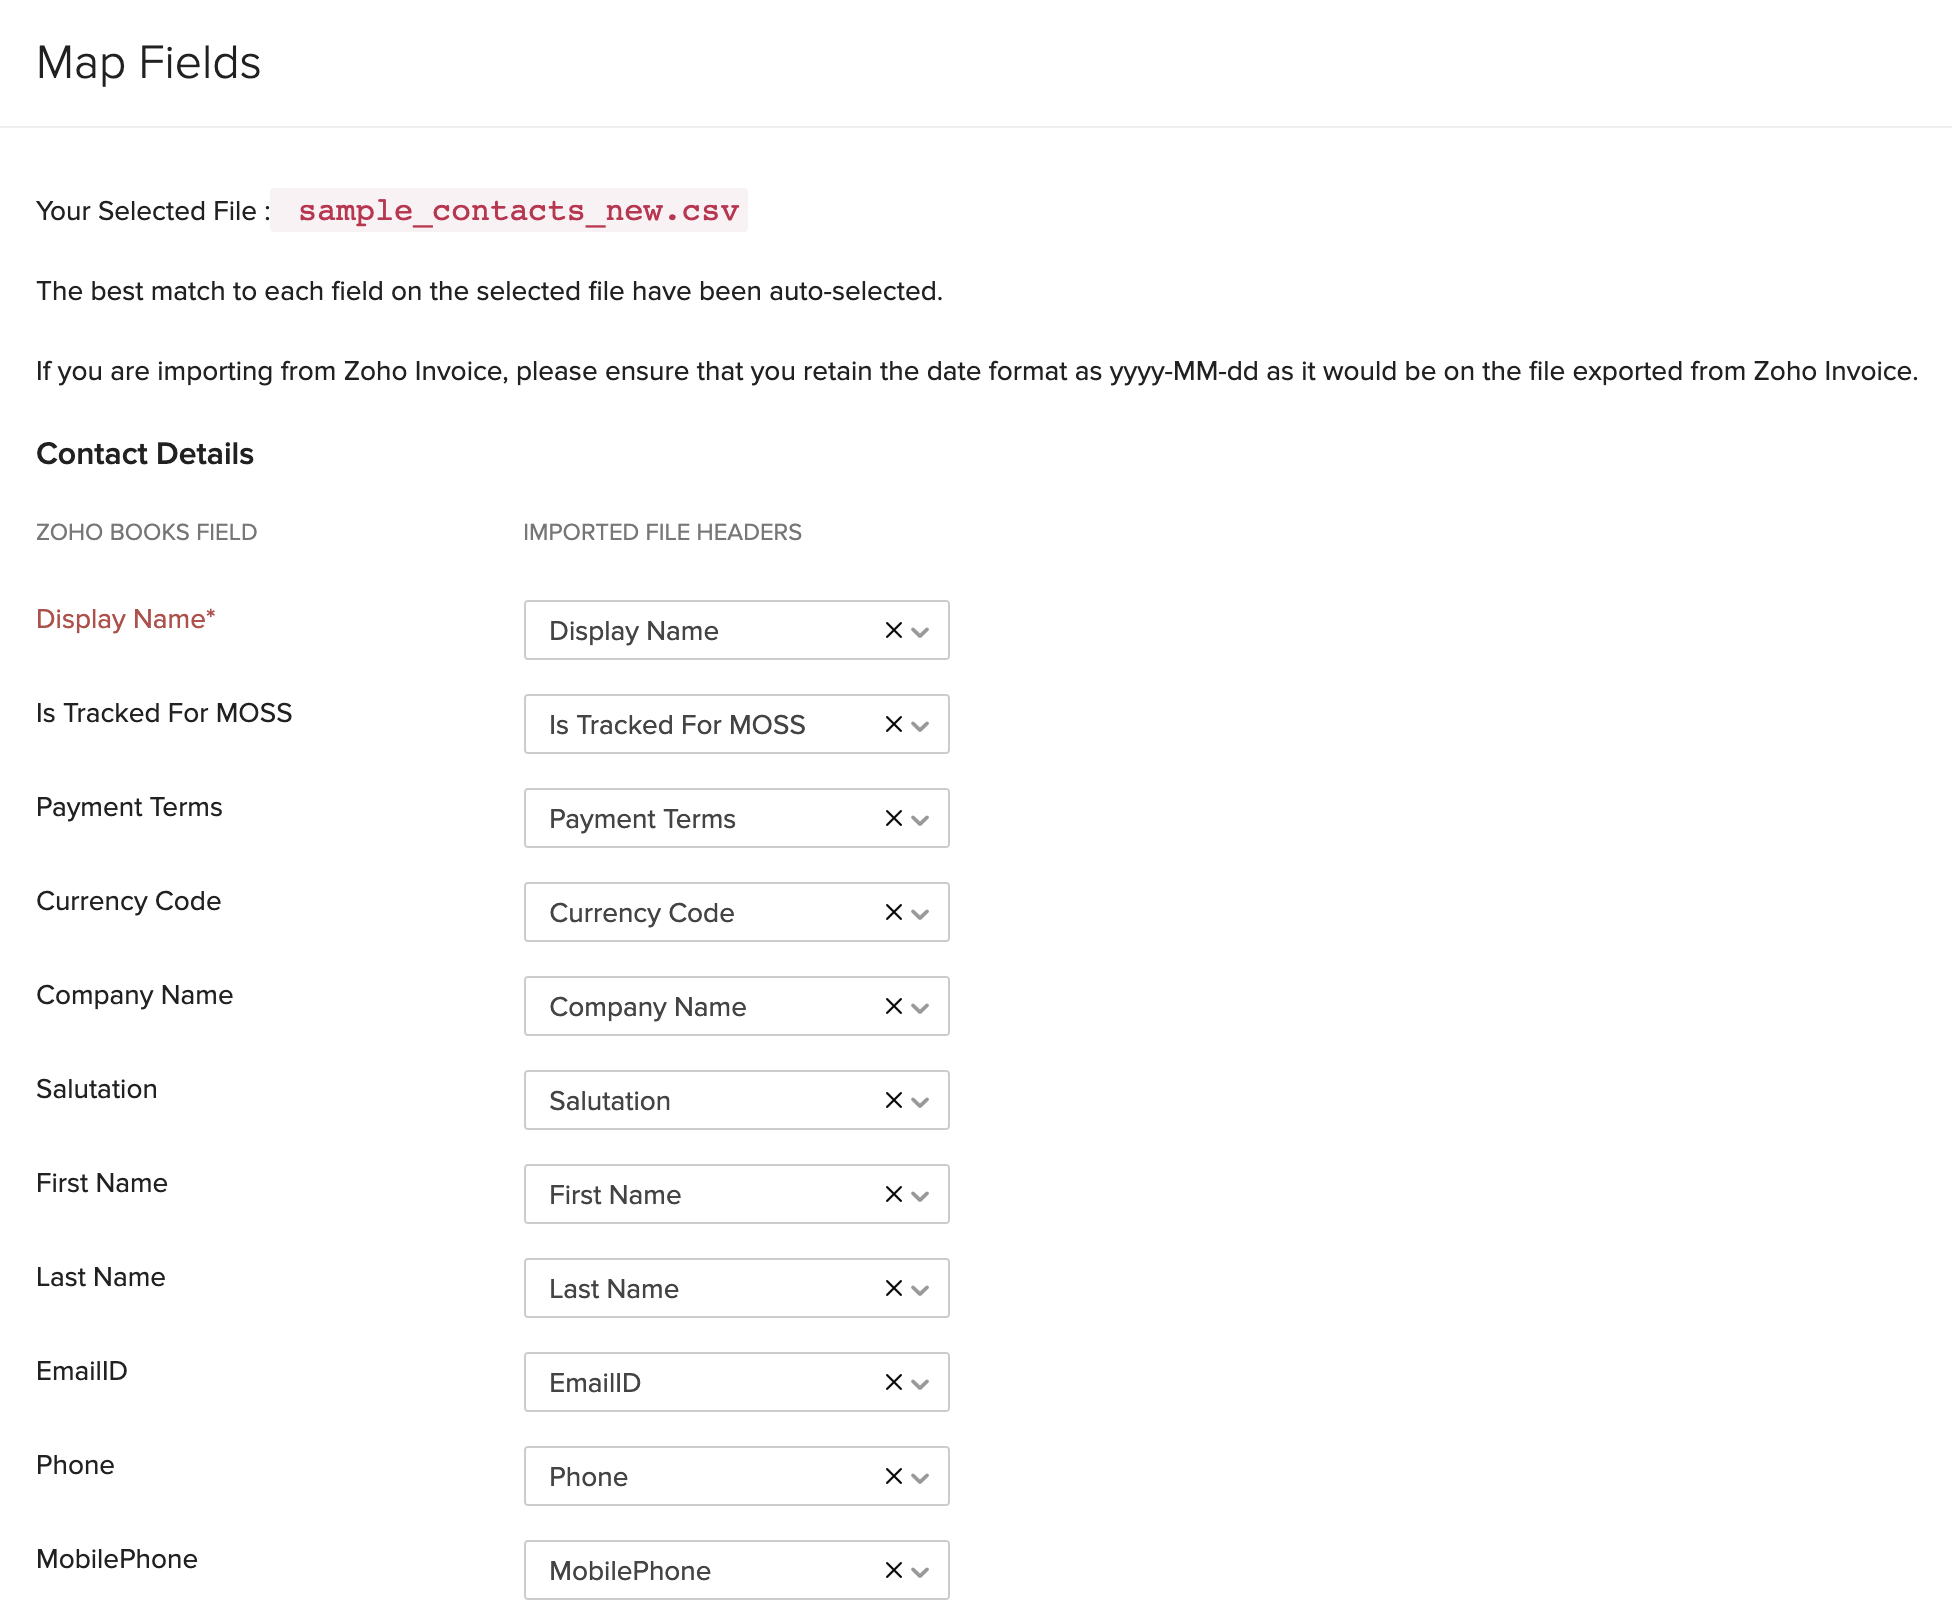
- In the Map Fields page, ensure that all the fields in Zoho Books are mapped correctly to the fields in the import file.
- Click Next.
- Click Import.
Follow similar steps to import your Vendors (based on the Vendor Contact List report). You can additionally import your Contact Persons list into Zoho Books by following steps similar to importing customers.
Import Items
Items are all the goods and services in your organization. You can import all the products and services in your QuickBooks Online account into Zoho Books.
The Product/Service List report in QuickBooks Online is the equivalent of the items present in the Items module in Zoho Books (you would have already exported this report in earlier steps).
The Inventory Valuation Detail report in QuickBooks Online (which would have already been exported) provides details of the closing stock of each inventory item. Get this closing stock value of each item to be entered in the Initial Stock field of the import file for Zoho Books.
Before Migration…
Closing Stock If you have inventory items which have a closing stock at the end of a financial year, you can get this closing stock from the Inventory Valuation Detail report (exported earlier). This can be entered as the opening stock while importing the items into Zoho Books.
Entering this stock value automatically creates opening balances for the items in Zoho Books. This can be viewed under the account Inventory Asset report in Zoho Books.
Track Inventory in Zoho Books Now, coming back to Zoho Books. If you wish to track inventory for your items in Zoho Books, you’ll have to enable inventory. Here’s how you can do it:
- Log in to your Zoho Books account.
- Click Settings on the top right corner of the page.
- Select Items under Items.
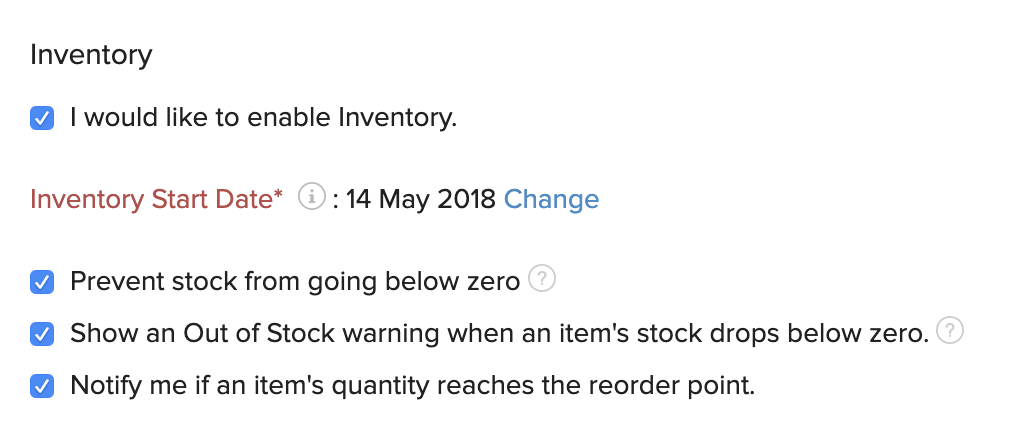
- Mark the box I would like to enable Inventory and enter the Inventory Start Date (the date on which you migrated to Zoho Books). This date should be the same as your Opening Balance Date.
- Click Save.
Mandatory Fields During the import, make sure you include the following mandatory fields in the import file to track inventory for your items:
- Inventory Account
- Initial Stock
- Initial Stock Rate
- Item Type (Sales, Purchase, Sales and Purchase, Inventory)
Migration Process
To import your items into Zoho Books:
- Log in to your Zoho Books account.
- Go to the Items module in the left sidebar.
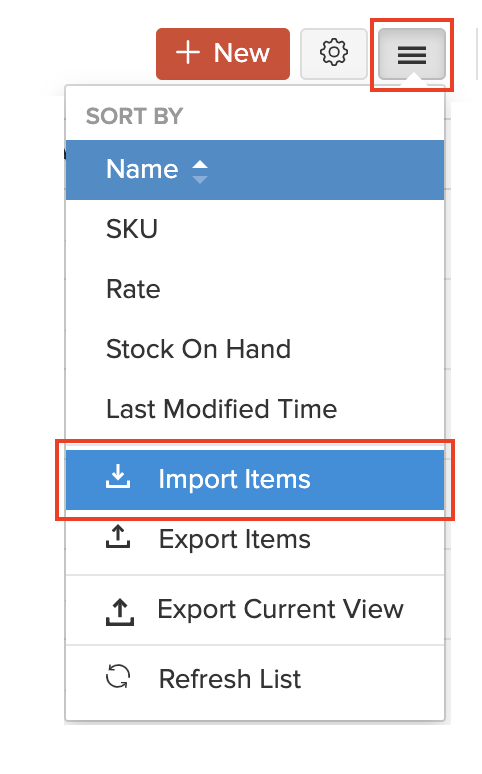
- Click the More icon in the top right corner of the page.
- Select Import Items.
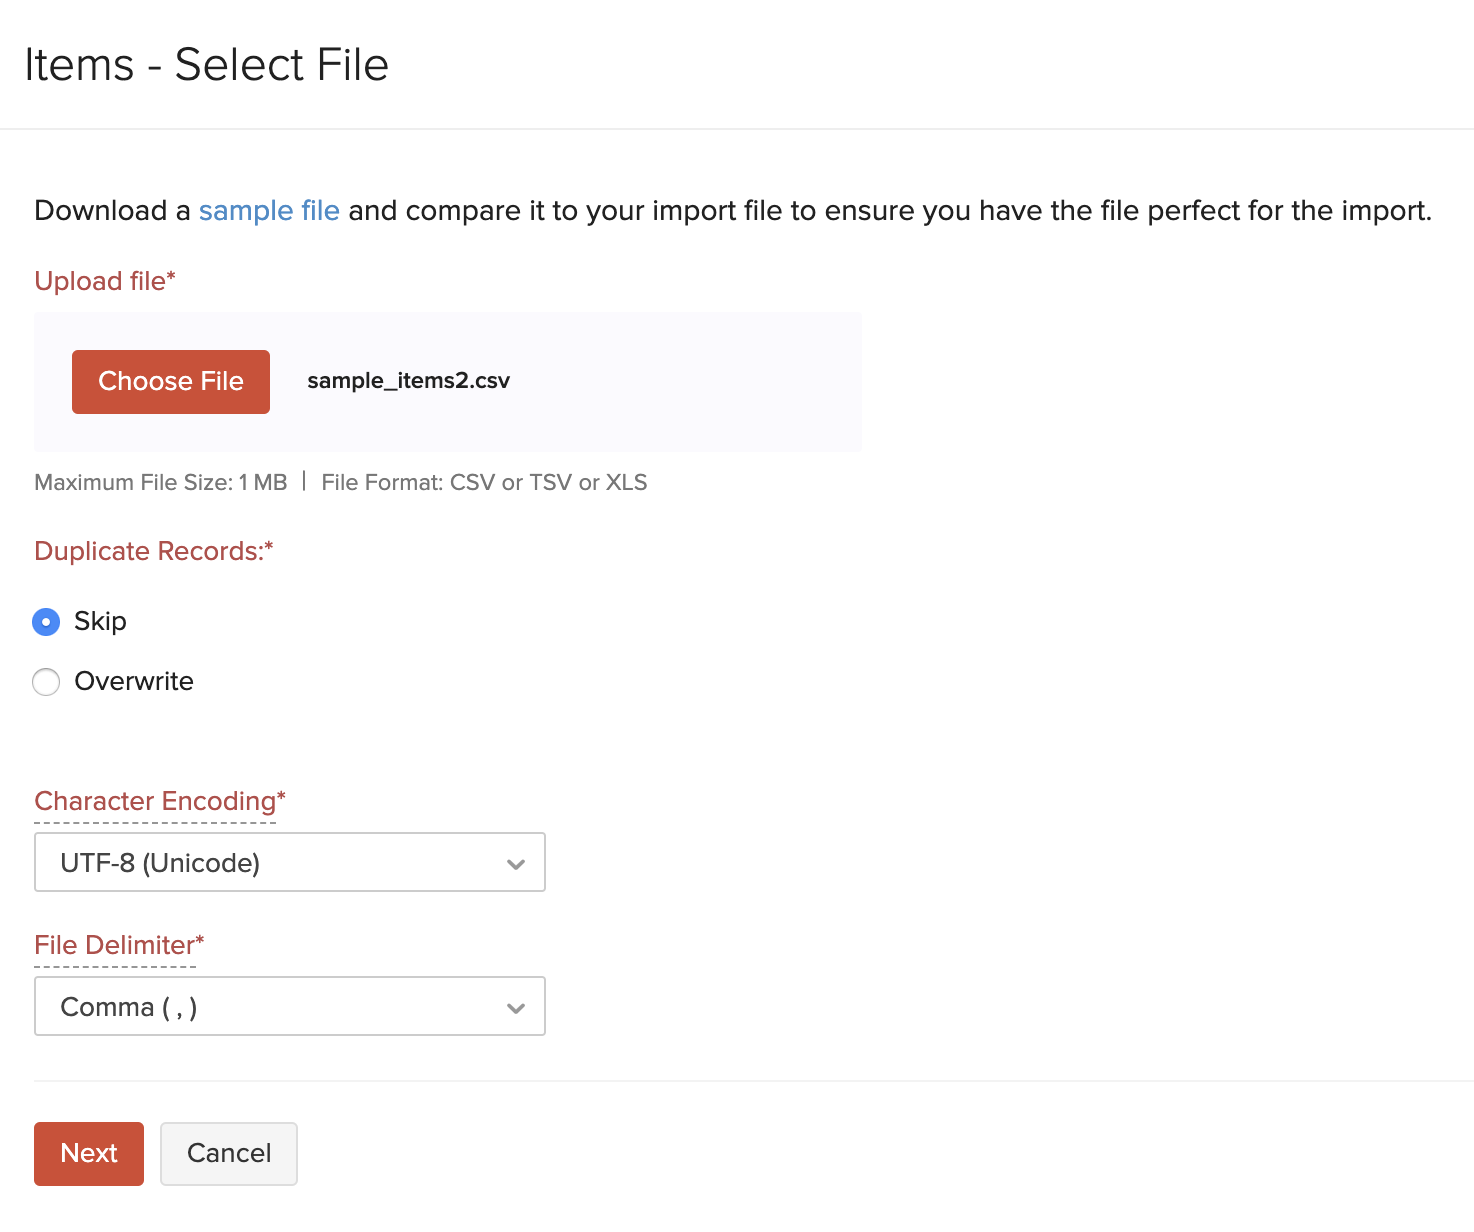
- Click the Choose File button and upload the import file (refer to the Product/Service List report). You can download the sample file to view the format of the import. You can also choose to Skip or Overwrite the Duplicate Records. Make sure you enter the closing stock of each item in the Initial Stock field in the import file.
- Click Next.
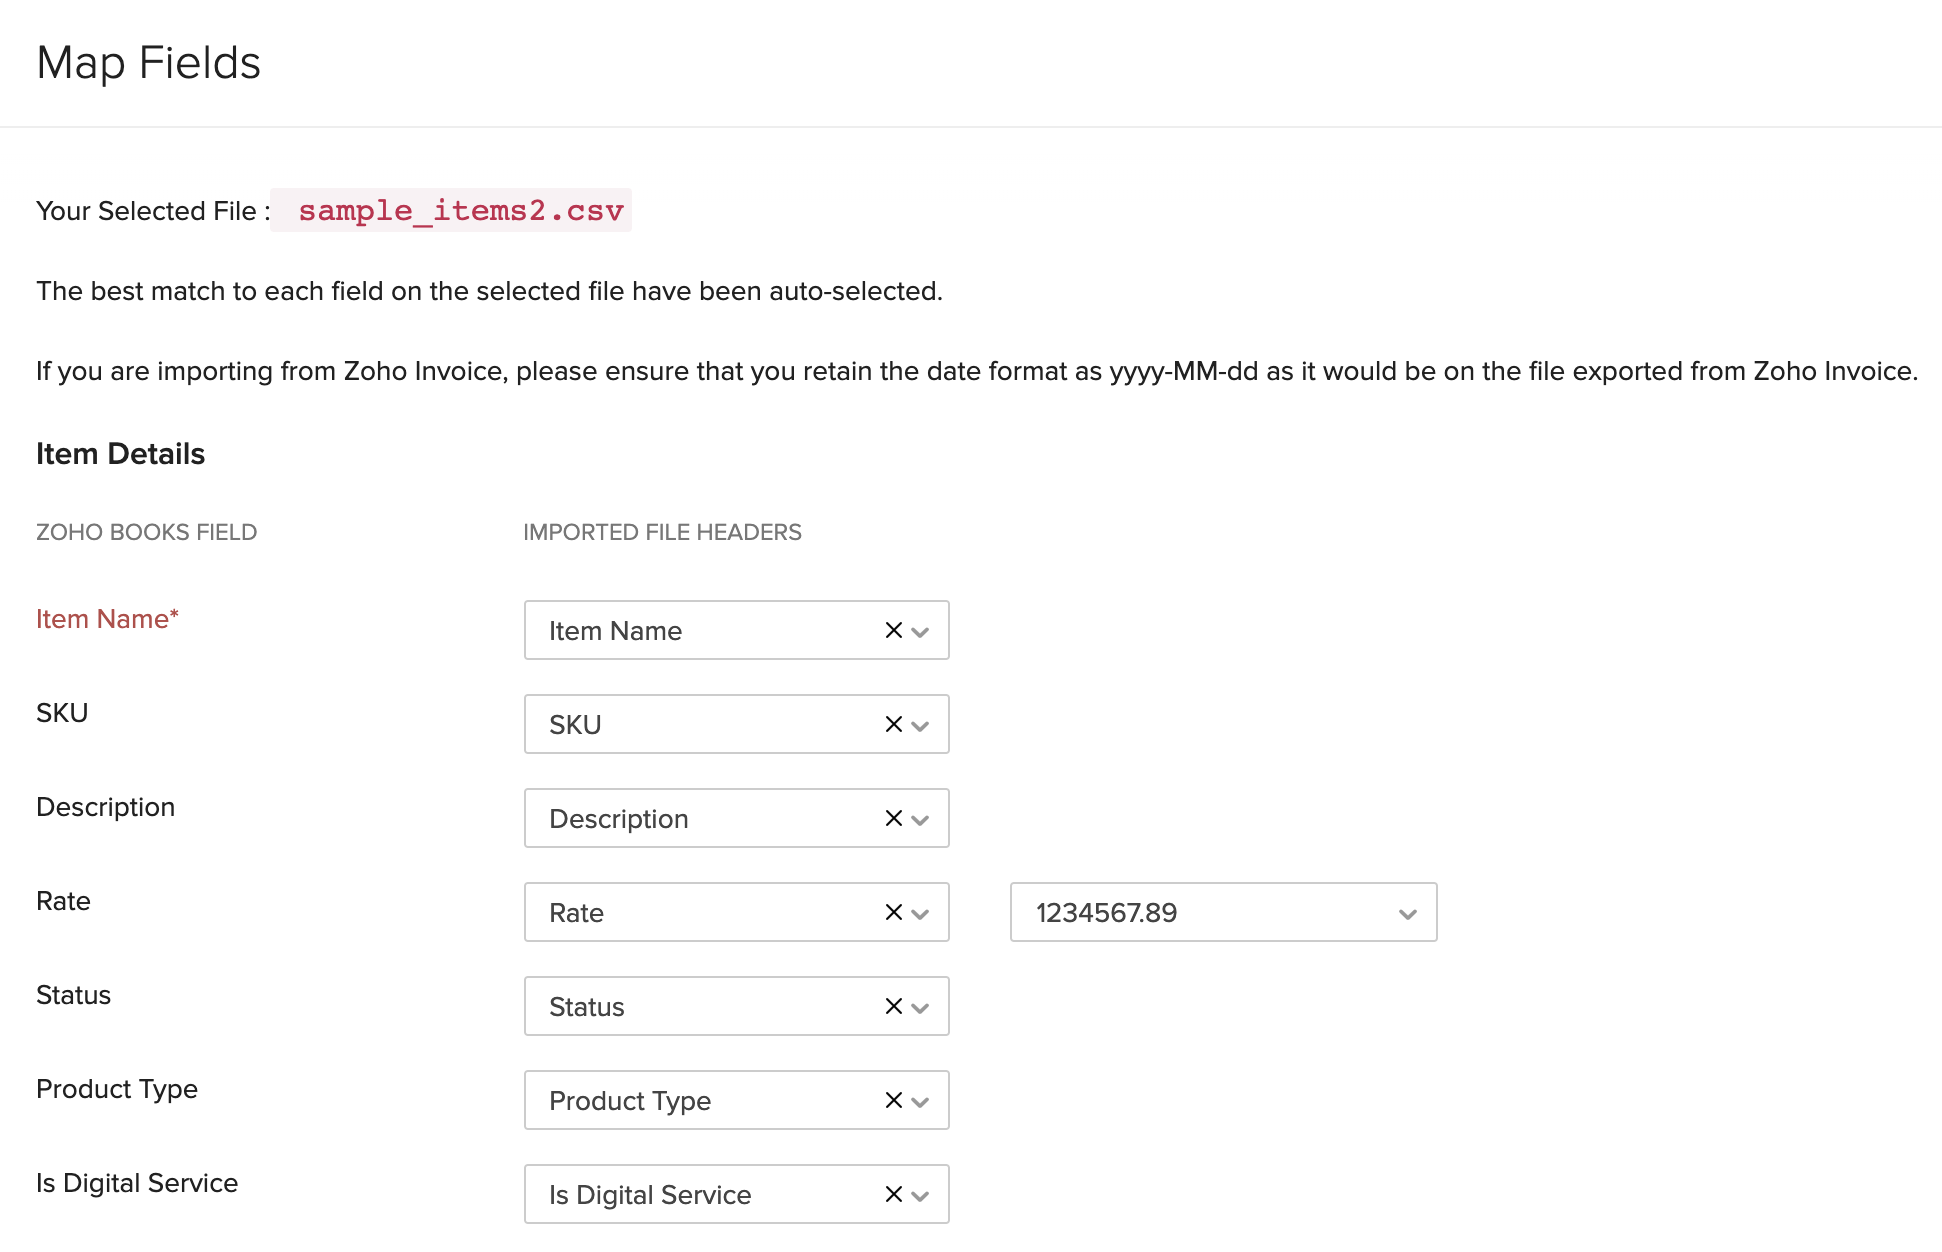
- In the Map Fields page, ensure that all the fields in the import file and Zoho Books are mapped correctly (make sure that the mandatory fields mentioned above are also added and mapped correctly).
- Click Next at the bottom of the page.
- Click Import.
After this, you would have imported all your items (products and services) into Zoho Books.
Add Bank or Credit Card Accounts
With Zoho Books, you can link your bank account and fetch live bank feeds. You can also import your bank statements manually.
Migration Process
Live Bank Feeds If you choose to fetch live feeds from your bank, make sure to fetch the feeds from the date you’ve entered the opening balance. Otherwise, there is a chance of automatically fetching the previous financial year’s statements.
To add a bank account and fetch live bank feeds:
- Log in to your Zoho Books account.
- Go to the Banking module in the left sidebar.
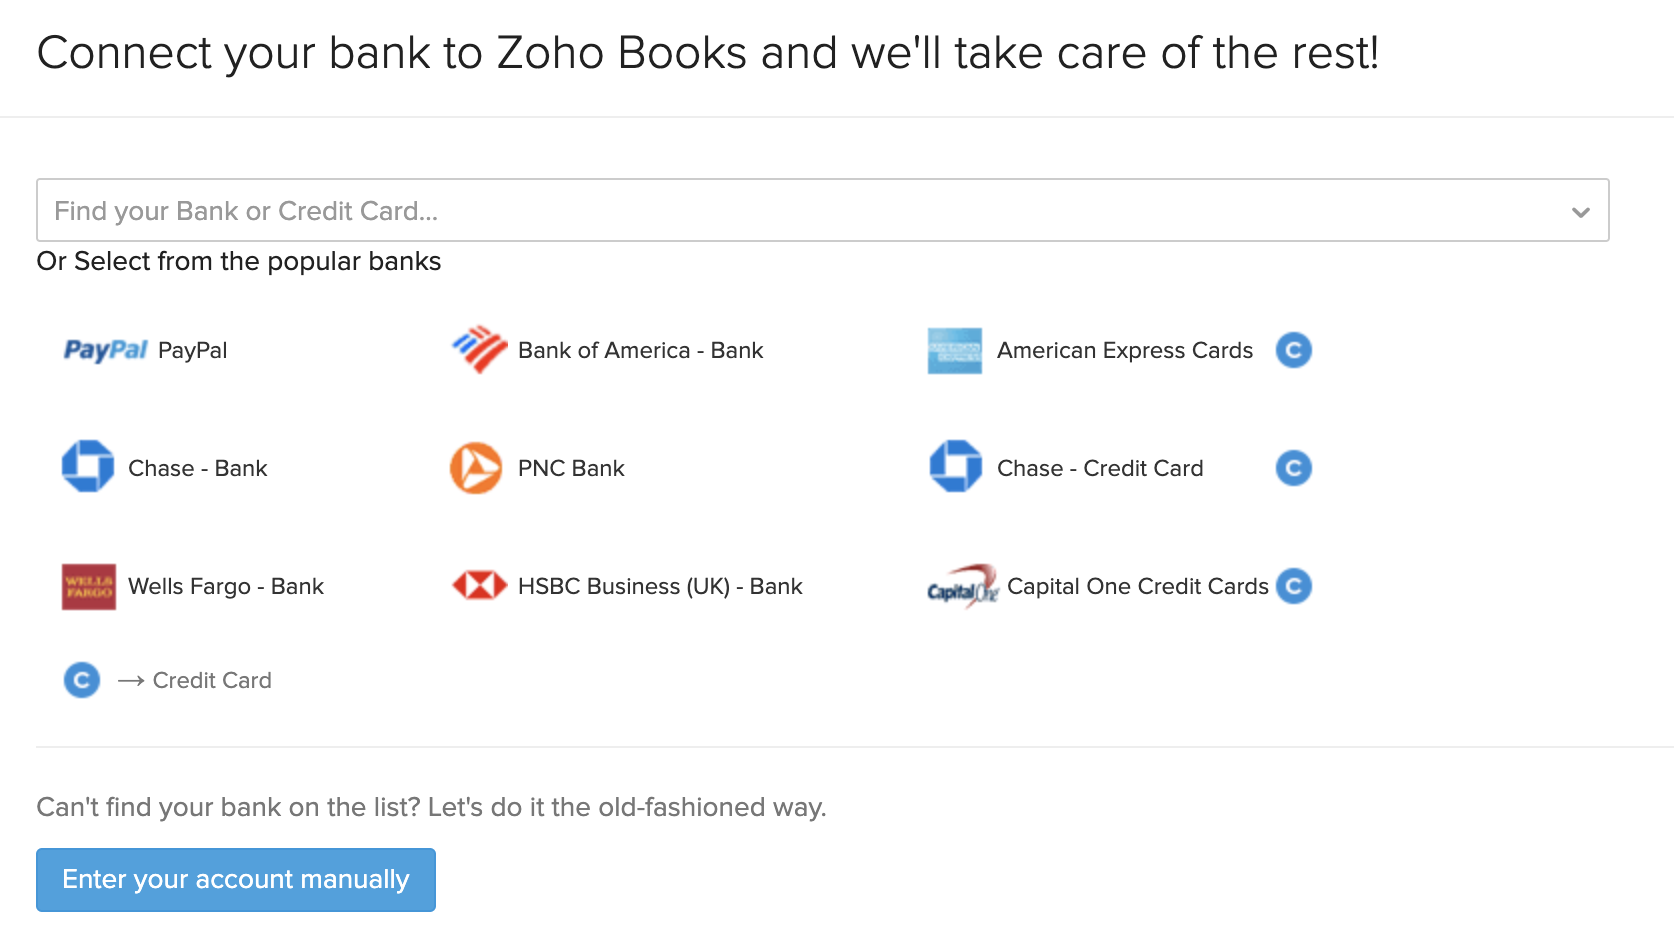
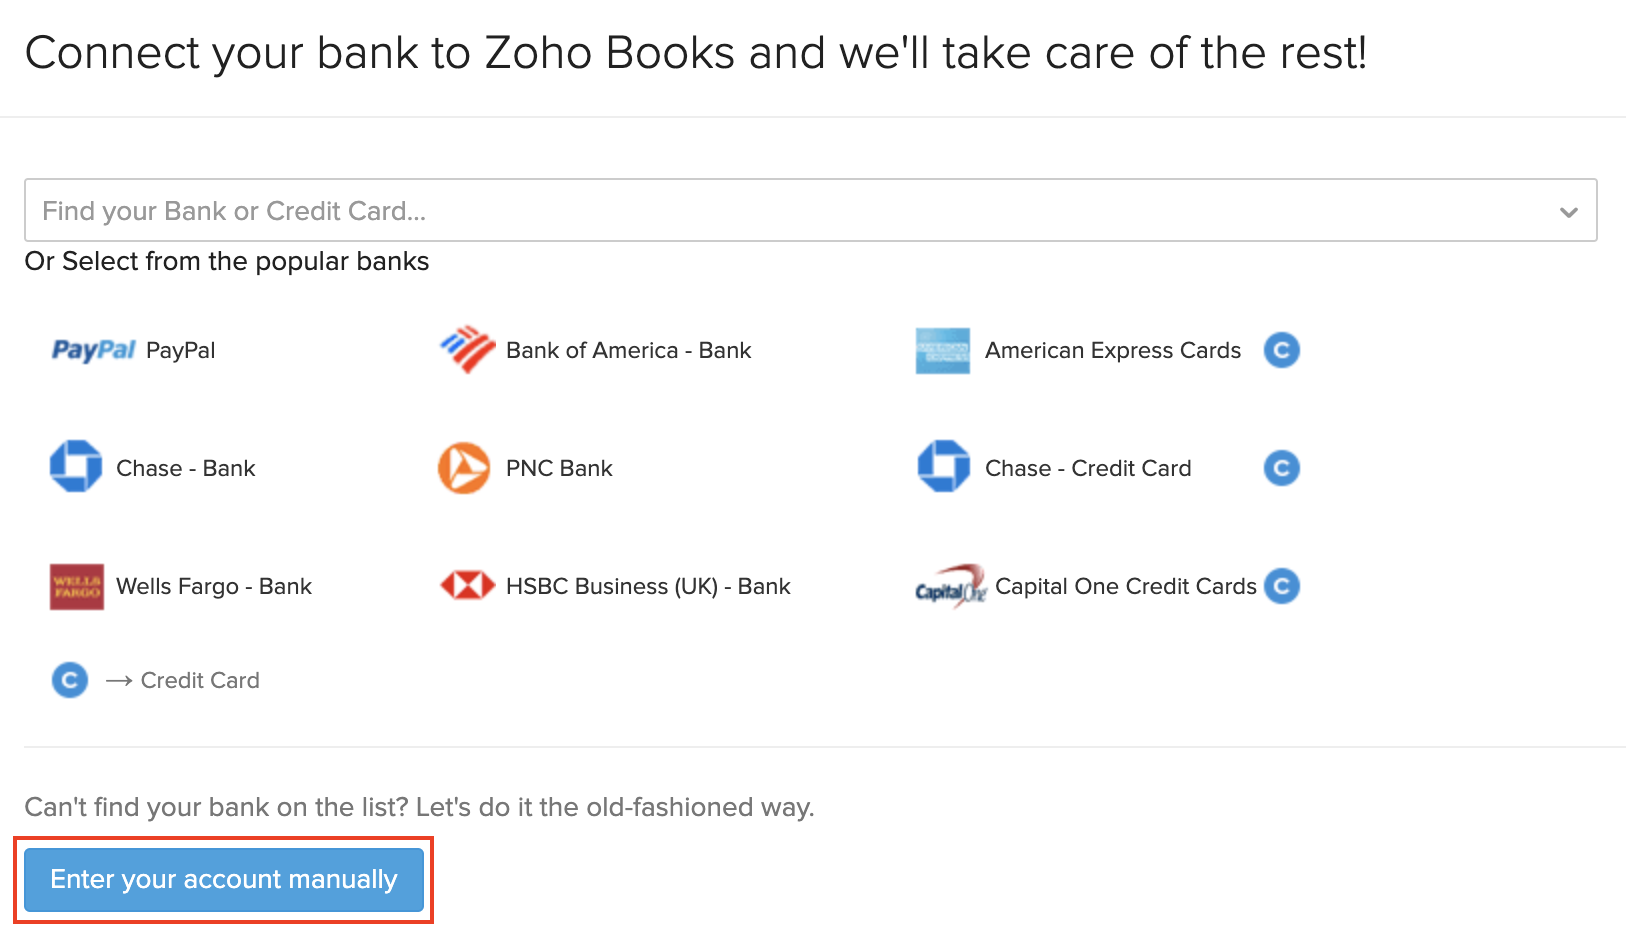
- Click the Add Bank or Credit Card button in the top right corner of the page.
- Select a bank from the list of popular banks or type in the search bar to find your bank.
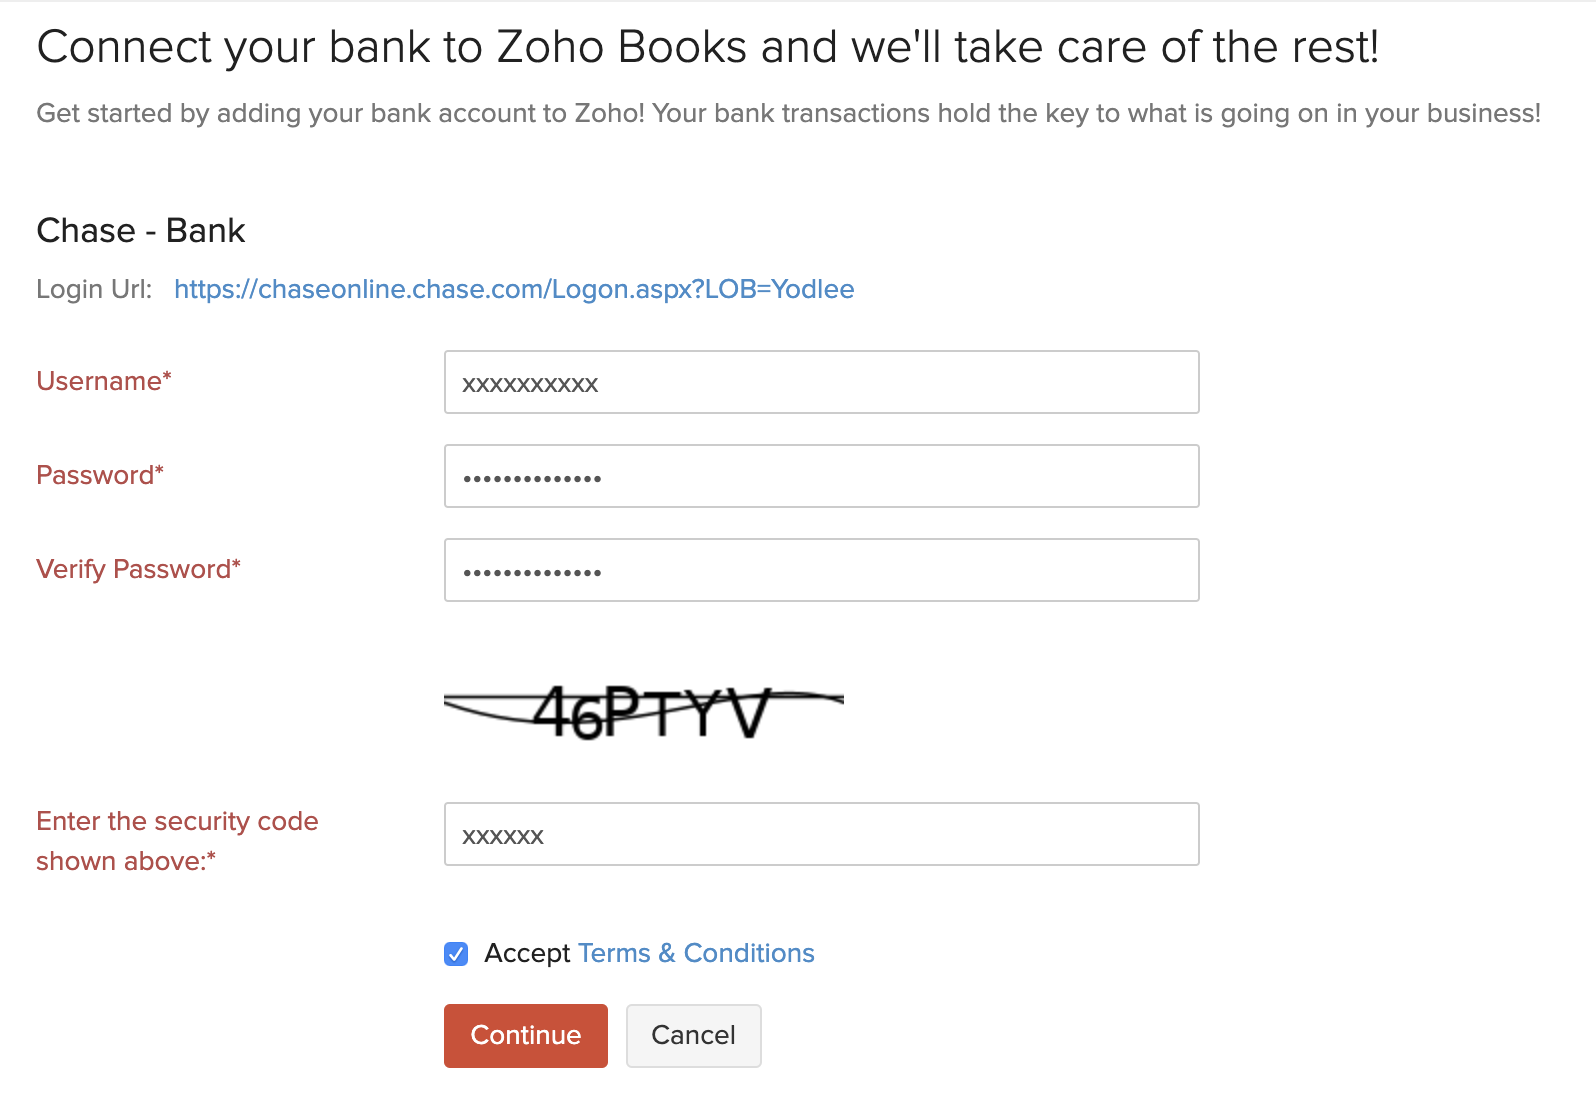
- Enter the credentials of the bank that you’ve selected and accept the Terms & Conditions.
- Click Continue to connect to your bank account.
Import Bank Statements
To import bank statements manually, you would first need to add a bank or credit card account manually in Zoho Books and upload their statements. Here’s how you can do it:
- Log in to your Zoho Books account.
- Go to the Banking module in the left sidebar.
- Click the Add Bank or Credit Card button in the top right corner of the page.
- Click the Enter your account manually button at the bottom of the page.
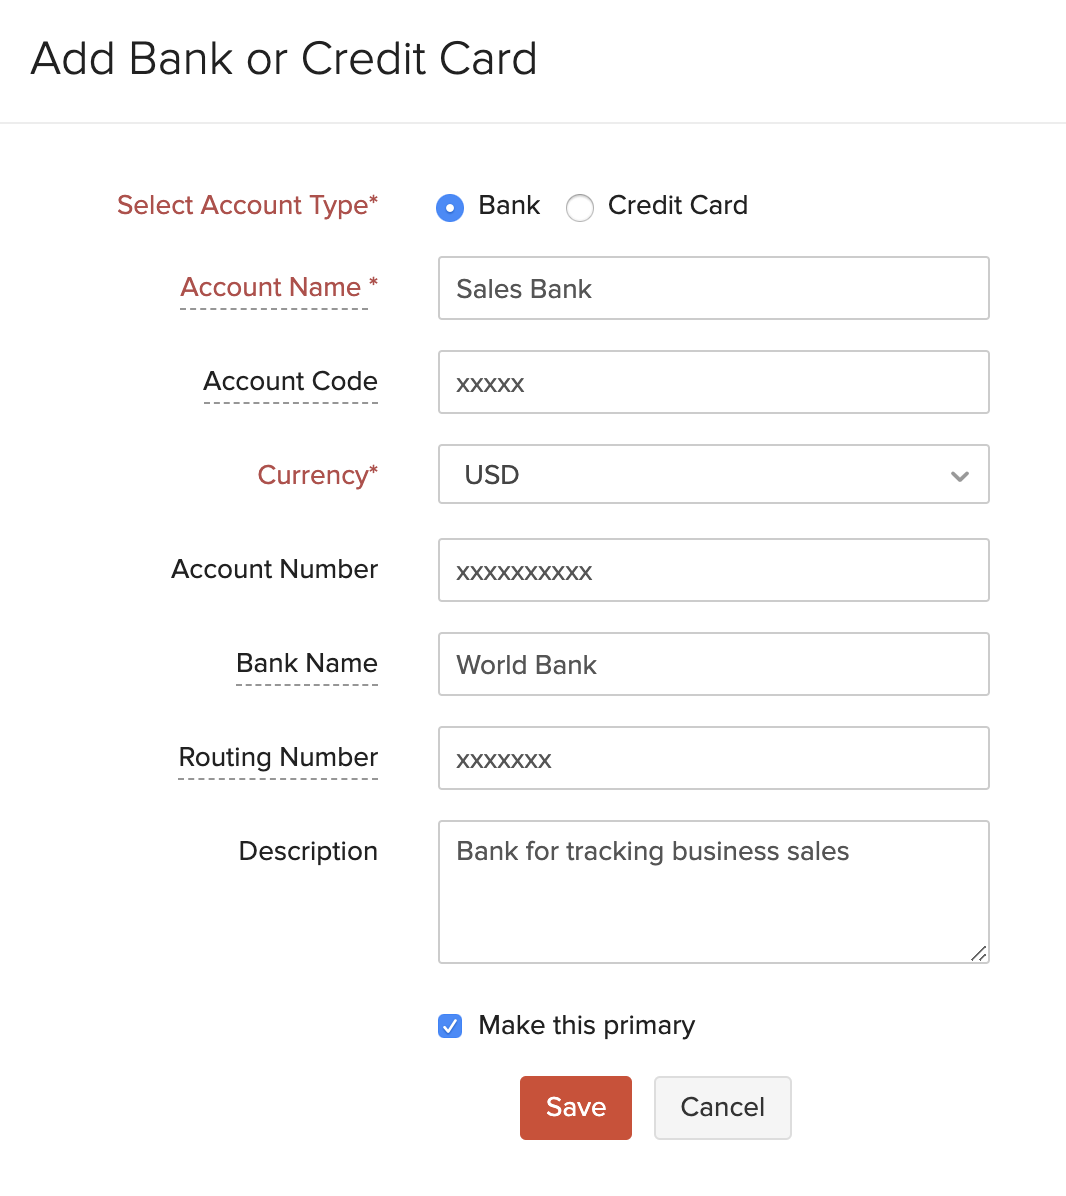
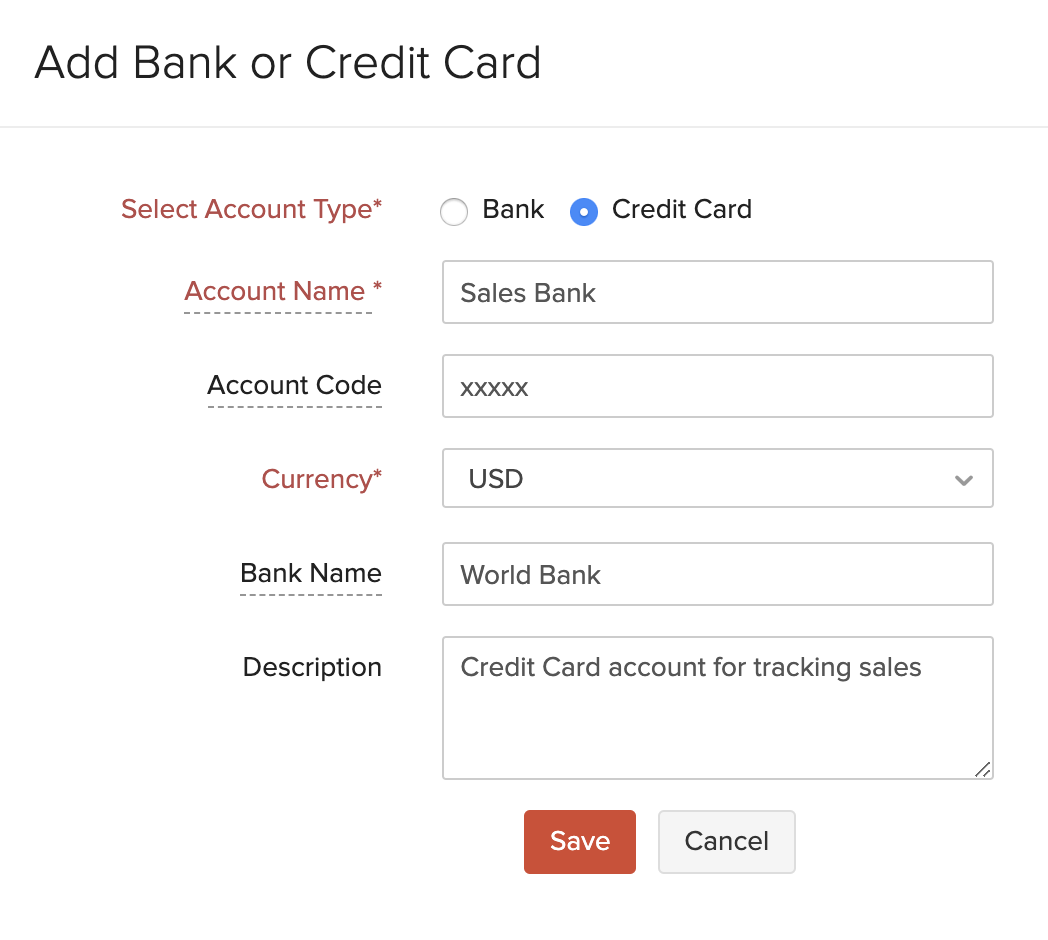
- Enter the bank or credit card details. You can make this bank account the primary account by marking the box Make this primary.
- Click Save.
After you’ve added a bank or credit card account, you can import their statements by clicking the Import Statement button. You can also record transactions for them in Zoho Books by clicking Add Transaction and selecting the required transaction.
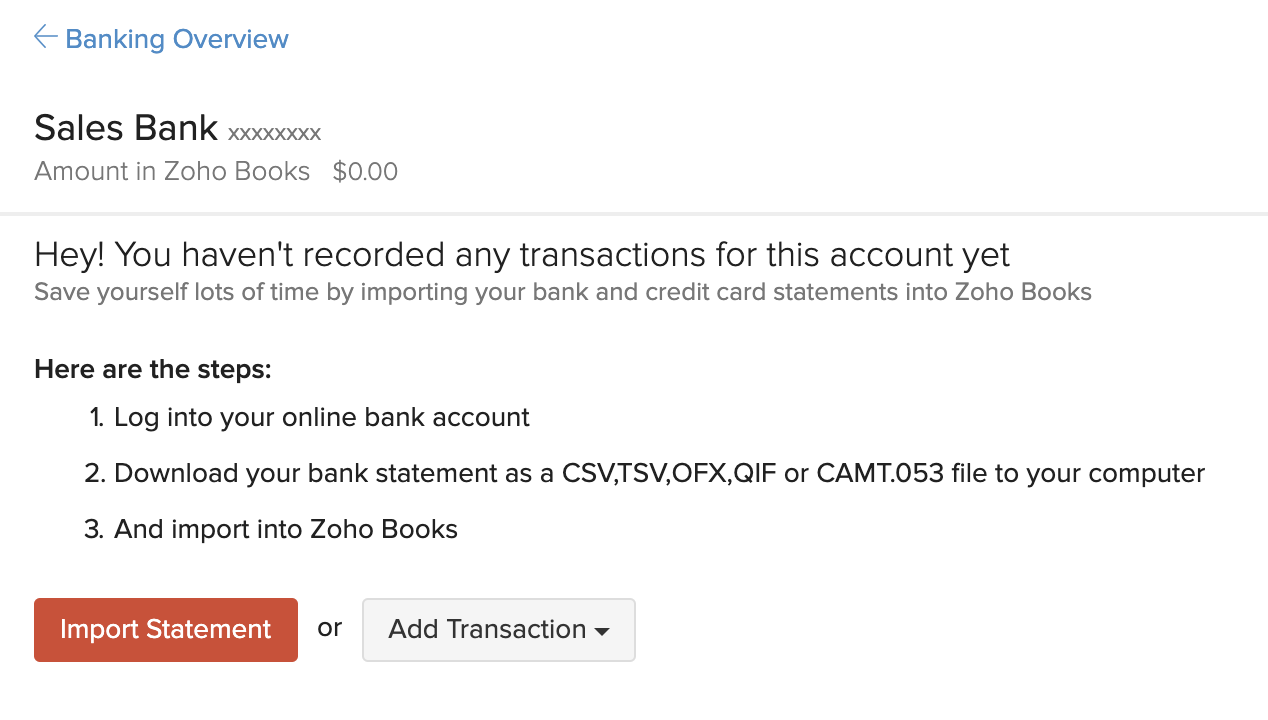
Note: Only the last 90 days transactions can be fetched inside Zoho Books.
Enter Opening Balances
Opening Balances are the amounts you have in different accounts of your business at the beginning of an accounting period.
In QuickBooks Online, the Trial Balance report (exported in earlier steps) contains the opening balances of different accounts. You would need to import these balances into Zoho Books.
Migration Process
When entering the opening balances in Zoho Books, make sure you enter them in the following order:
- Customers and Vendors Balances
- Asset accounts
- Expense accounts
- Bank accounts
- Liability accounts
- Equity accounts
- Income accounts
To enter your opening balances in Zoho Books:
- Log in to your Zoho Books account.
- Click Settings on the top right corner of the page.
- Click Opening Balances under Organization.
- Click the Edit icon on top of the page.

In this page, you’ll be able to enter all your opening balances.
Customers and Vendors Balances
The opening balances for customers and vendors will be entered while you’re importing them into Zoho Books.
There are two ways to enter the opening balances for customers:
- While creating the customer/vendor
- Importing it in the opening balances module
If you have added the opening balances of your customers/vendors while creating or importing them, you’ll not be able to import them in this page.
If you have not added the opening balances, this is how you can import them in the Opening Balances module:
- Log in to your Zoho Books account.
- Click Settings on the top right corner of the page.
- Click Opening Balances under Organization.
- Click the Edit icon on top of the page.
- Click Import to import the balances for your Accounts Receivable and Accounts Payable.

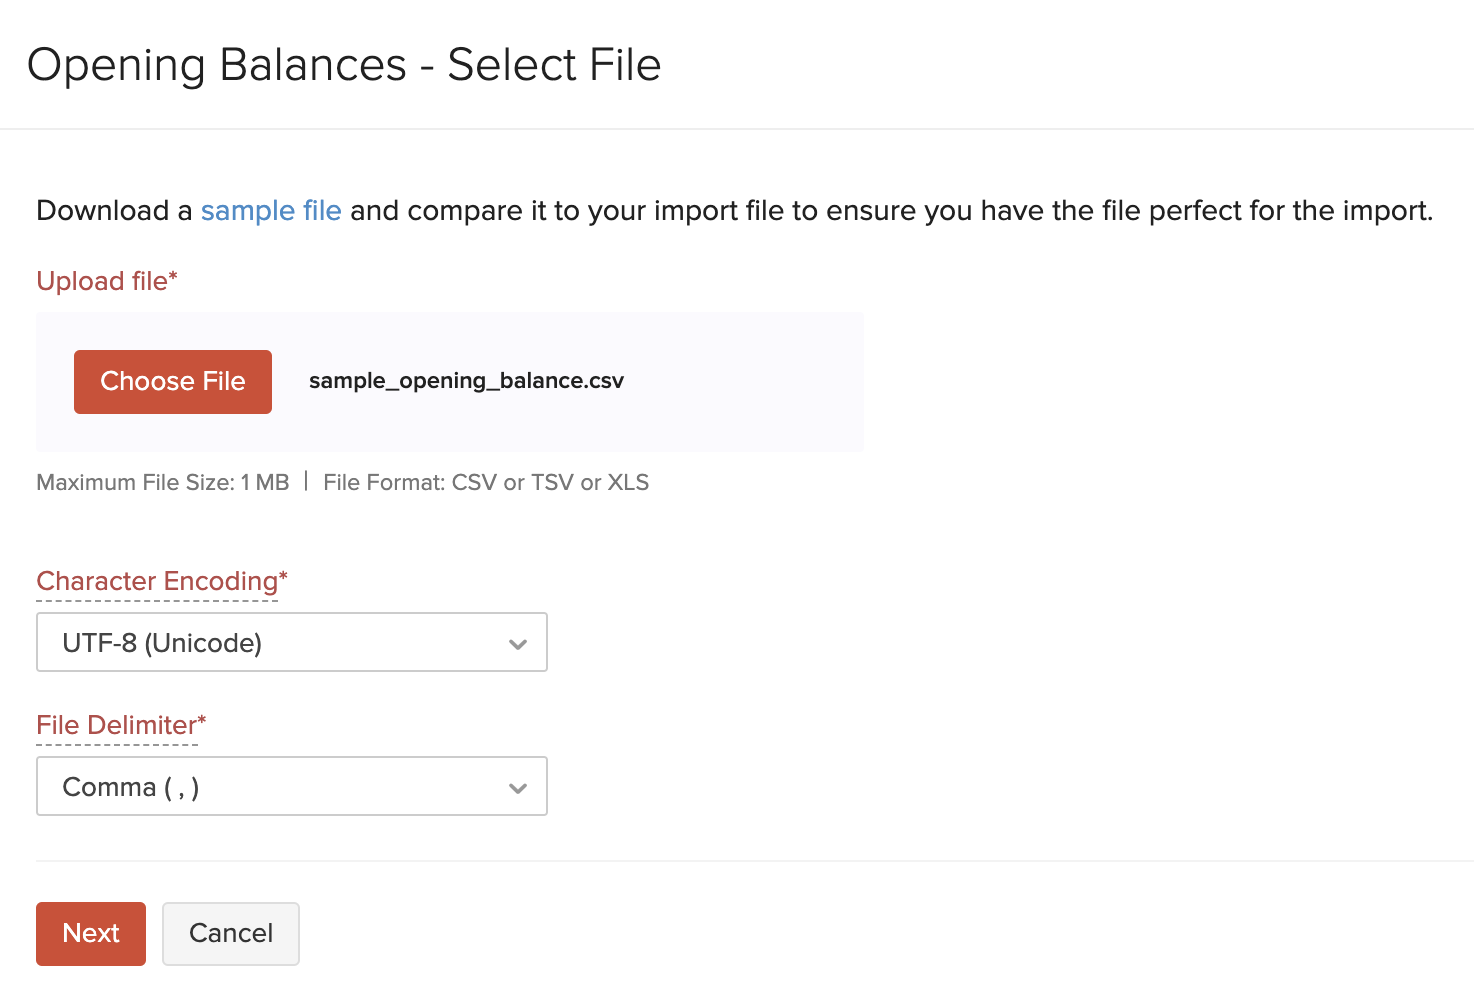
- Click the Choose File button and upload the import file. You can download the sample file to view the format of the import file.
- Click Next.
- In the Map Fields page, ensure that all the fields in the import file and Zoho Books are mapped correctly.
- Click Next at the bottom of the page.

- Click Import.
After this, you would have successfully imported all your customers’ opening balances.
Note: Opening balances can be imported only if the customers and vendors exist in Zoho Books already.
Asset accounts
Now, let’s enter the opening balances for the Asset accounts.
The inventory asset and other asset accounts will be listed here.
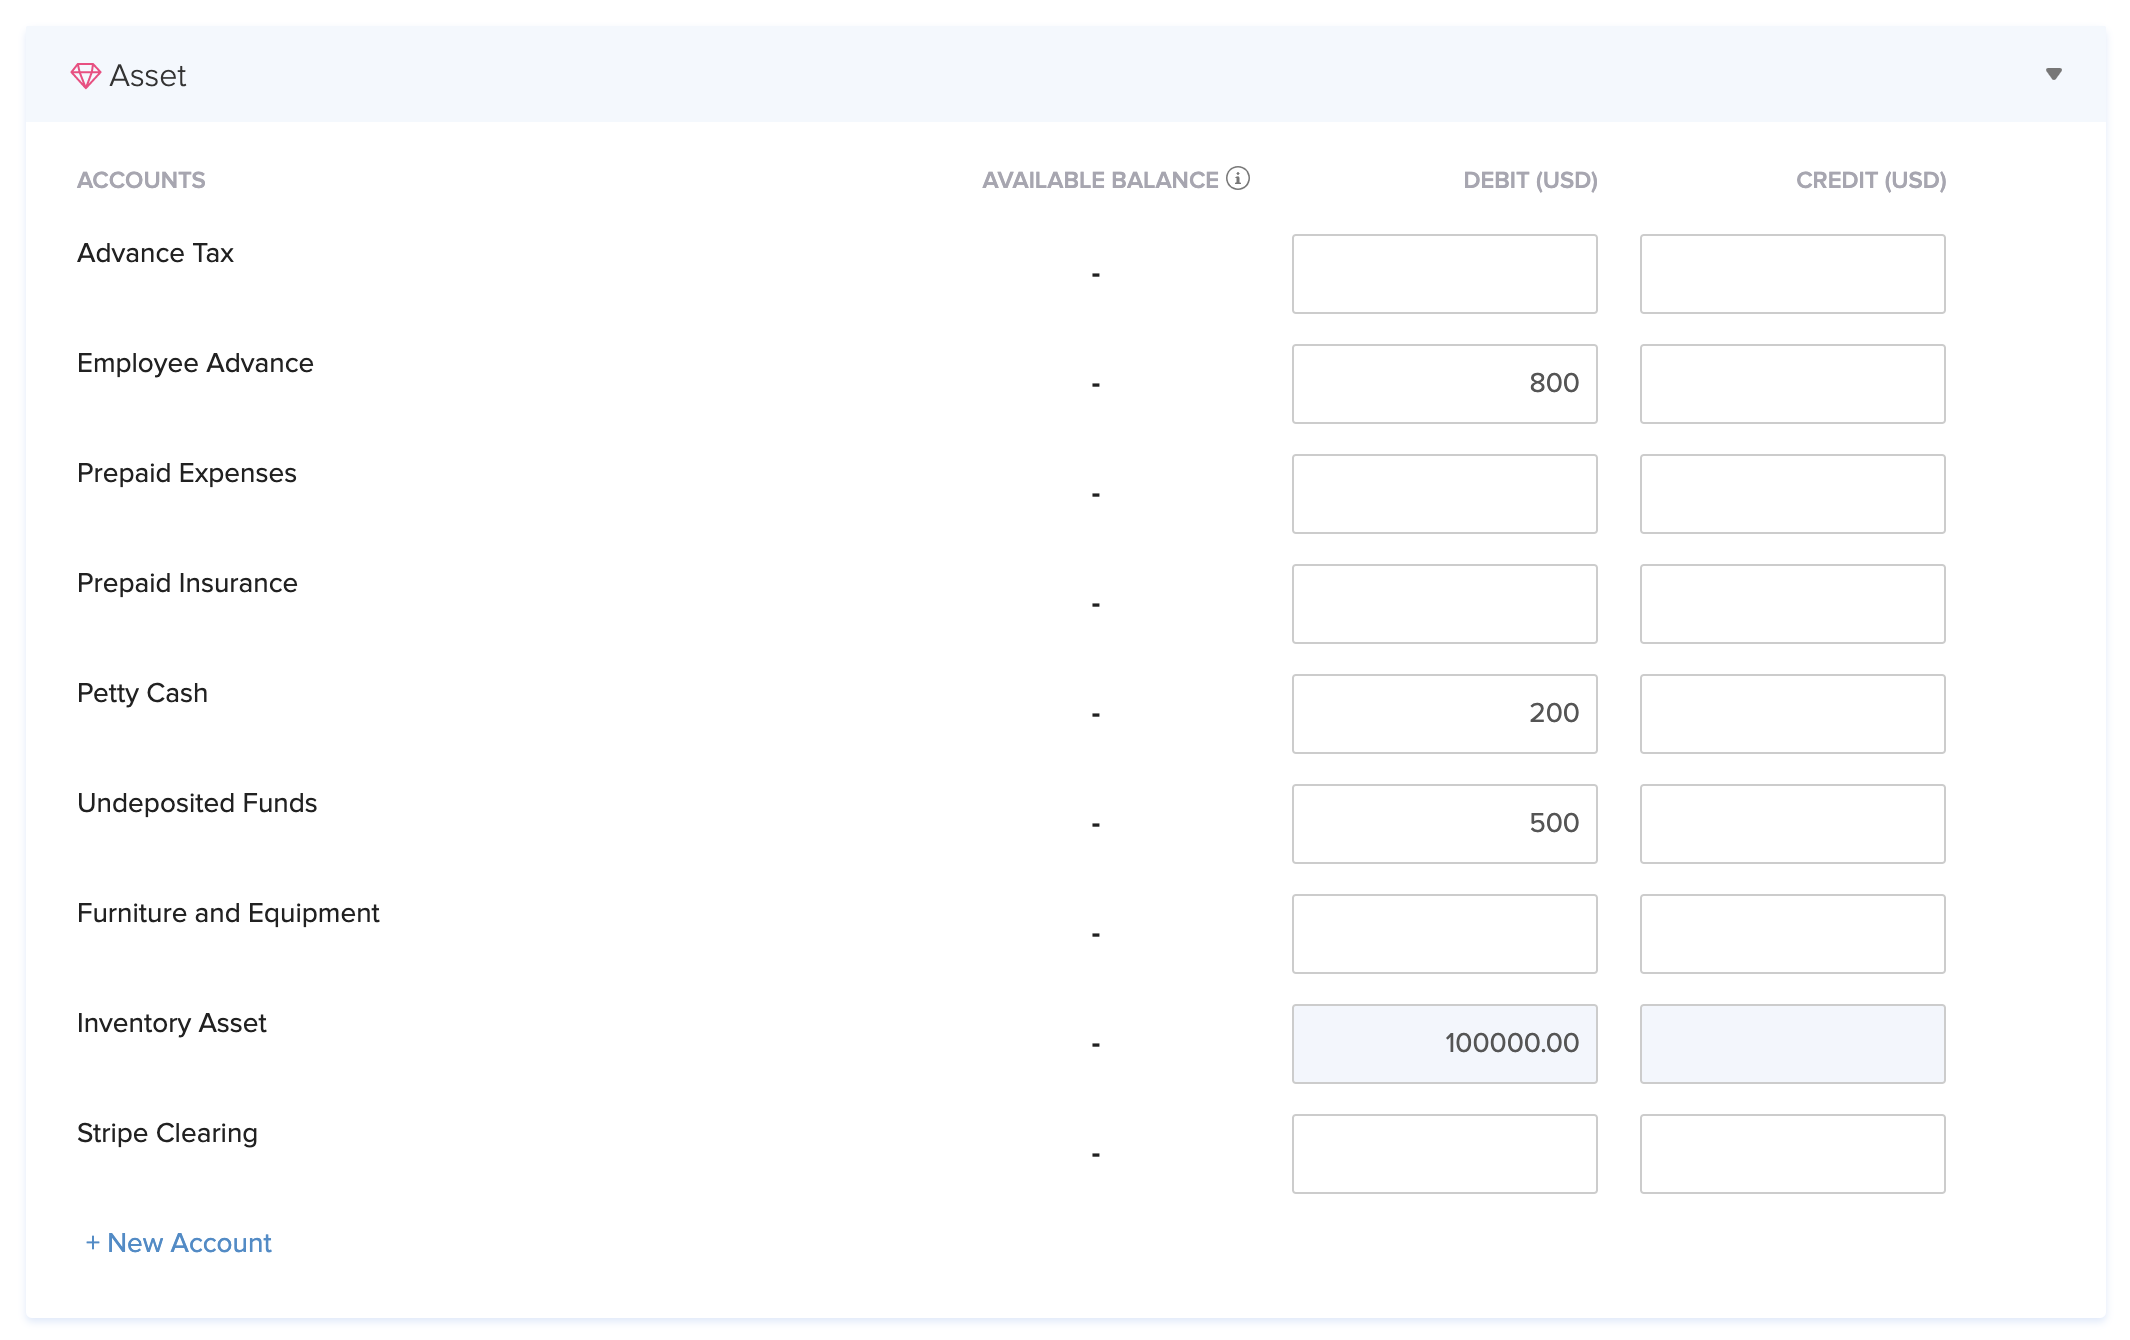
Enter the balances against the corresponding accounts.
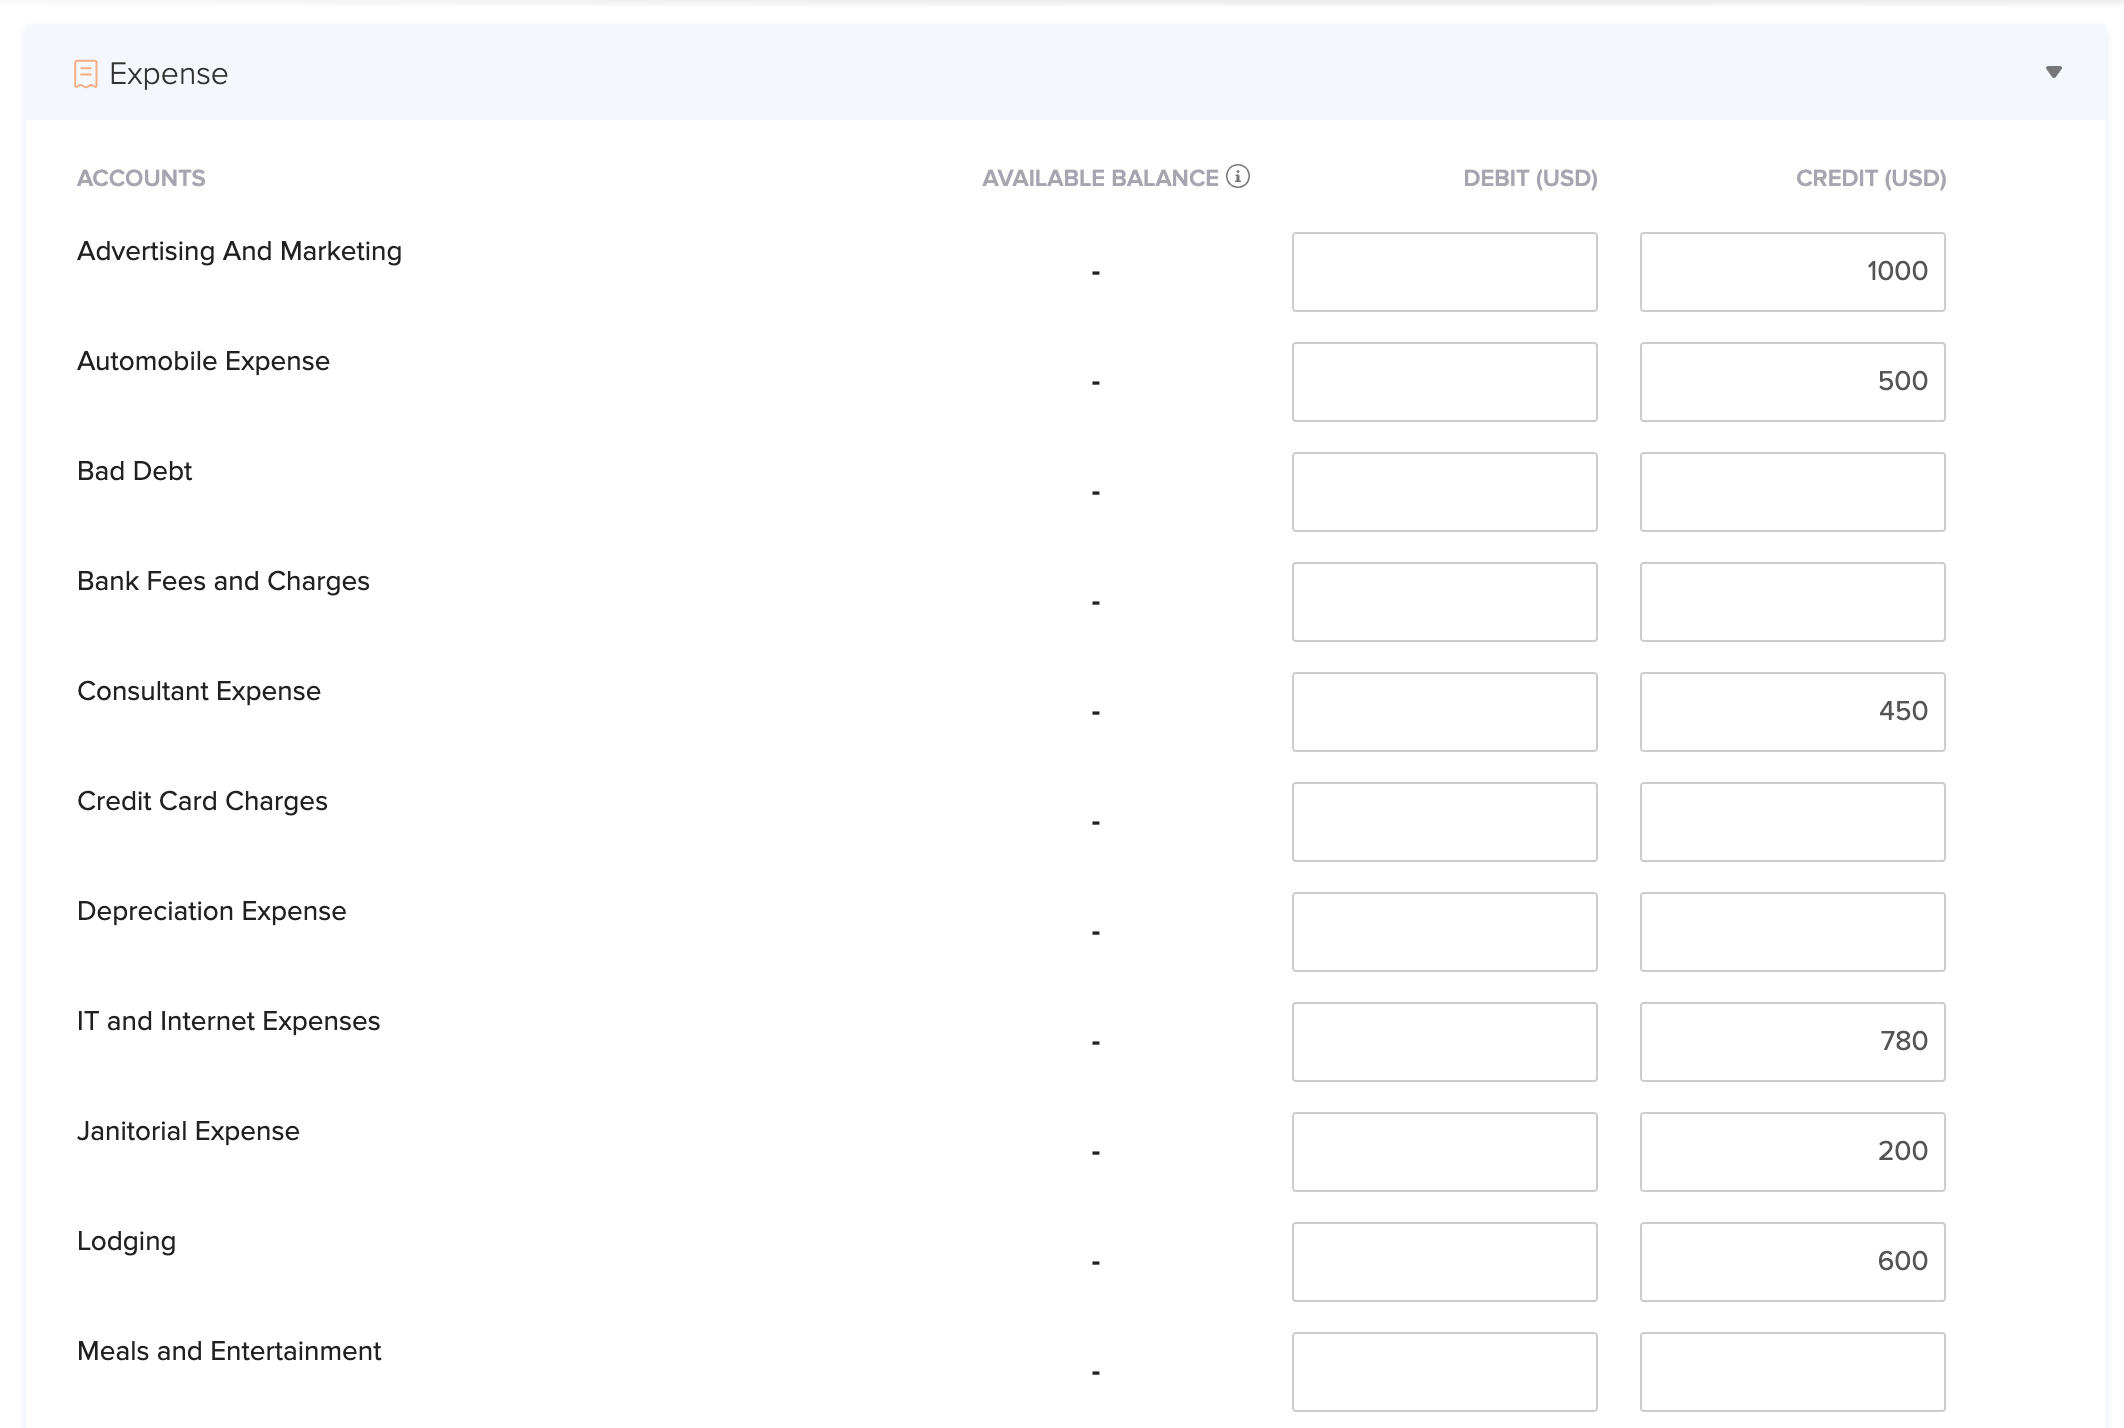
Expense accounts
In the Expenses section, you can enter the opening balances for the different expense accounts in your organization. Enter the balances against the corresponding accounts.
Bank accounts
If you have added any bank accounts in Zoho Books, you’ll be able to view them here. Enter the bank balance for these accounts.
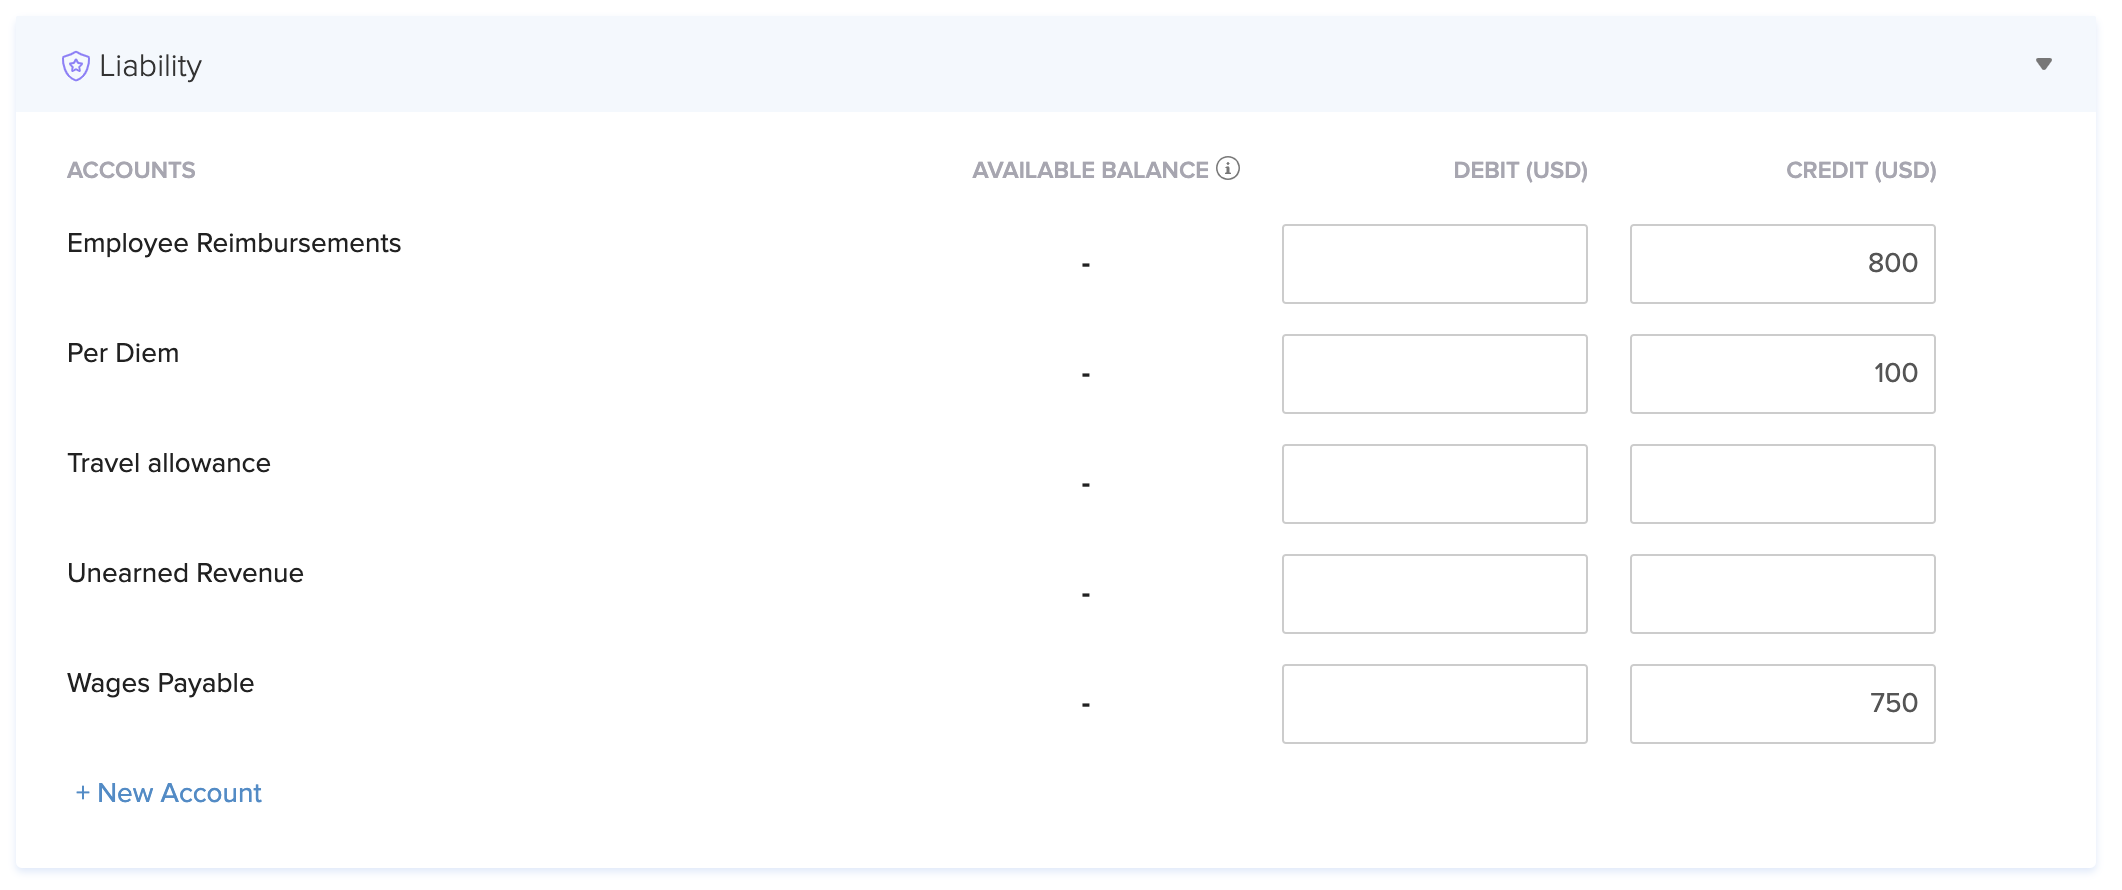
Liability accounts
All the accounts of the type Other liability and Other current liability will be listed under the liability section. You can enter the account balances against the corresponding accounts.
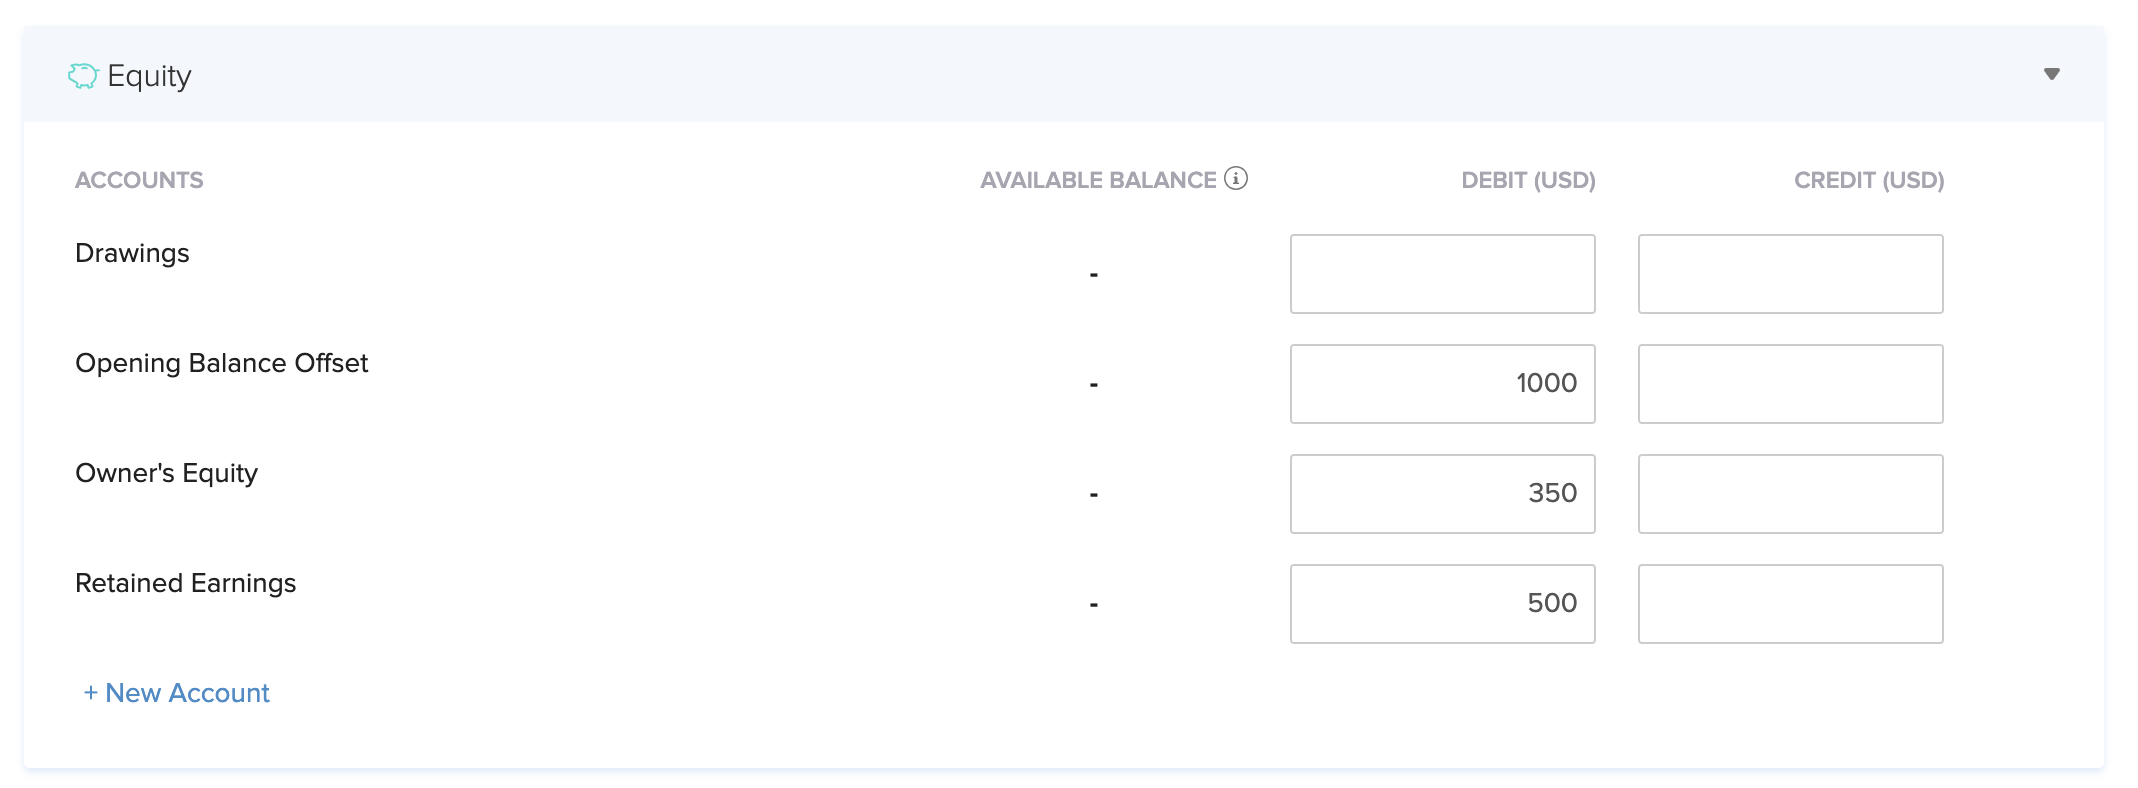
Equity accounts
Accounts under the Equity category such as Drawings, Retained Earnings and Owner’s Equity will be listed here. Enter the balances against the corresponding accounts.
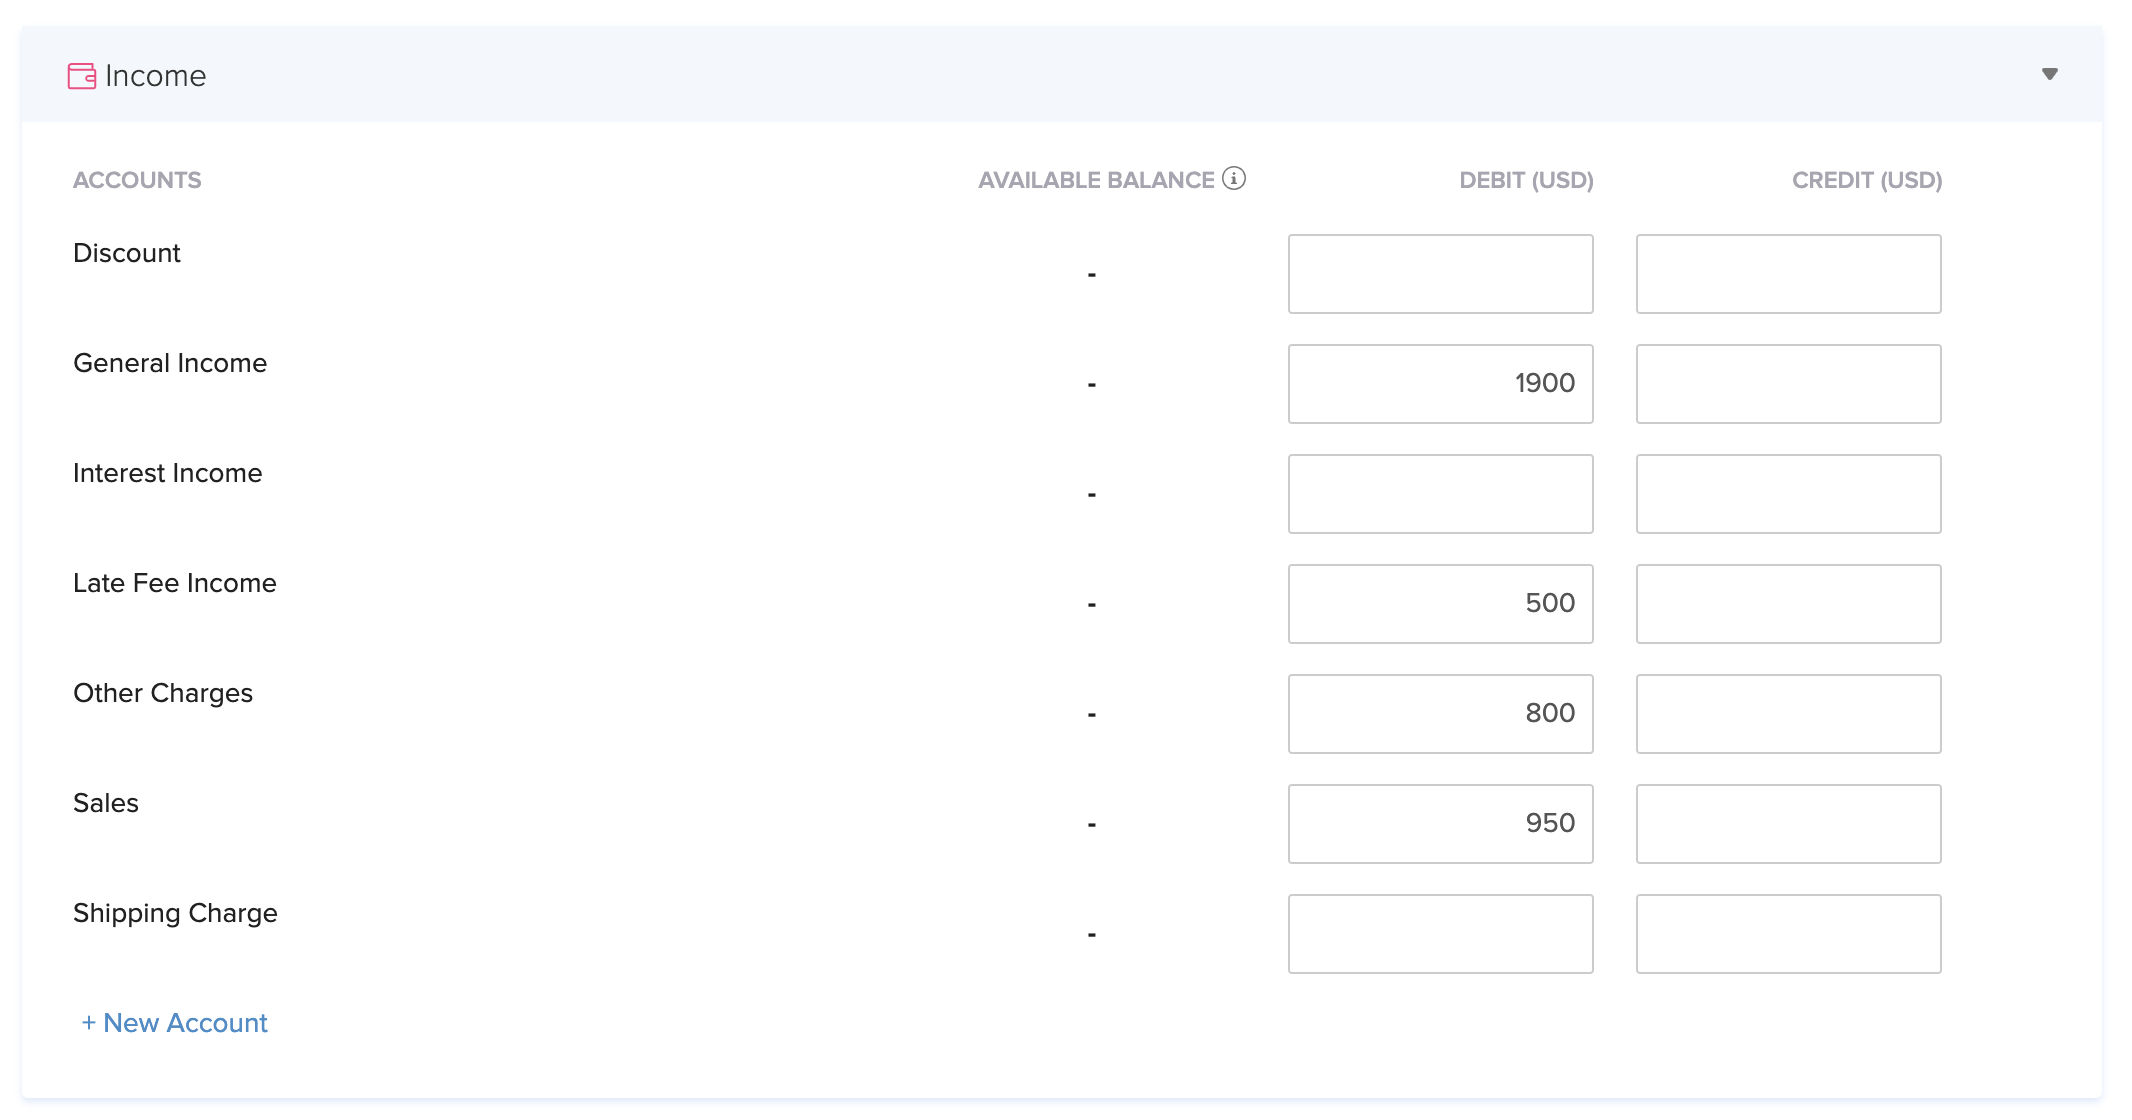
Income accounts
Accounts related to your business income such as Sales, Discounts, etc. will be listed under the Income section. You can enter the balances against the corresponding accounts.
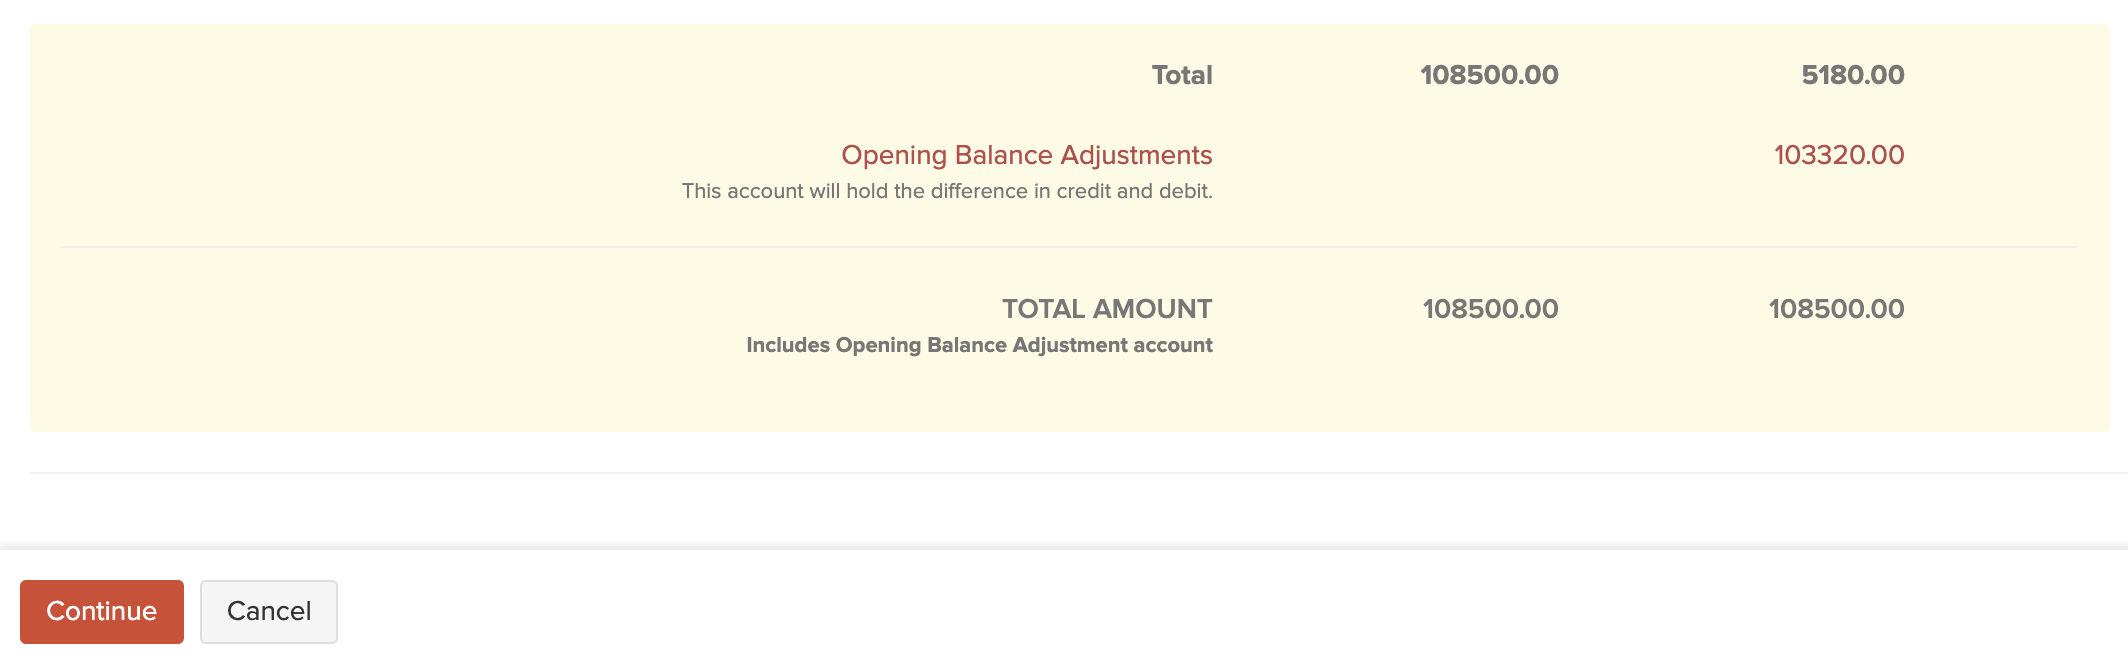
- Once you’ve entered the opening balances of all the accounts, click Continue, verify if you’ve entered the balances correctly, then click Confirm.
- Click OK in the confirmation pop-up.
You have now successfully entered the opening balances.
After you’ve made changes to all the accounts mentioned above, follow these steps:
- After entering the opening balances of different accounts, click Continue at the bottom of the page.
- Click Confirm to save the opening balances.
Insight: You’ll be able to see an additional column Available Balance. The value in this column will be populated based on the transactions (if any) that you have created before the opening balance date.
You can add new account(s) under any of the category by clicking + New in the respective category.
If there is a difference between the Debits and Credits in the opening balances, you’ll get a notification for which you can click Continue. This amount can later be adjusted in the Opening Balance Adjustment account in Zoho Books.
The opening balances in Zoho Books can be edited at any point of time. You can also click the Accounts Receivable section to verify the opening balances of the customers.
If you’re migrating in the middle of a financial year and would like to bring in the transactions after the opening balance date into Zoho Books, import these post-dated transactions after entering your opening balances.
Import Purchases and Sales
In any business there would be sales and purchase transactions recorded. You can import all the these transactions from QuickBooks Online to Zoho Books.
If you have already entered the opening balances of your customers, you’ll not be able to bring in their open transactions. The pre-dated transactions will sync with the opening balances.
Migration Process
Transactions before the Opening Balance Date
You would have exported the outstanding invoices/bills and advance payments from your customers and vendors in QuickBooks.
You have to import transactions into Zoho Books in the following order:
- Purchases
- Sales
Purchases
Purchase transactions mostly include your bills and the payments that you have made to your local and overseas vendors. You’ll have to import two major aspects in the purchase transactions:
- Outstanding bills
- Vendor advances
In the pre-migration steps, you would have exported the Accounts Payables (A/P) report from QuickBooks Online. In this report, you’ll find the Payments section which will contain all the payments made to different vendors.
In this report, you’ll be able to find the outstanding bills of your vendors and also the payments you have made. You’ll first need to import your bills into Zoho Books, followed by the payments you receive from various vendors.
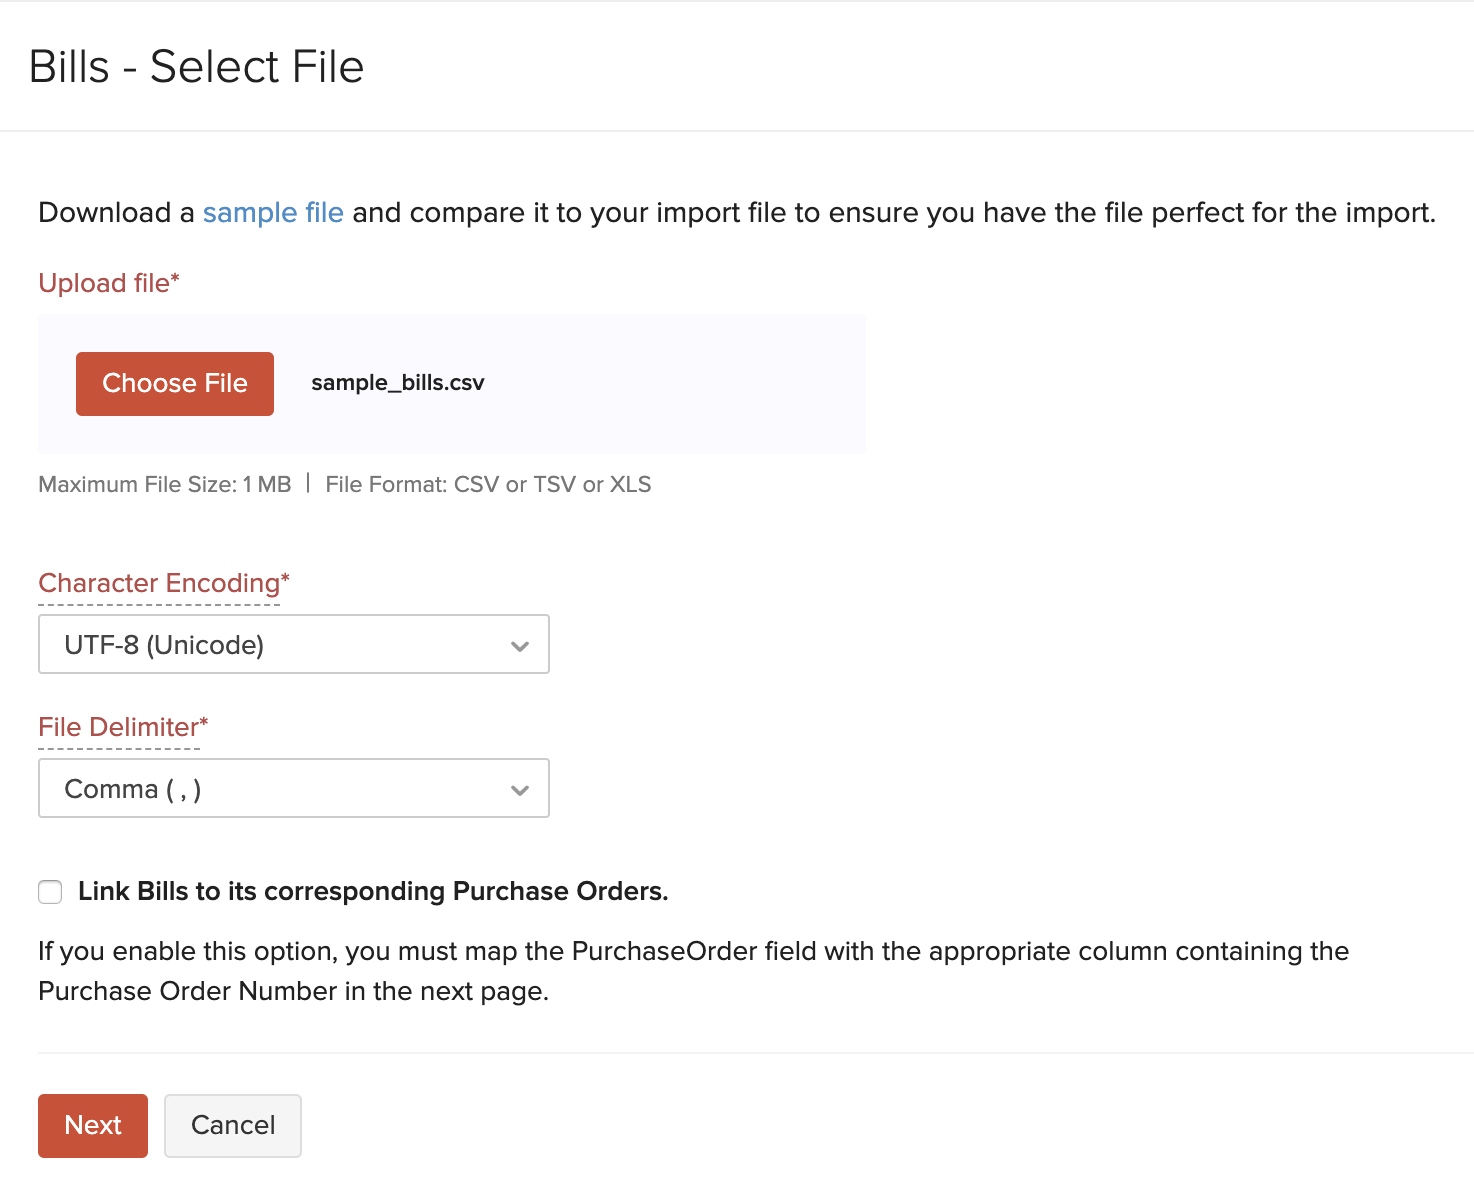
To import your bills into Zoho Books:
- Log in to your Zoho Books account.
- Go to Purchases on the left sidebar and select Bills.
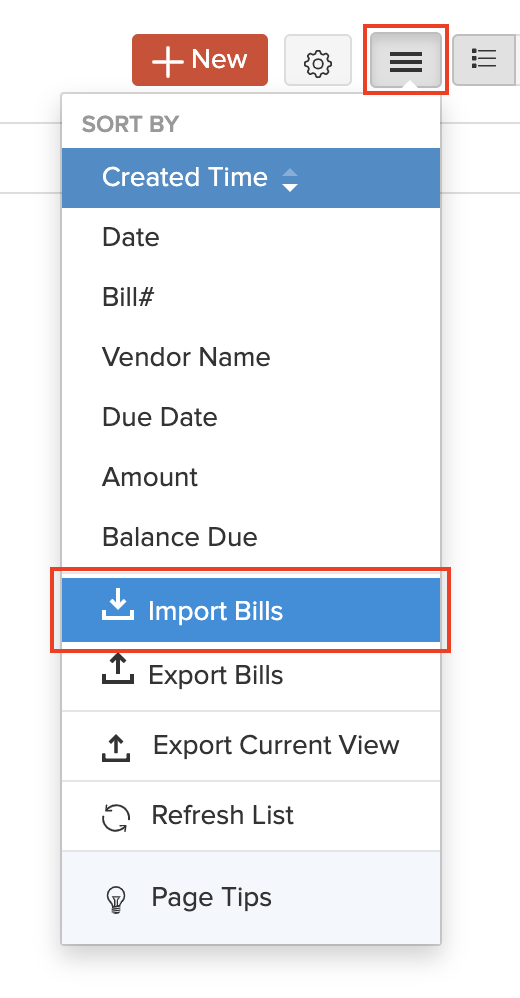
- Click the More icon in the top right corner of the page.
- Select Import Bills.
- Click the Choose File button and upload the import file. You can download the sample file to view the format of the import.
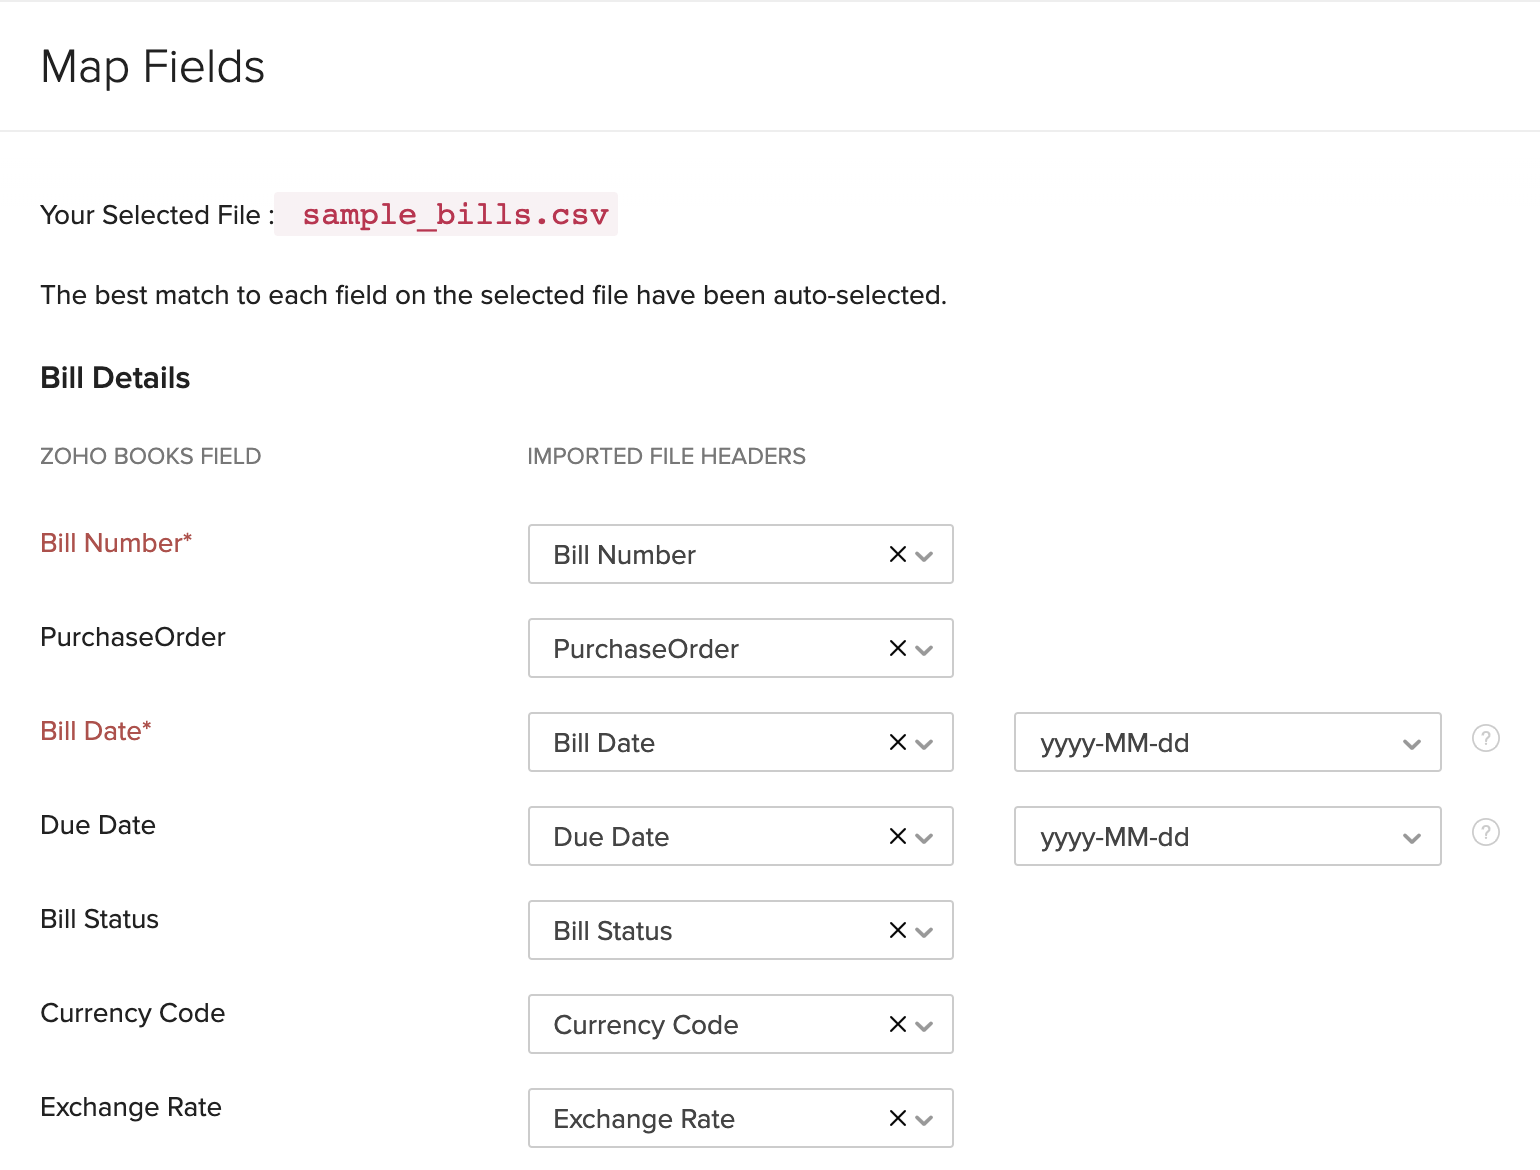
- Click Next.
- In the Map Fields page, ensure that all the fields in the import file and Zoho Books are mapped correctly.
- Click Next at the bottom of the page.
- Click Import.
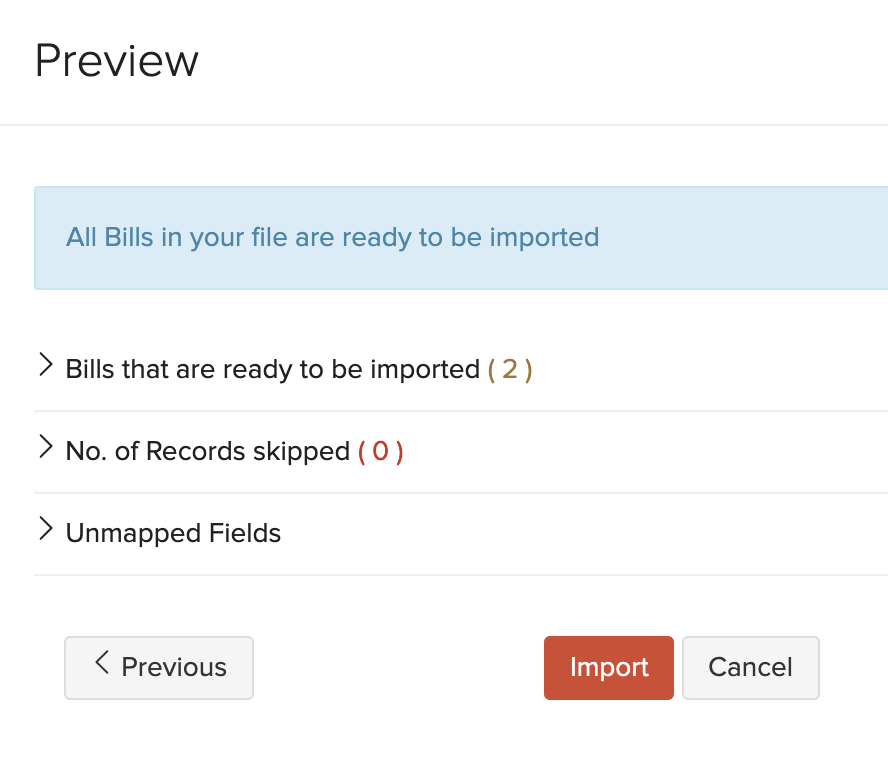
After this, you would’ve successfully imported all your outstanding bills.
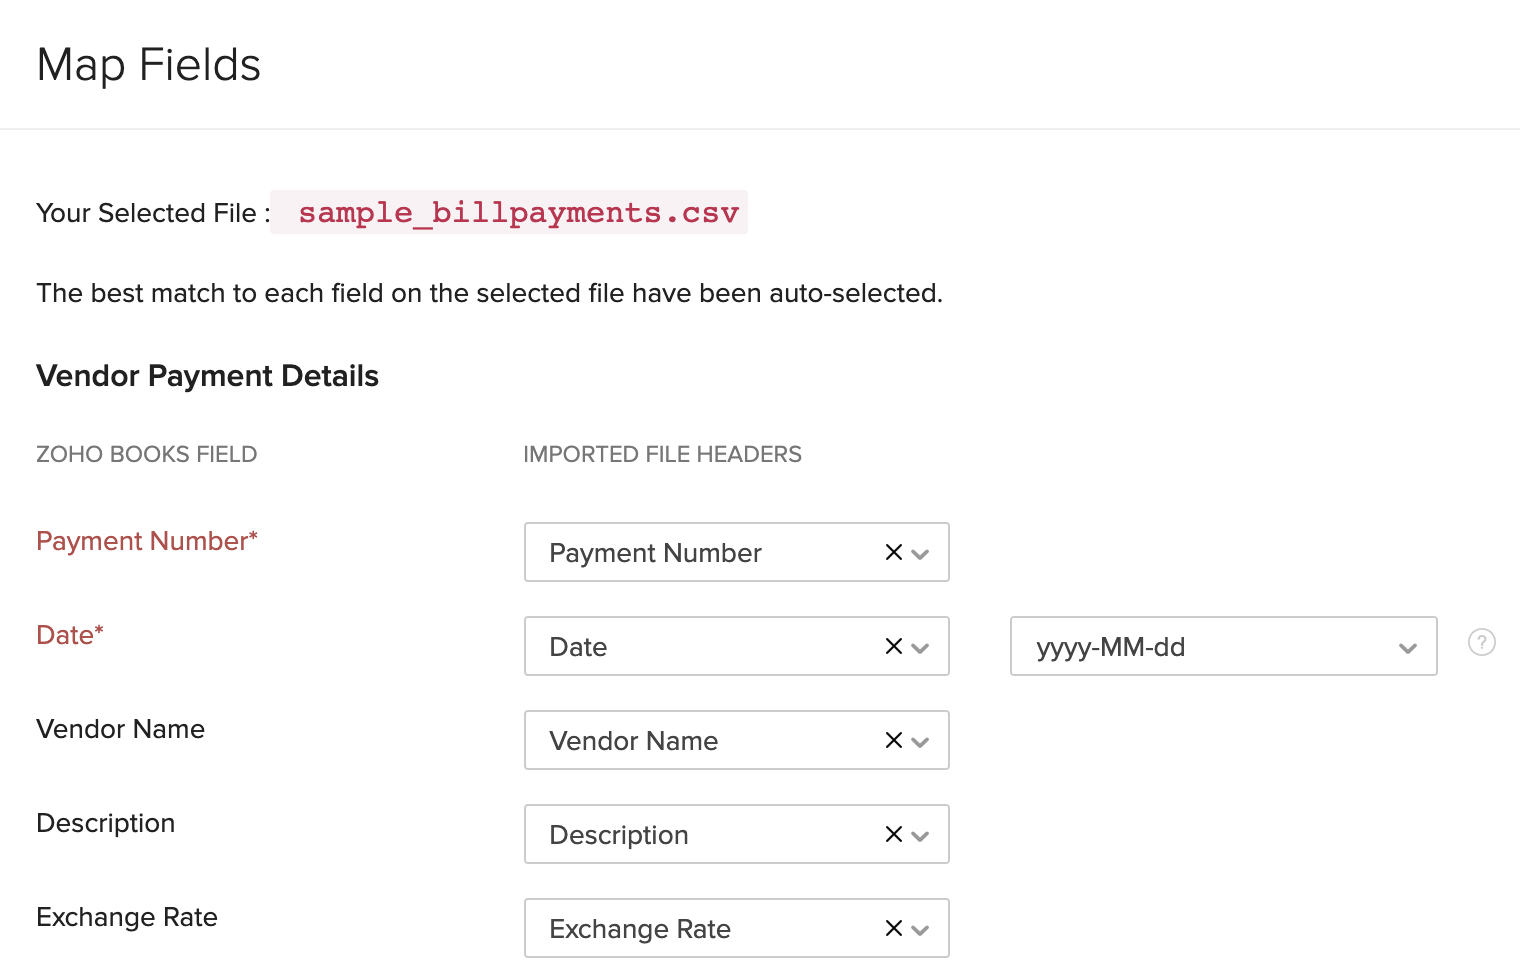
Next, you need to import the open vendor advances. Here’s how you can do it:
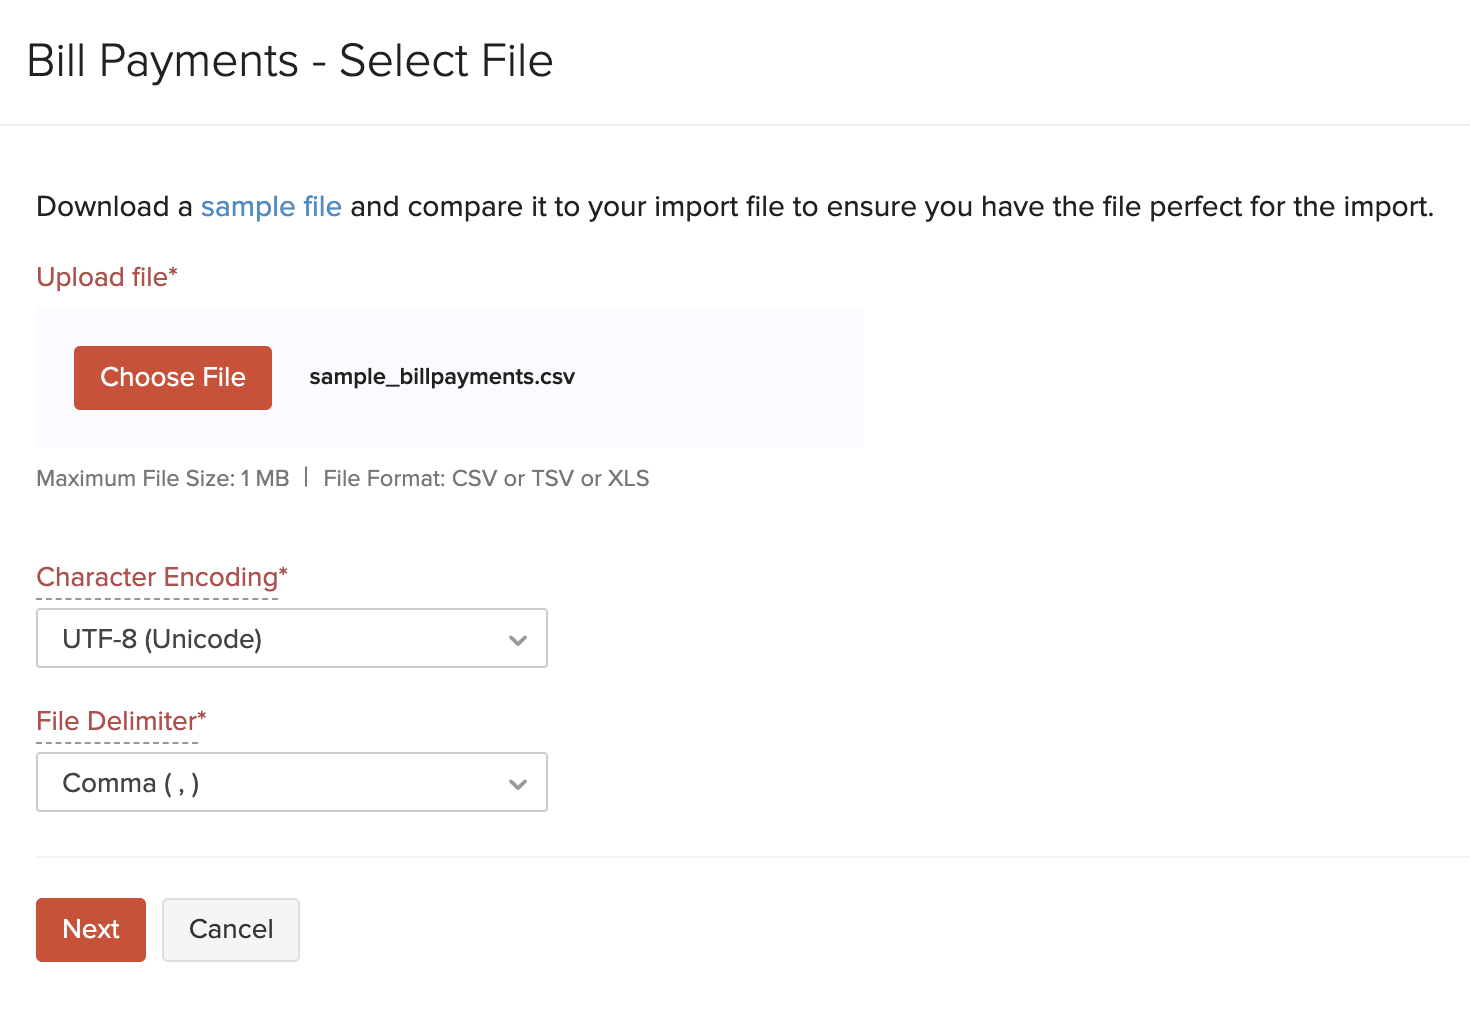
- Go to Purchases > Payments Made.
- Click the More icon in the top right corner of the page.
- Select Import Payments.

- Click the Choose File button and upload the import file. You can download the sample file to view the format of the import.
- In the Map Fields page, ensure that all the fields in the import file and Zoho Books are mapped correctly.
- Click Next at the bottom of the page.
- Click Import.
After this, you would’ve successfully imported your open vendor advances.
After importing your bills, vendor advances and customer advances, you would’ve successfully imported all your pre-dated open transactions (transactions before the opening balance date).
Also, if you have inventory items and wish to bring in the closed transactions of the previous financial year as well, then:
- Import the stock increasing transactions, i.e. bills, credit notes, etc. first, followed by the stock reducing transactions, i.e invoices, debit notes, etc.
- All the transactions should be imported in the ascending order of their date.
Sales
Sales transactions mostly include your invoices and the payments that you received from your local and overseas customers. You’ll have to import two major aspects in the sales transactions:
- Outstanding invoices
- Customer advances
Since we have already entered the opening balances (Customer Balances) for the customers while creating them, we don’t need to create or import open invoices again. We’ll just have to import the open customer advances.
In the pre-migration steps, you would have exported the Accounts Receivables (A/R) report from QuickBooks Online. In this report, you’ll find the Payments section which will contain all the payments received from different customers. You need to import these details into Zoho Books. Here’s how you can do it:
- Log in to your Zoho Books account.
- Go to Sales > Payments Received.
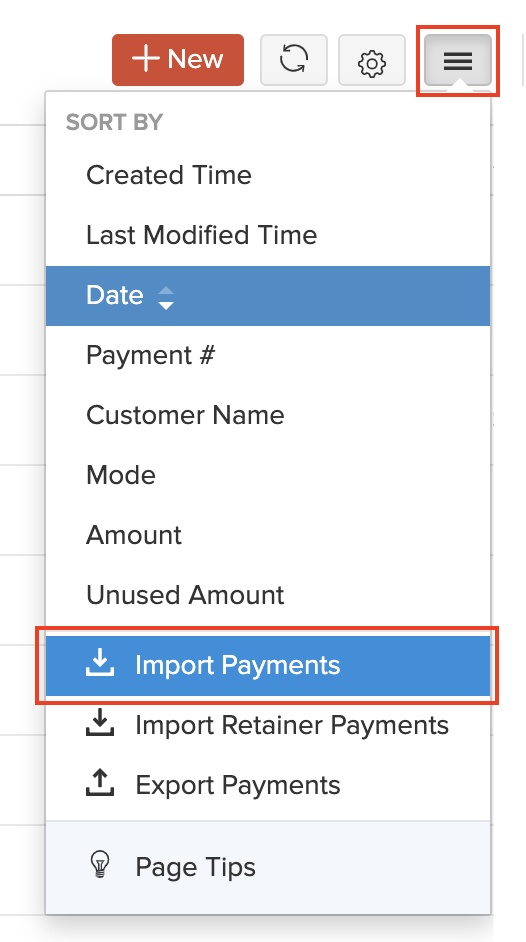
- Click the More icon in the top right corner of the page.
- Select Import Payments.
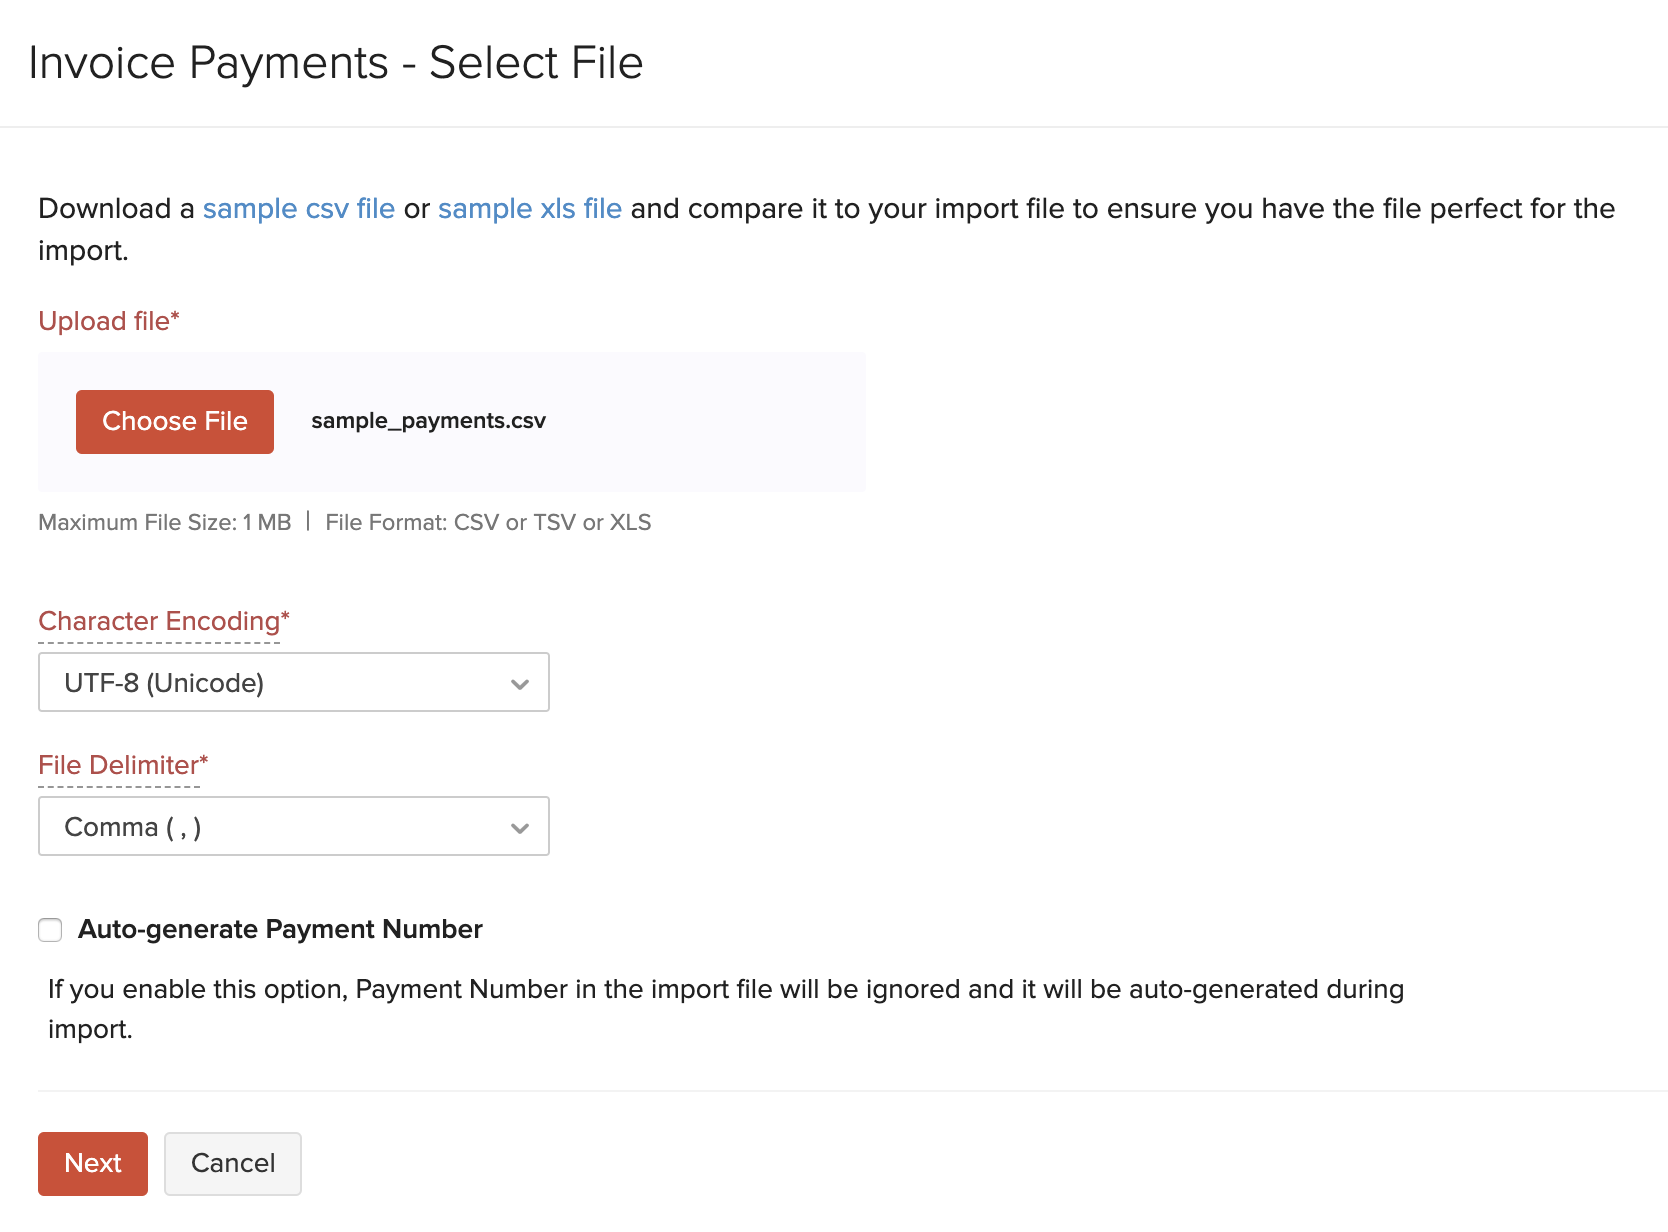
- Click the Choose File button and upload the import file. You can download the sample file to view the format of the import.
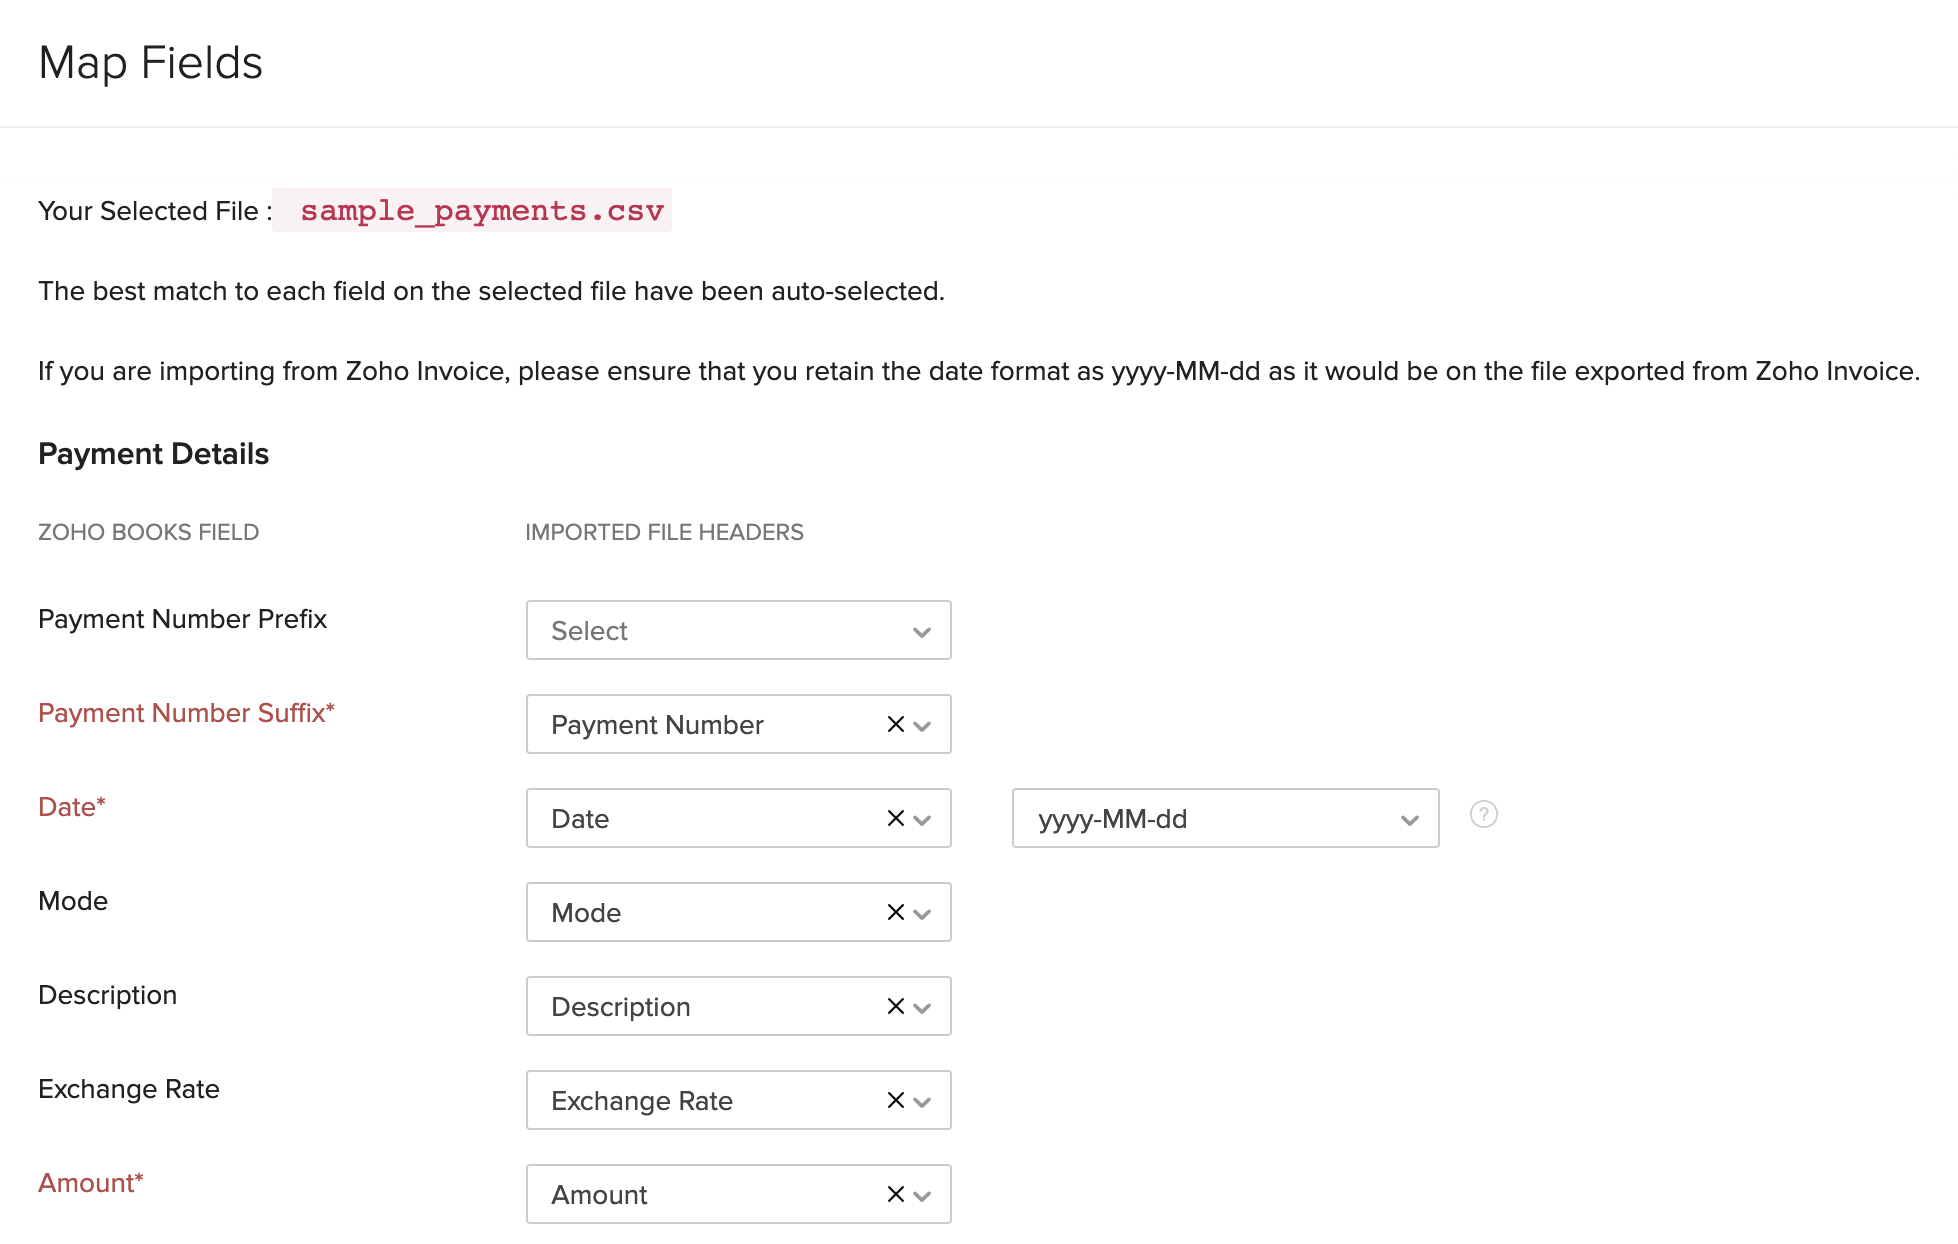
- In the Map Fields page, ensure that all the fields in the import file and Zoho Books are mapped correctly.
- Click Next at the bottom of the page.
- Click Import.
After this, you would’ve successfully imported your customer advances into Zoho Books.
Note: The open transactions should be dated before the opening balance date.
Sync Transactions
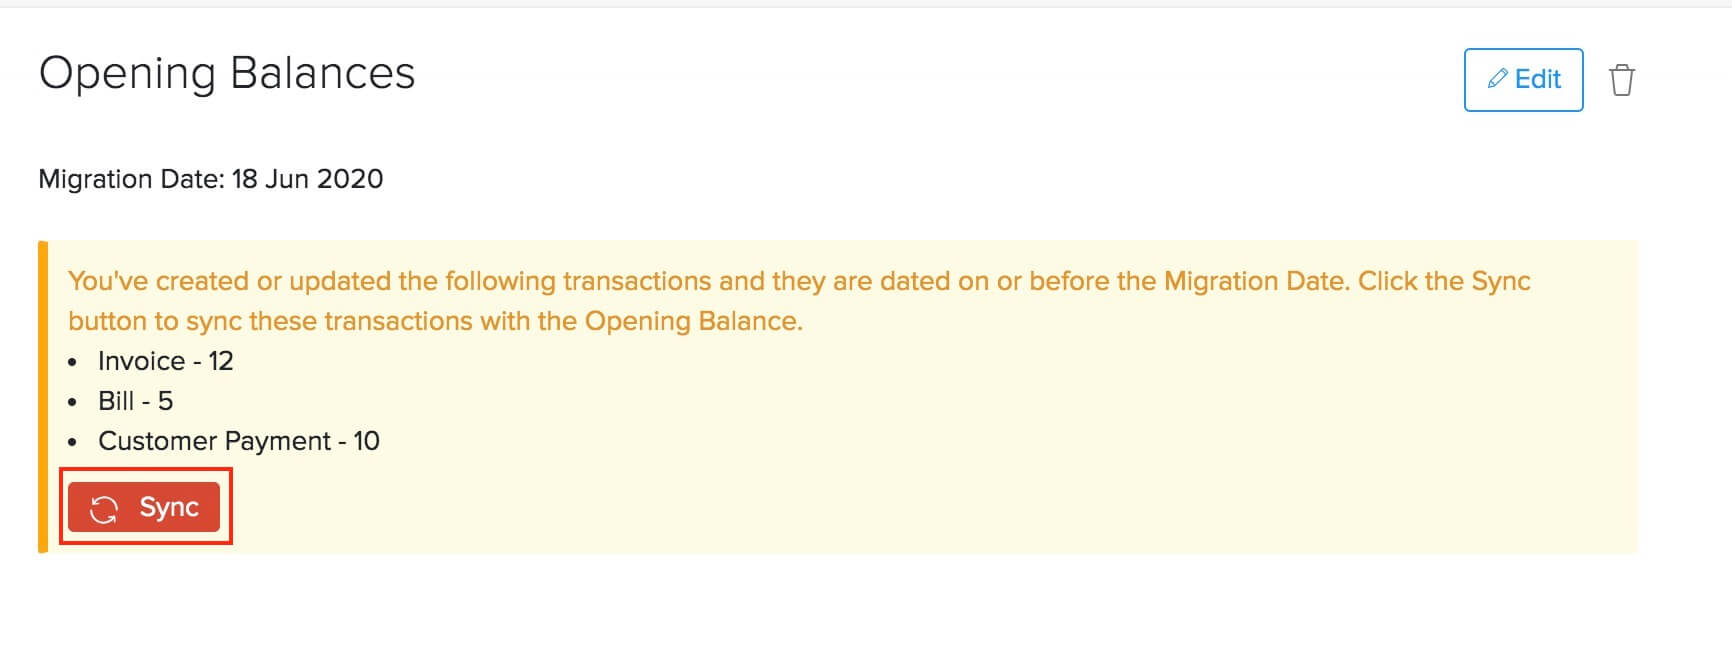
After you have imported all the required transactions, it is important that you check if they’ve been properly synced with the Opening Balances. Only then will you get accurate account values in the Trial Balance report.
If you had imported transactions that are dated on or before the migration date, then you need to sync them manually with the Opening Balances in Zoho Books. To do this:
- Click Settings on the top right corner of the page.
- Click Opening Balances under Organization.
- The number of transactions that are backdated will be listed here.
- Click Sync.
With this final step, your migration process will be completed and you can start exploring the other features offered by Zoho Books.
What You Can Do after Migrating
Now that you have migrated to Zoho Books successfully, you can customize your organization further. You can set up payment gateways to accept online payments or integrate with other apps such as Zoho CRM and Zoho Analytics.
Zoho Books also has many features that you can utilize to streamline your accounting process, here’s some of them to get you started:
- Transaction approvals
- Auto-charge for recurring transactions
- Template customization
- Payment reminders
- Customer Portal and Vendor Portal
Note:If you face any issues or have doubts regarding the migration process, you can write to us at support.usa@zohobooks.com. We’d be glad to help you out.
 Yes
No
Yes
No
Thank you for your feedback!