
- Automation
- Workflow Rules
- Create a New Workflow Rule
- Other Actions in Workflow Rules
- Change the Order of Workflow Rules
- Edit a Workflow Rule
- Mark a Workflow Rule As Inactive
- Clone a Workflow Rule
- Delete a Workflow Rule
- Workflow Actions
- Email Alerts
- Other Actions in Email Alerts
- In-app Notifications
- Other Actions in In-app Notifications
- Field-Update
- Other Actions in Field Updates
- Webhooks
- Delete a Webhook
- Custom Functions
- What is Deluge?
- Creating New Schedules
Automation
Workflow Automation streamlines your business operations by automating routine tasks. With Workflow Automation, you can create workflow rules that execute tasks based on predefined conditions. This enables you to focus on important business tasks while automation takes care of the repetitive tasks.
Workflow Rules
You can automate tasks such as sending emails, updating fields, and triggering webhooks or custom functions by creating workflow rules in Zoho Commerce. The workflow rule executes automatically once the conditions are met.
Scenario: Bailey wants to automatically send a welcome email with a referral code to customers after they complete their first order. To achieve this, she sets up a workflow rule in Zoho Commerce that triggers an email alert as soon as the payment is marked as complete. This ensures the email is sent instantly, helping Sarah engage with customers efficiently while saving time and manual effort.
In Workflow Rules, you can:
- Create a New Workflow Rule
- Other Actions in Workflow Rules
Create a New Workflow Rule
To create a new workflow rule:
- Log in to your Zoho Commerce organization.
- Click Settings in the top right corner.
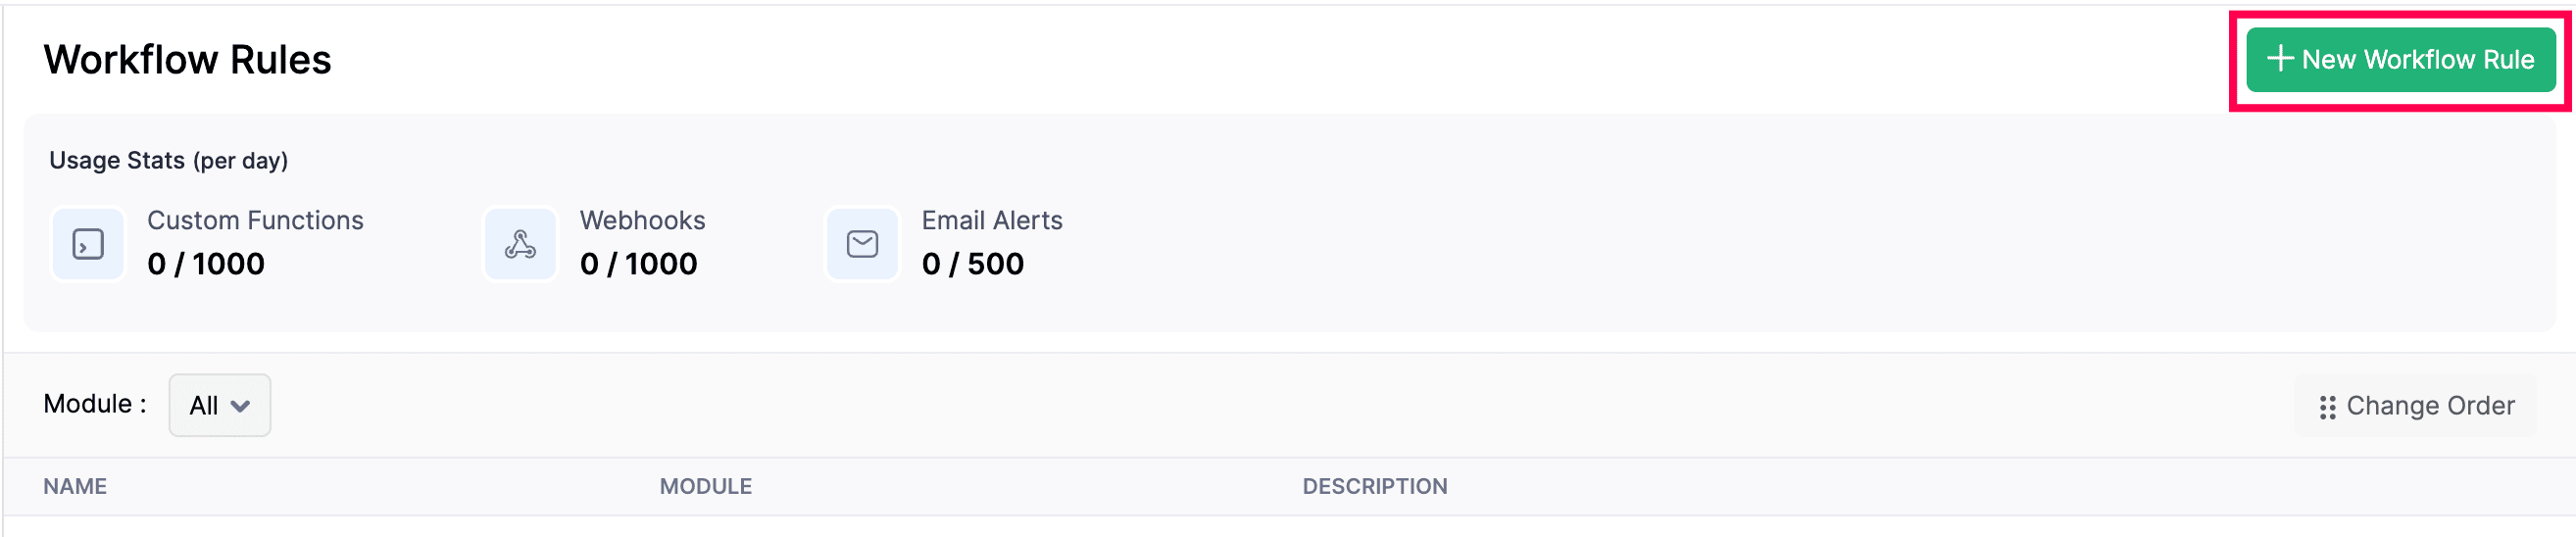
- Navigate to Workflow Rules under Automation.
- Click + New Workflow Rule in the top right corner.
- In the New Workflow Rule pop-up, fill in the following fields:
- Workflow Rule Name: Enter a name for the workflow rule.
- Description: Add a description if necessary.
- Module: Select the module for the workflow rule from the drop-down menu.
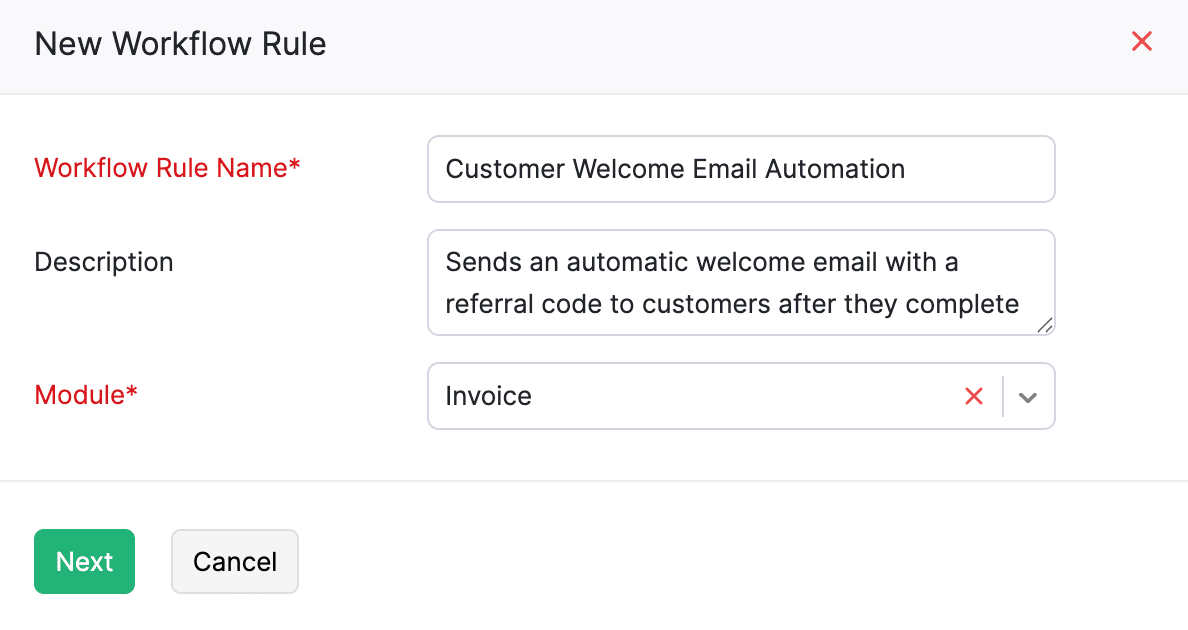
- Click Next.
- Under WORKFLOW RULE EXECUTION CONDITION, fill in the following fields:
- Workflow Type: Choose either Event Based or Date Based.
- Action Type: Select the action type that triggers the workflow.
- Execute the workflow when: Choose the actions that trigger the workflow (Edit, Edited or Created).
- Execute when the record is: Select either Edited for the first time or Edited each time.
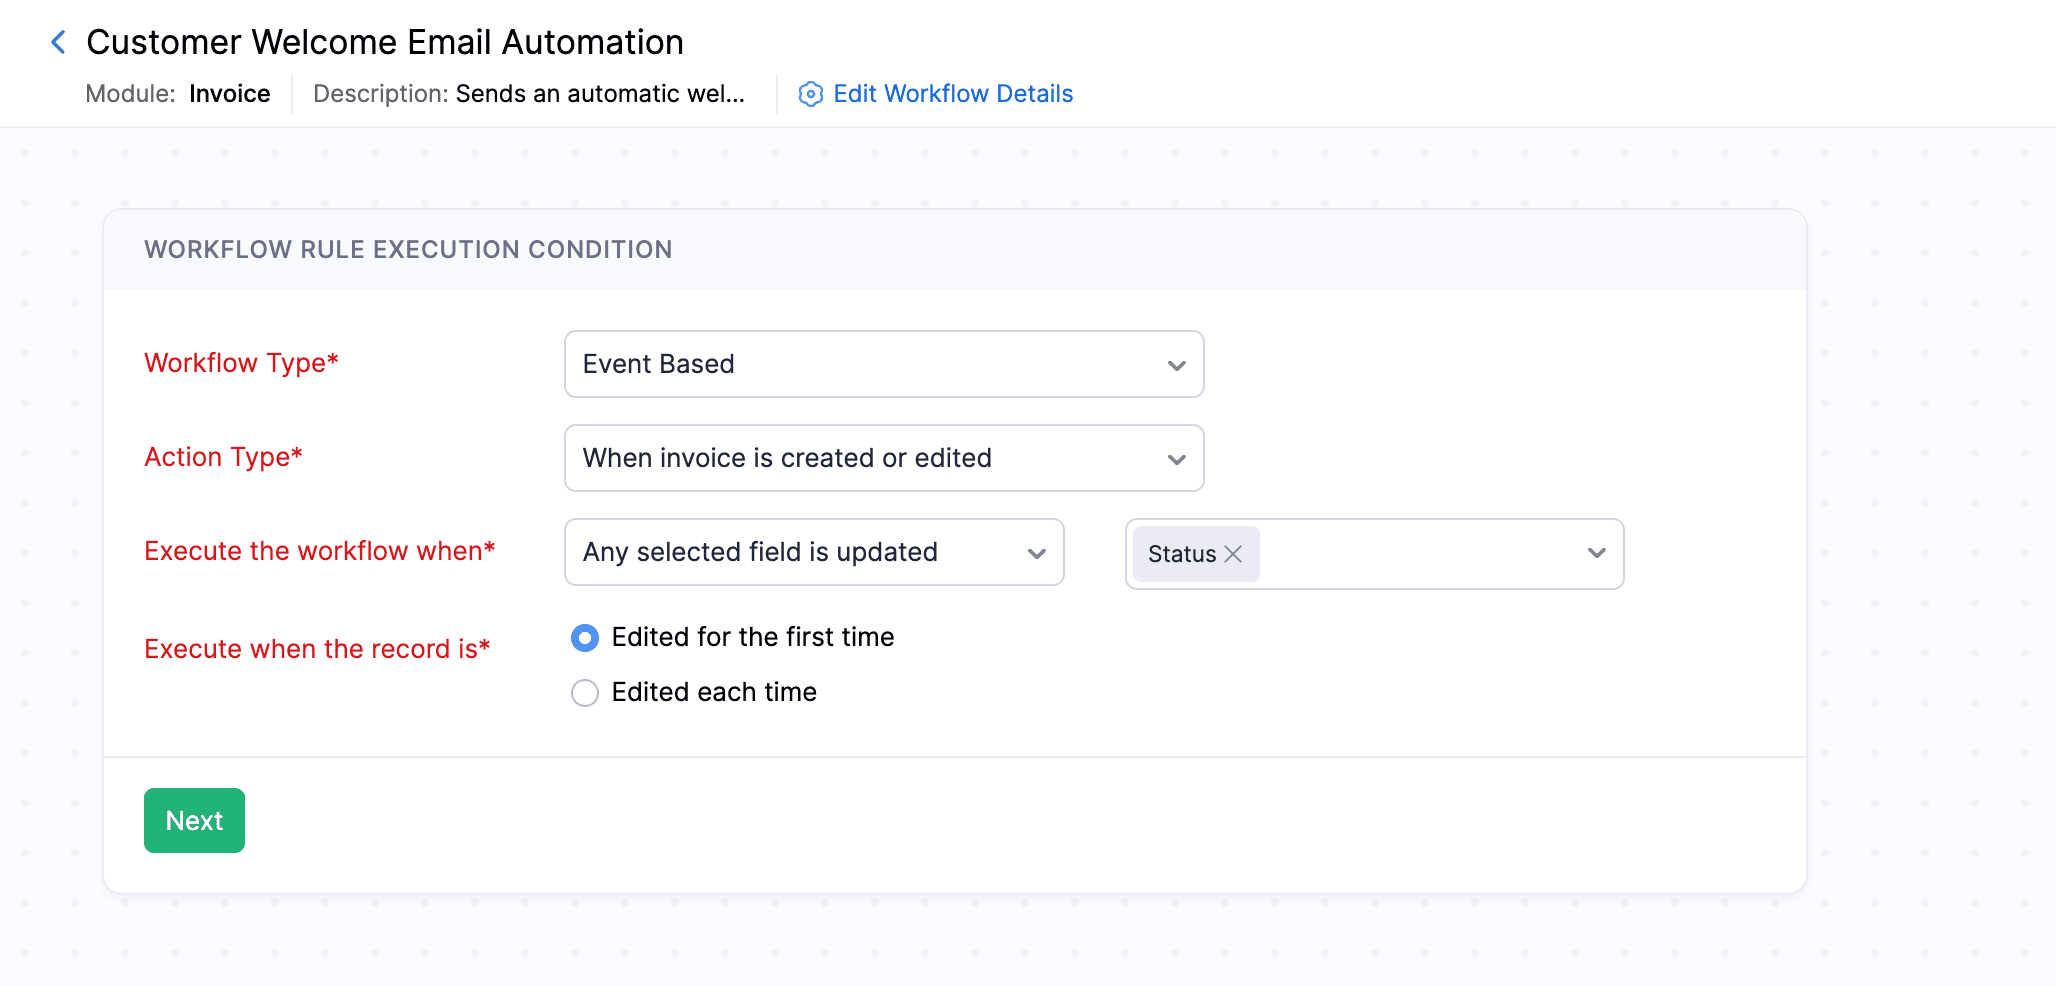
Note: Execute the workflow when and Execute when the record is fields will only appear when the Action Type is set to Edited or Edited or reated.
- Click Next.
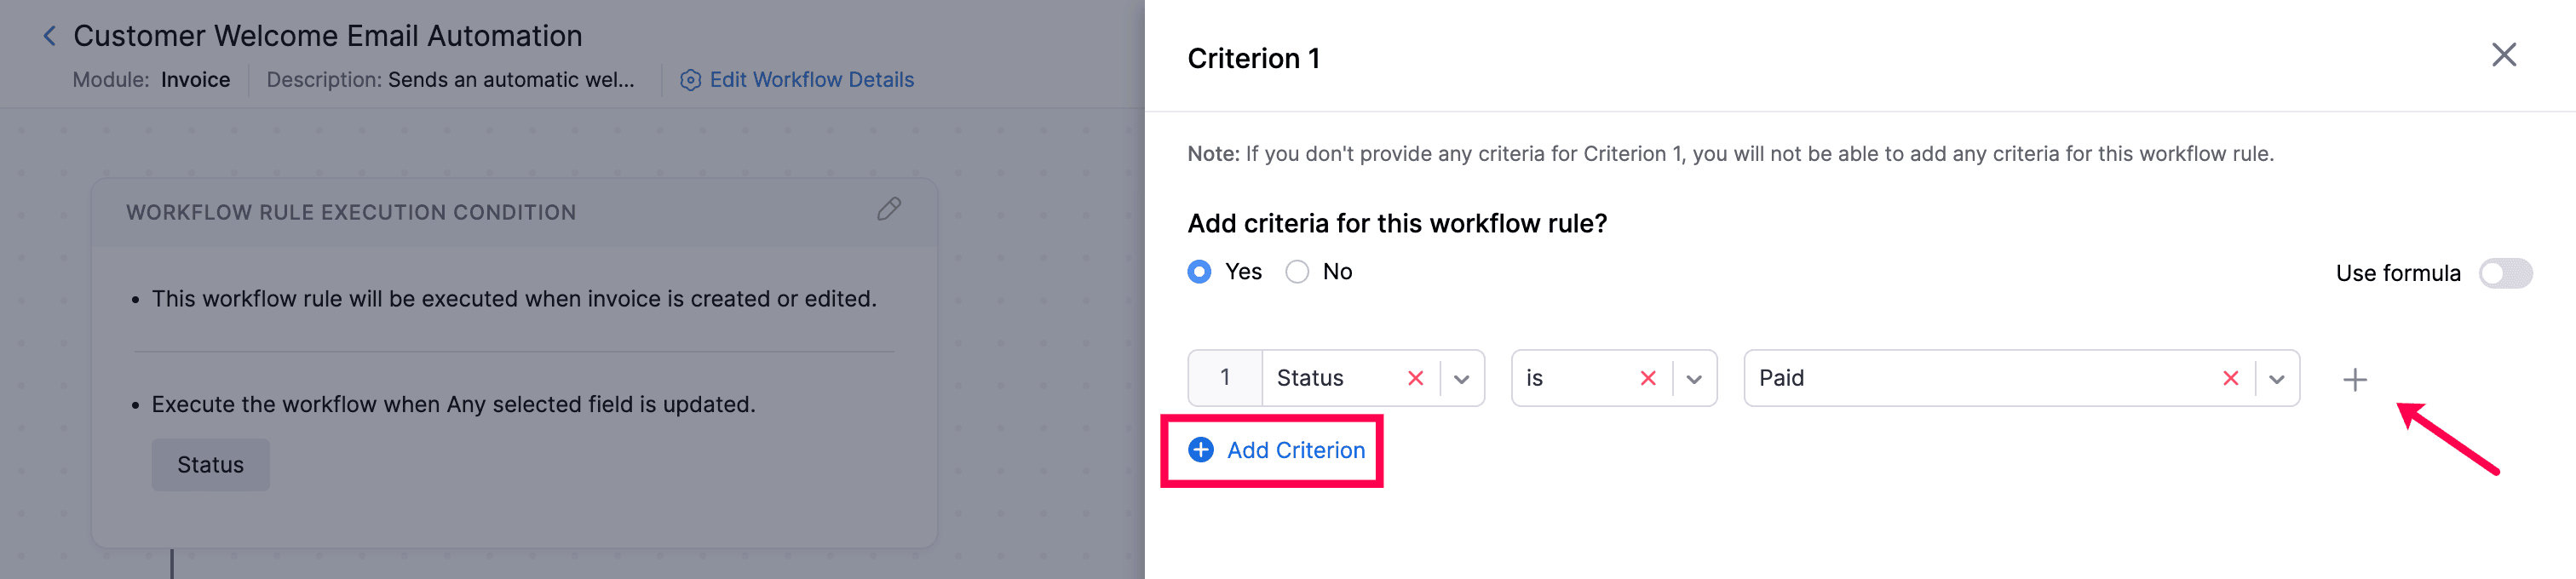
- Click + New Criteria to create a new criteria for the workflow rule:
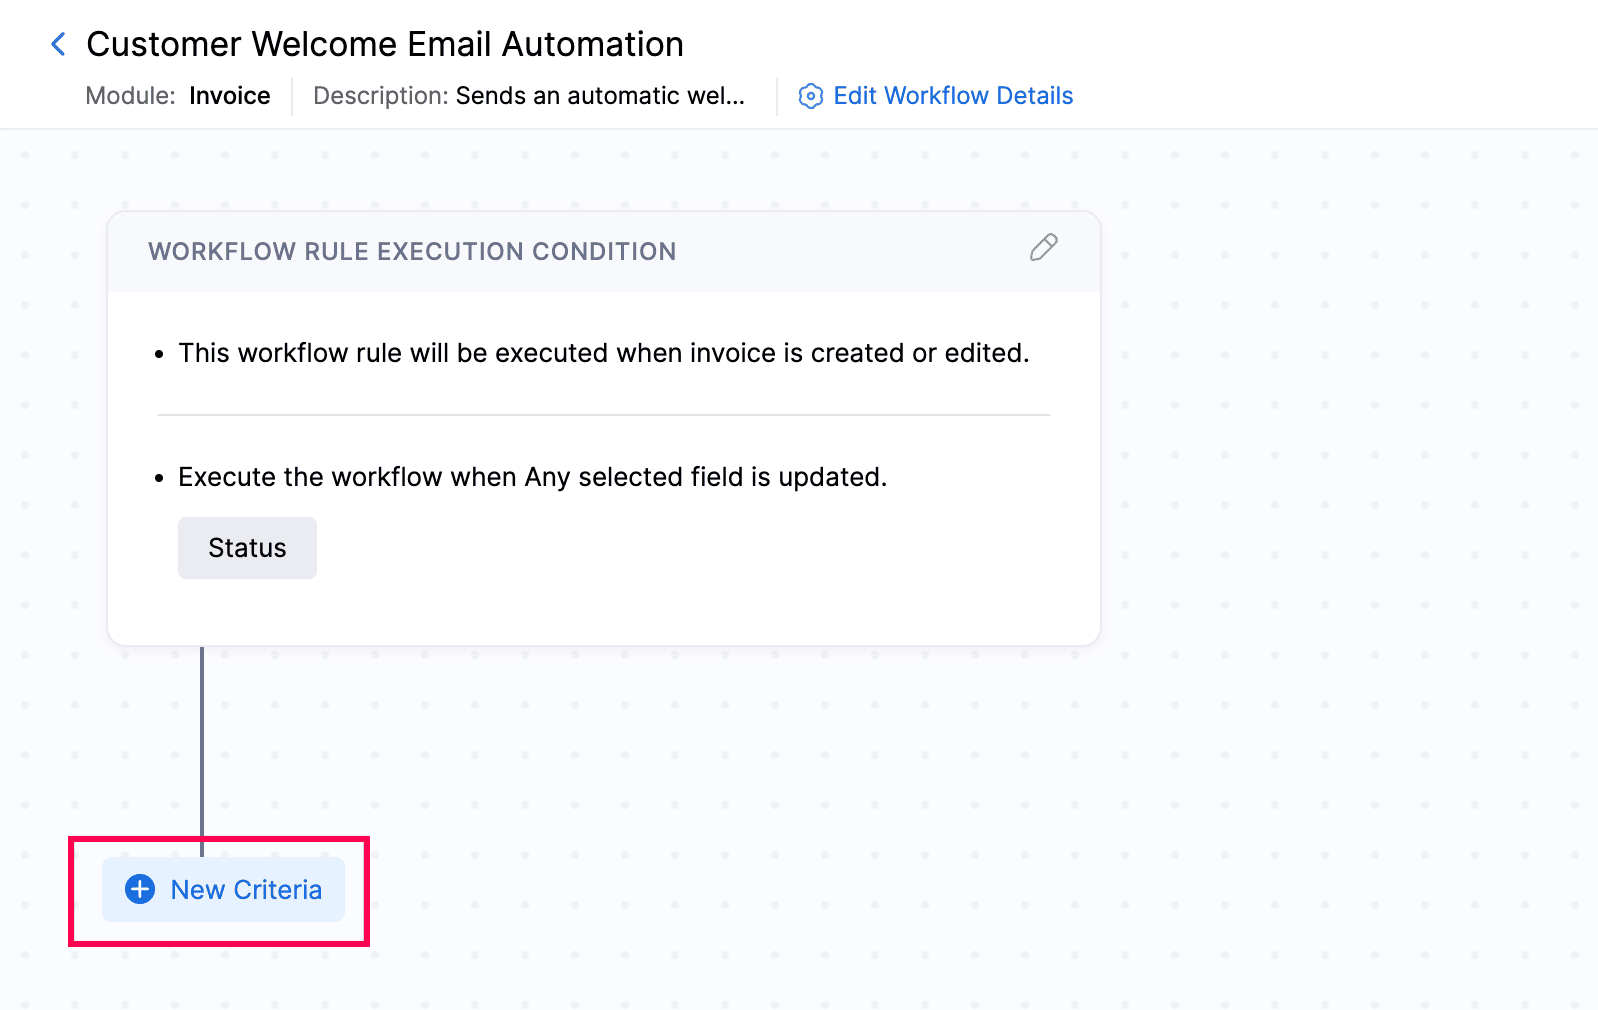
- In the pane that appears, click Yes to add criteria or No to skip.
- Enter the criteria by selecting a field, a comparator, and entering the necessary value.
- Click + Add Criterion or + to create additional criteria if necessary.
- If you add multiple criteria, select either AND or OR from the dropdown based on how you want the criteria to work. You can also edit the criteria pattern by manually entering the criteria in the CRITERIA PATTERN field.
- Once you’ve added the necessary criteria, click Done.
- Next, choose the action to perform when the conditions are met. Click + Immediate Action to add the required actions.
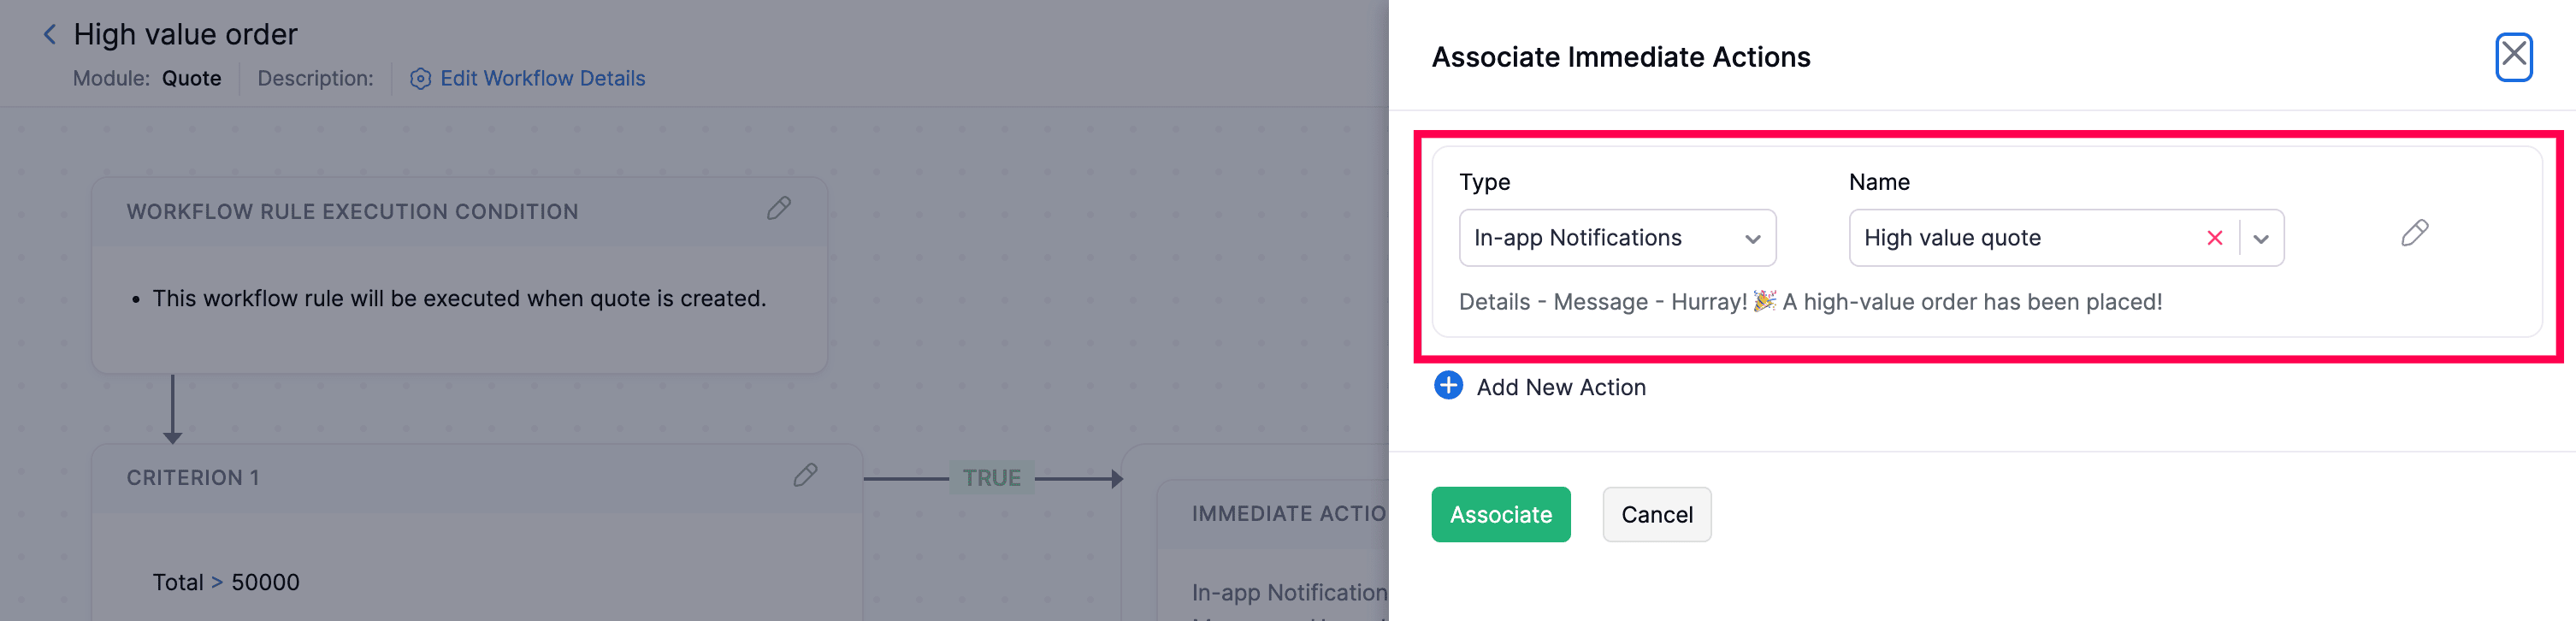
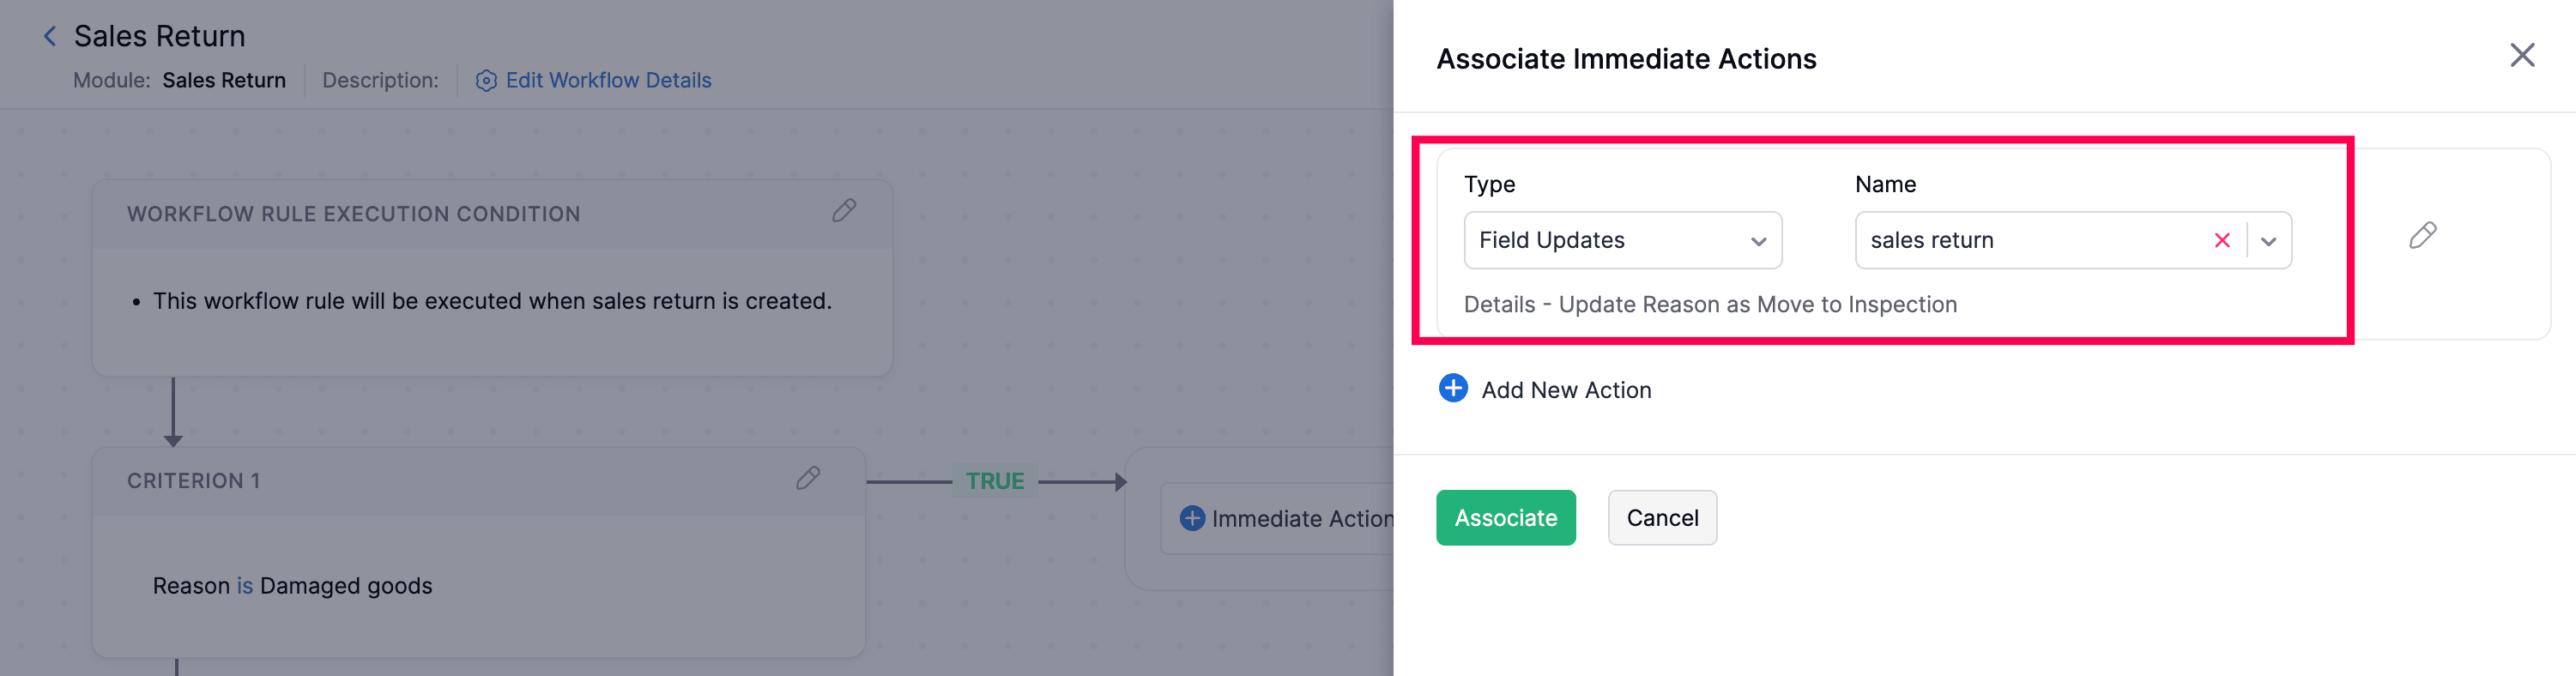
- In the right pane, select the type of workflow action you want to associate with the workflow rule from the Type dropdown. Next, from the Name dropdown, choose the workflow action you created and configured.
- Click + Add New Action to add more actions if necessary.
- Click Associate to finish associating actions with the criteria.

- Click Associate to finish associating actions with the criteria.
- Click Save to apply and finalize the workflow rule settings.
Other Actions in Workflow Rules
- Change the Order of Workflow Rules
- Edit the Workflow Rule
- Clone a Workflow Rule
- Mark a Workflow Rule as Inactive
- Delete a Workflow Rule
Change the Order of Workflow Rules
You can change the order of workflow rules to control the sequence in which they are executed. Here’s how:
Note: To reorder workflow rules, make sure to select a specific Module other than All, Active, ornInactivenas the filter.
- Log in to your Zoho Commerce organization.
- Click Settings in the top right corner.
- Navigate to Workflow Rules under Automation.
- Select the module where you want to change the order of workflow rules by clicking the Module dropdown.
- Click Change Order in the right corner.

- Now, pick and reorder the rules based on your preference.
- Reorder the Workflow Rules.
- Click Save Reorder.
Edit a Workflow Rule
You can edit workflow rules to update their conditions, actions, or other settings in Zoho Commerce. Here’s how:
- Log in to your Zoho Commerce organization.
- Click Settings in the top right corner.
- Navigate to Workflow Rules under Automation.
- Hover over and select the workflow rule you want to edit, and click Edit.
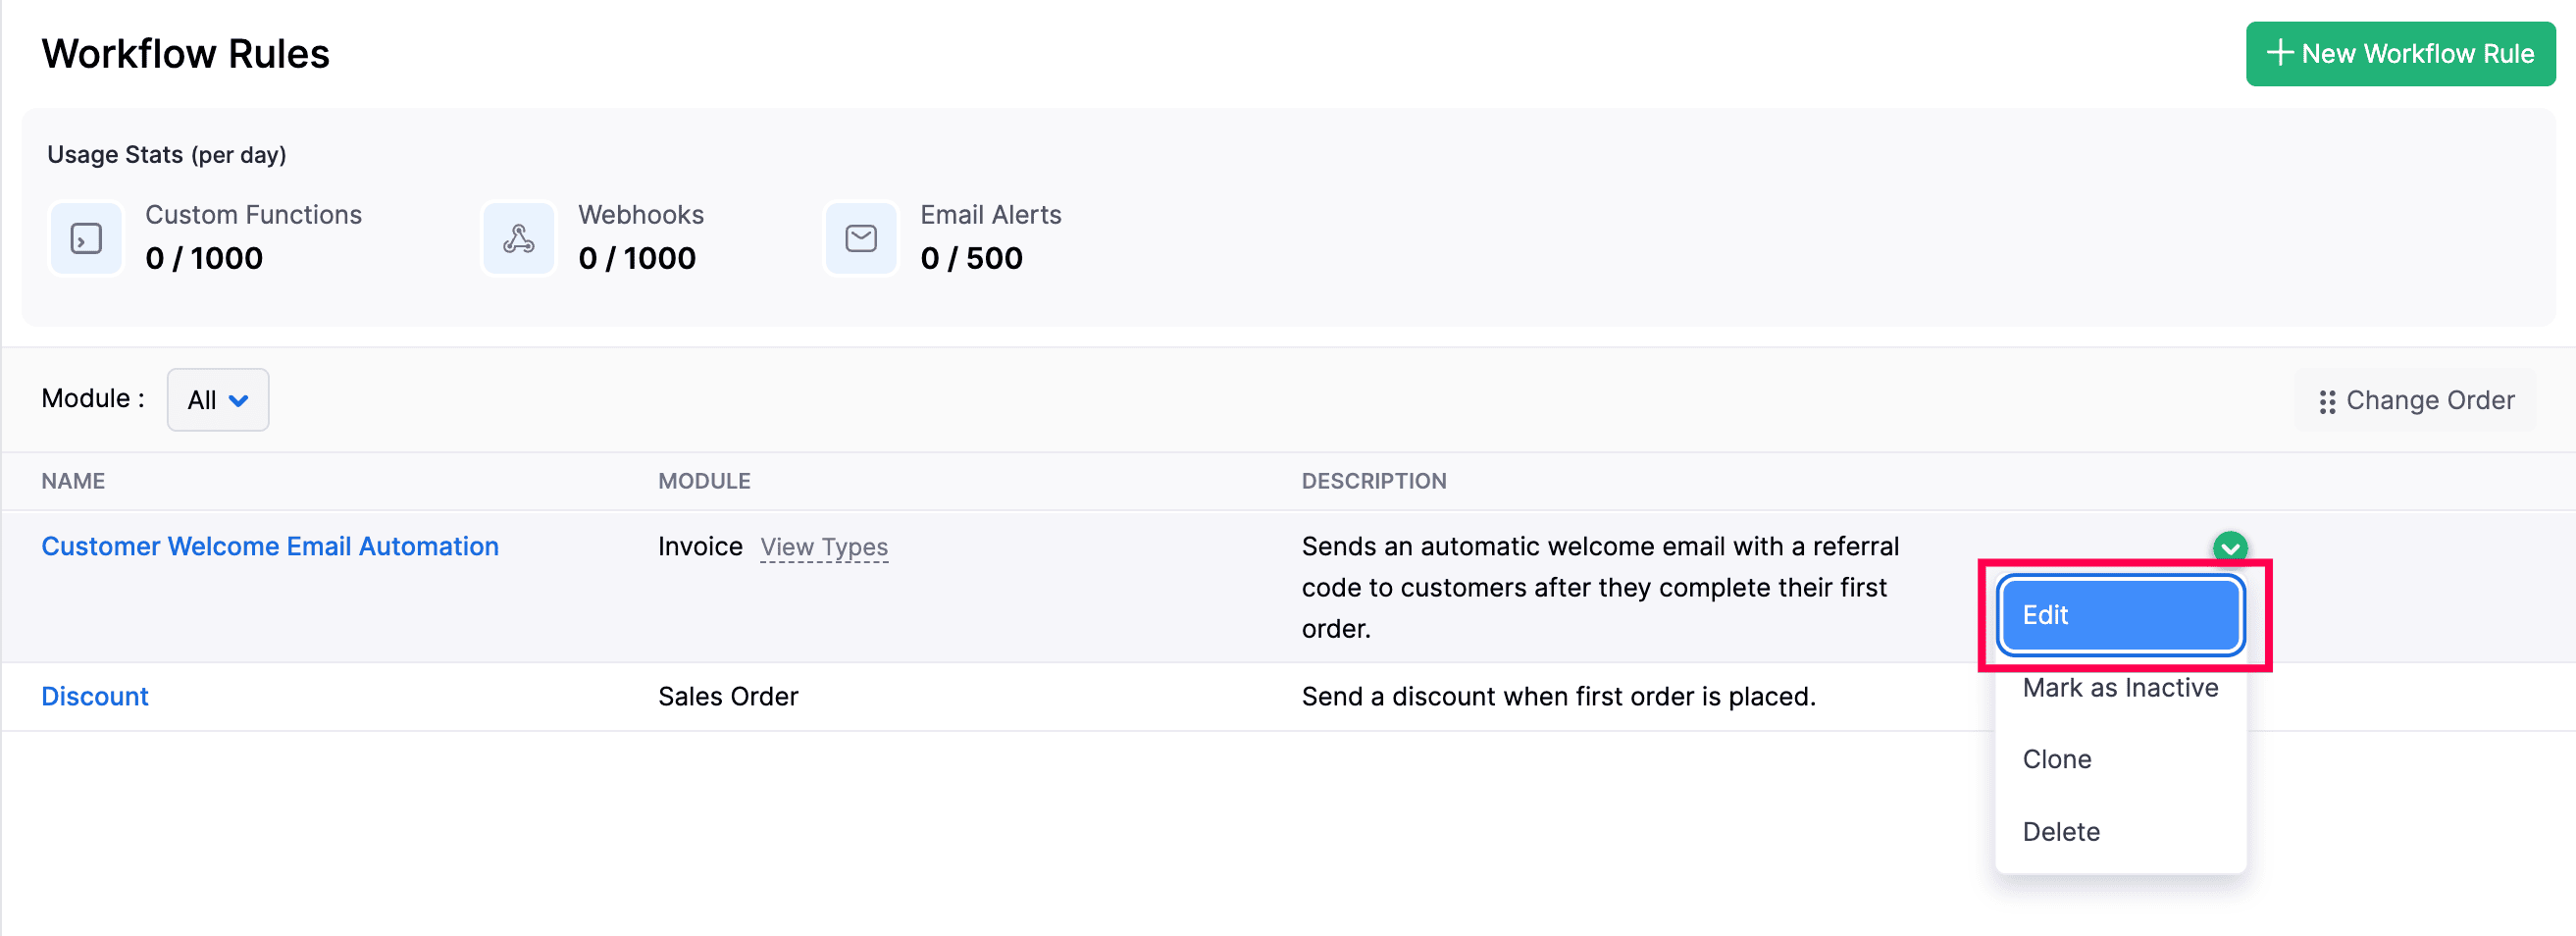
- Make your changes, and click Save.
Mark a Workflow Rule As Inactive
You can mark workflow rules as inactive to temporarily disable their execution without deleting them. Here’s how:
- Log in to your Zoho Commerce organization.
- Click Settings in the top right corner.
- Navigate to Workflow Rules under Automation.

- Hover over the workflow rule you want to mark as inactive, click the dropdown to the right, and select Mark as Inactive.
Clone a Workflow Rule
You can clone the existing rule if you need a new workflow rule with the same details. Here’s how:
- Log in to your Zoho Commerce organization.
- Click Settings in the top right corner.
- Navigate to Workflow Rules under Automation.
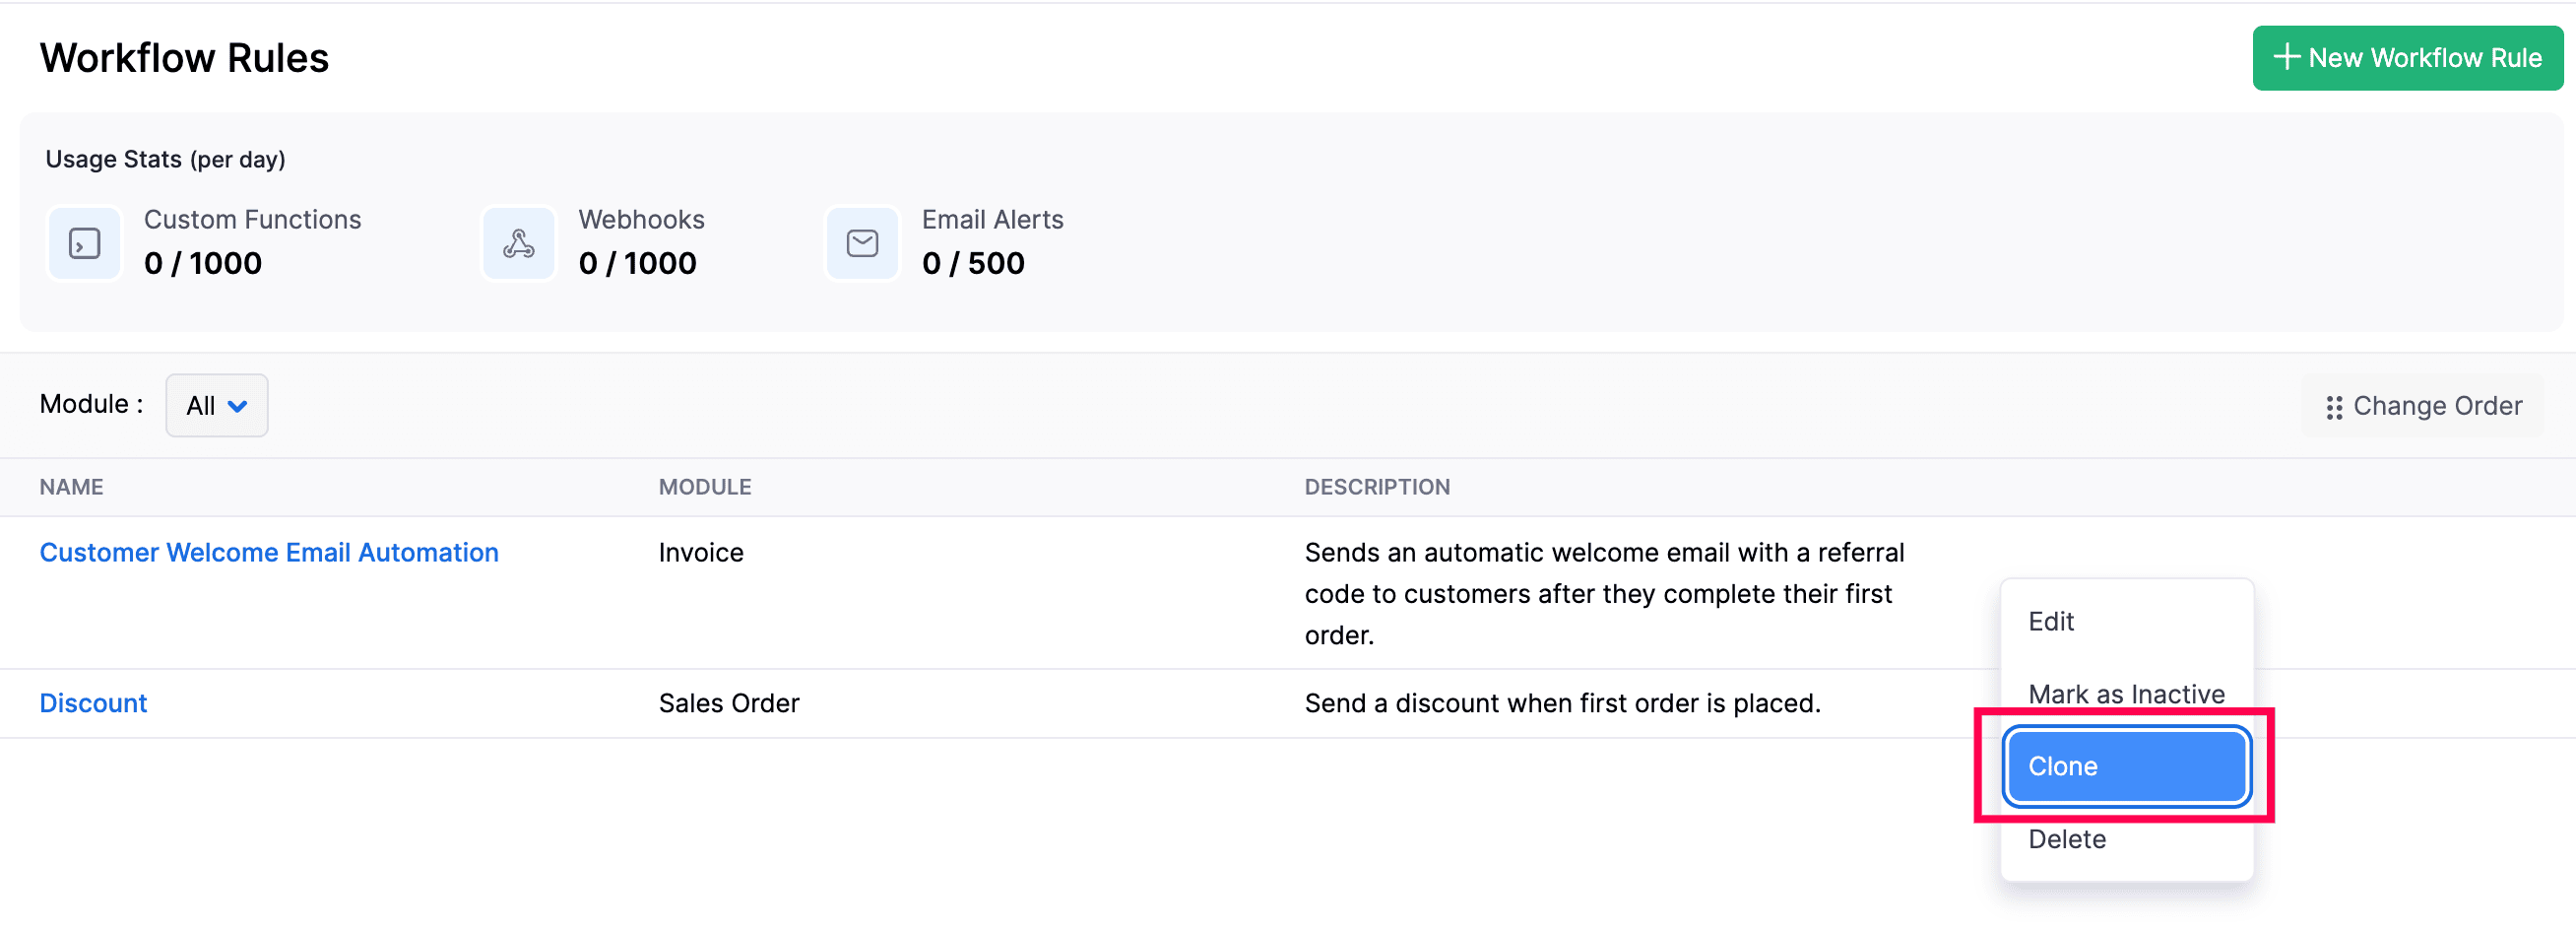
- Hover over the workflow rule you want to clone, click the dropdown to the right, and select Clone.
- In the New Workflow Rule page, review the cloned details.
- Verify the WORKFLOW RULE EXECUTION CONDITIONS, and click Update.
- Click Save.
Delete a Workflow Rule
You can delete workflow rules that are no longer needed in Zoho Commerce. Here’s how:
- Log in to your Zoho Commerce organization.
- Click Settings in the top right corner.
- Navigate to Workflow Rules under Automation.
- Hover over the workflow rule you want to delete, click the dropdown to the right, and select Delete Workflow Rule.
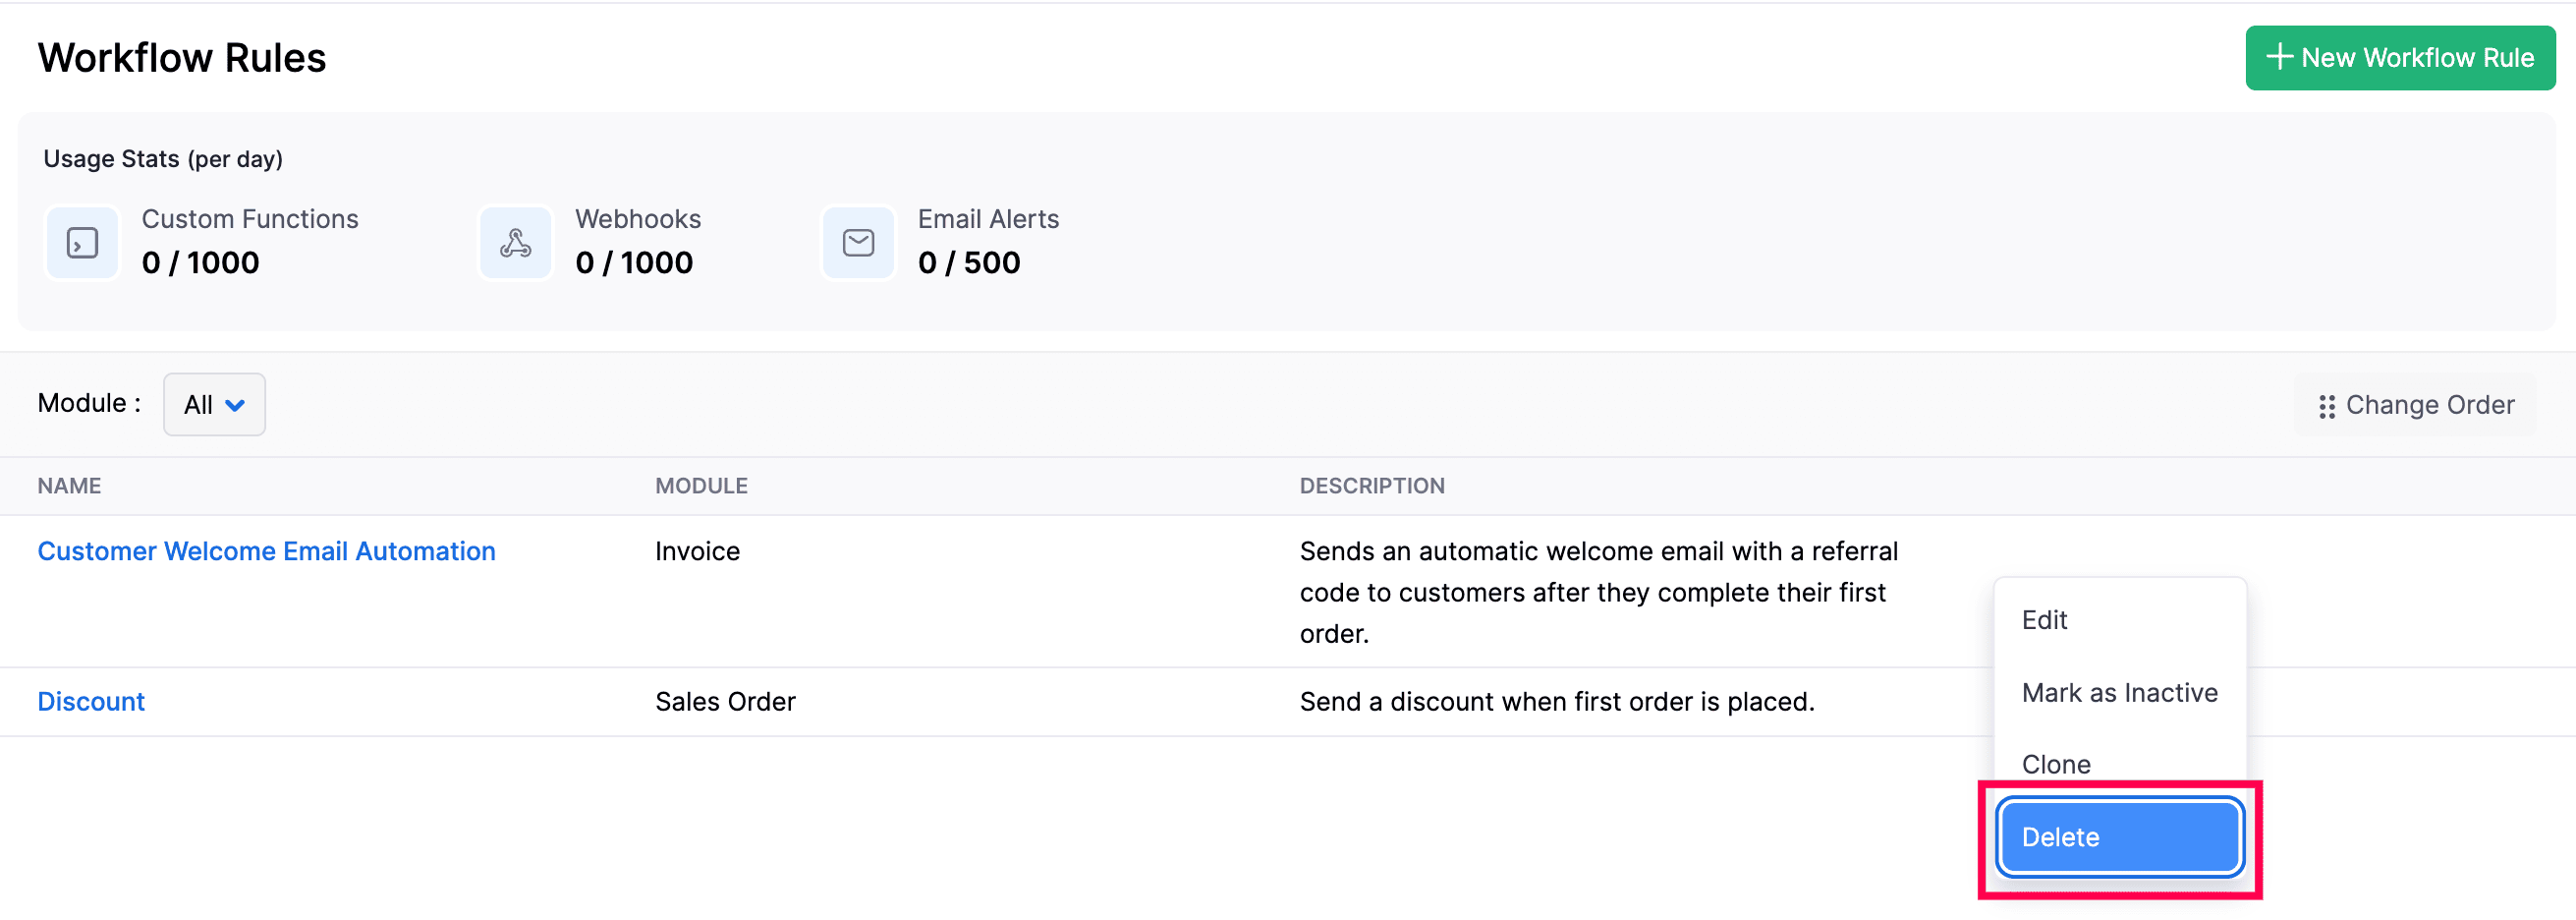
- In the popup, click Yes to confirm.
Workflow Actions
Workflow actions allow you to automate specific responses when conditions are met. Workflow Actions include:
Email Alerts
An Email Alert is a workflow action that automatically sends an email to specified recipients when certain conditions are met.
Scenario: Zylker pvt. Ltd. is an electronics manufacturing company. The Head of Business Development wants to receive email alerts whenever a sales rep creates a quote exceeding ₹5,00,000 for one of their key clients. This ensures timely follow-up and premium service delivery. A workflow can be configured to automatically send out an email alert when the following conditions are met:
-
Execute When: Created
-
Rule Criteria: Total amount due is greater than ₹5,00,000.
-
Immediate Action: Email alert to the Head of Business Development / Sales leadership team.
To create an email alert:
- Log in to your Zoho Commerce organization.
- Click Settings in the top right corner.
- Navigate to Workflow Actions under Automation.
- Go to Email Alerts.
- Click + New Email Alert in the top right corner.

- In the pop-up that appears, fill in the following details:
- Name: Give a unique name for the email alert.
- Module: Select the module for which you wish to create an email alert.
- Email Template: You can pick a template from the drop-down or click on + Add New Email Template if you wish to create a new one.
- Email Recipients: Pick contacts from the drop-down to whom you wish to send the email alerts.
- Additional Recipients: If you wish to send out email alerts to more people, enter their email addresses separated by a comma.
- Click on Save to create a new email alert.
You can now select one of the many email alerts created, from the drop-down, to notify you when a workflow is triggered.
Other Actions in Email Alerts
Edit an Email Alert
- Log in to your Zoho Commerce organization.
- Click Settings in the top right corner.
- Navigate to Workflow Actions under Automation.
- Go to Email Alerts.
- Hover over and select the email alert you want to edit, and click Edit.
- Make your changes, and click Save.
Delete an Email Alert
- Log in to your Zoho Commerce organization.
- Click Settings in the top right corner.
- Navigate to Workflow Actions under Automation.
- Go to Email Alerts.
- Hover over and select the email alert you want to delete, and click Delete.
- In the popup, click Yes to confirm.
Note: You can create a maximum of 5 email alerts for each workflow rule, and a maximum of 500 email alerts can be triggered per day.
In-app Notifications
Zoho Commerce allows you to create in-app notifications to alert users about important events or activities within your organization. You can configure these notifications for any module and specify the conditions under which they should be triggered.
Scenario: Patricia manages an online home décor store using Zoho Commerce. She wants her team to be instantly notified whenever a high-value order (above ₹50,000) is placed, so they can prioritize packaging and delivery. To automate this, she sets up an* in-app notification *rule in Zoho Commerce that triggers whenever an order meets the specified criteria.
- Log in to your Zoho Commerce organization.
- Click Settings in the top right corner.
- Navigate to Workflow Actions under Automation.
- Go to In-app Notifications.
- Click + New In-app Notification in the top right corner.

- In the New In-app Notification page, fill in the following details:
- Name: A unique title to identify the in-app notification.
- Module: Module where the notification will be triggered.
- Recipients: The users or roles who should receive the notification.
- Message: The actual notification text shown to recipients.
- Click Save to create an in-app notification.
Once an In-app Notification is created, you can associate it with a workflow rule.
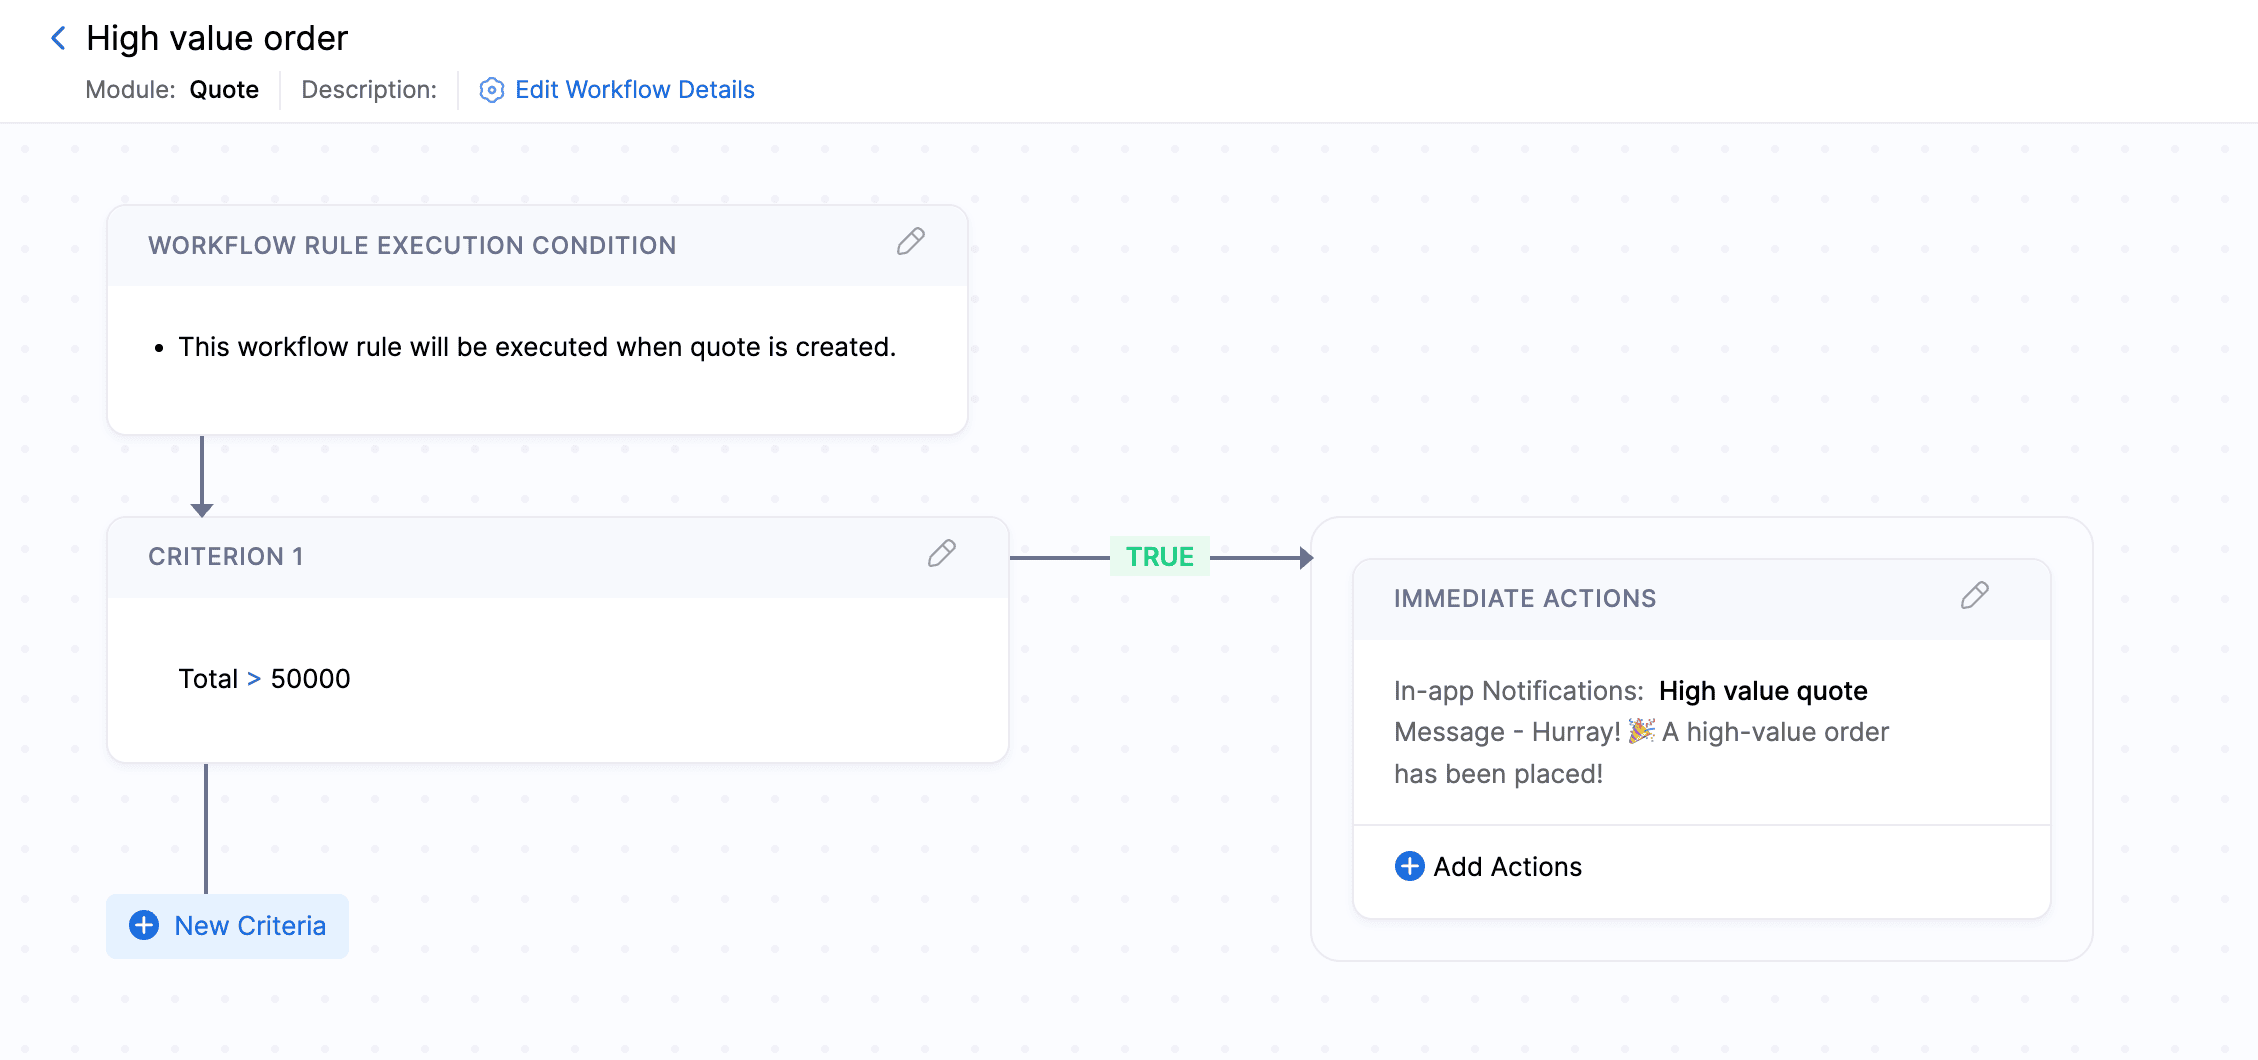
The next time the action occurs, selected recipients will be notified in the Bell icon. Click it to view the details.
Other Actions in In-app Notifications
Edit an In-app Notification
- Log in to your Zoho Commerce organization.
- Click Settings in the top right corner.
- Navigate to Workflow Actions under Automation.
- Go to In-app Notifications.
- Hover over and select the in-app notification you want to edit, and click Edit.
- Make your changes, and click Save.
Delete an In-app Notification
- Log in to your Zoho Commerce organization.
- Click Settings in the top right corner.
- Navigate to Workflow Actions under Automation.
- Go to In-app Notifications.
- Hover over and select the in-app notification you want to delete, and click Delete.
- In the popup, click Yes to confirm.
Field Updates
Field Updates allows you to automatically make changes to a field of a particular module for which the workflow has been triggered. Fields can be updated only for the following Category, Item, Sales Cancel, Sales Order, Invoice, Customer Payment, and Sales Return.
Scenario: Brandon, Regional Sales Head at Zylker Pvt. Ltd., noticed a rise in product returns marked as “Damaged.” To manage this efficiently, the operations team set up a workflow that automatically updates the reason field to “Send to Quality Check” whenever a return is submitted with “Damaged Product Received”, ensuring timely inspection.
-
Execute When: Return is Created.
-
Rule Criteria: Return Reason “Damaged Product Received”.
-
Immediate Action: Update the Reason field to “Send to Quality Check”.
To create a field update:
- Log in to your Zoho Commerce organization.
- Click Settings in the top right corner.
- Navigate to Workflow Actions under Automation.
- Go to Field Updates.
- Click + New Field Updates in the top right corner.

- On the New Field Update page, enter the following details:
- Name: A Title to identify the workflow rule
- Module: Select the module where the workflow will be applied.
- Update: Choose the specific field to be updated.
- Click on Save to create a new field update.
Once an Field Update is created, you can associate it with a workflow rule.
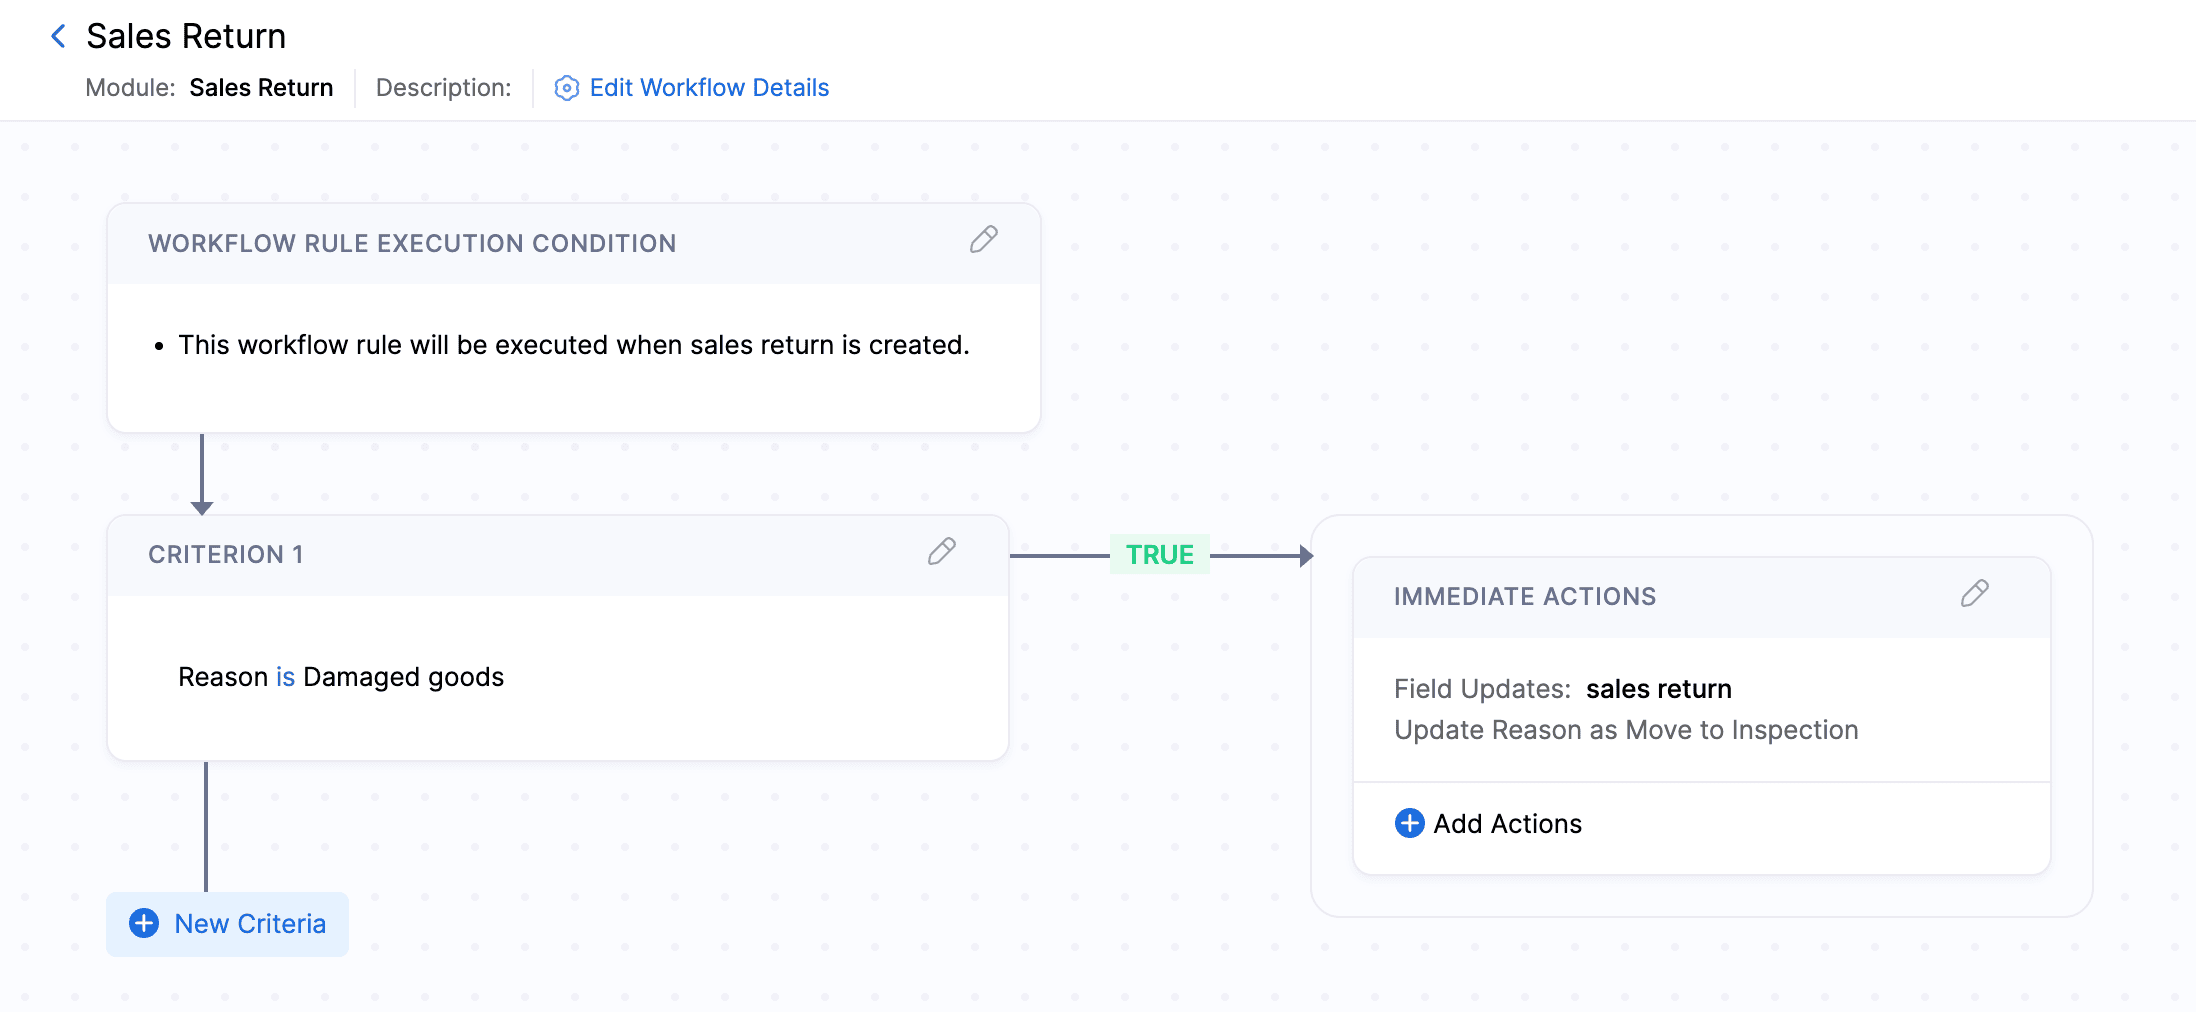
You can now select one of the many field updates created to implement changes when the workflow is triggered.
Other Actions in Field Updates
Edit a Field Update
- Log in to your Zoho Commerce organization.
- Click Settings in the top right corner.
- Navigate to Workflow Actions under Automation.
- Go to Field Updates.
- Hover over and select the field update you want to edit, and click Edit.
- Make your changes, and click Save.
Delete a Field Update
- Log in to your Zoho Commerce organization.
- Click Settings in the top right corner.
- Navigate to Workflow Actions under Automation.
- Go to Field Updates.
- Hover over and select the field update you want to delete, and click Delete.
- In the popup, click Yes to confirm.
Webhooks
Webhooks facilitate communication with third-party applications by sending instant web notifications every time an event occurs in Zoho Commerce. With Webhooks, you can configure HTTP & HTTPS URLs and associate them with workflow rules to automate the notification process.
Scenario: Manish Patel works as a Customer Experience Manager. A new customer requested a quotation for installing smart locks in their apartment. To create a first impression, Manish wants to instantly send a Thank You SMS as soon as the quote is approved. He sets up a webhook in automation to connect with an SMS gateway using the following parameters:
-
Execute When: Created or Edited.
-
Rule Criteria: When Contact Name is “ABC” and Contact Type is “Customer”.
-
Immediate Action: SMS alert using a webhook with SMS gateway.
To create a Webhook:
- Log in to your Zoho Commerce organization.
- Click Settings in the top right corner.
- Navigate to Workflow Actions under Automation.
- Go to Webhooks.
- Click + New Webhook in the top right corner.

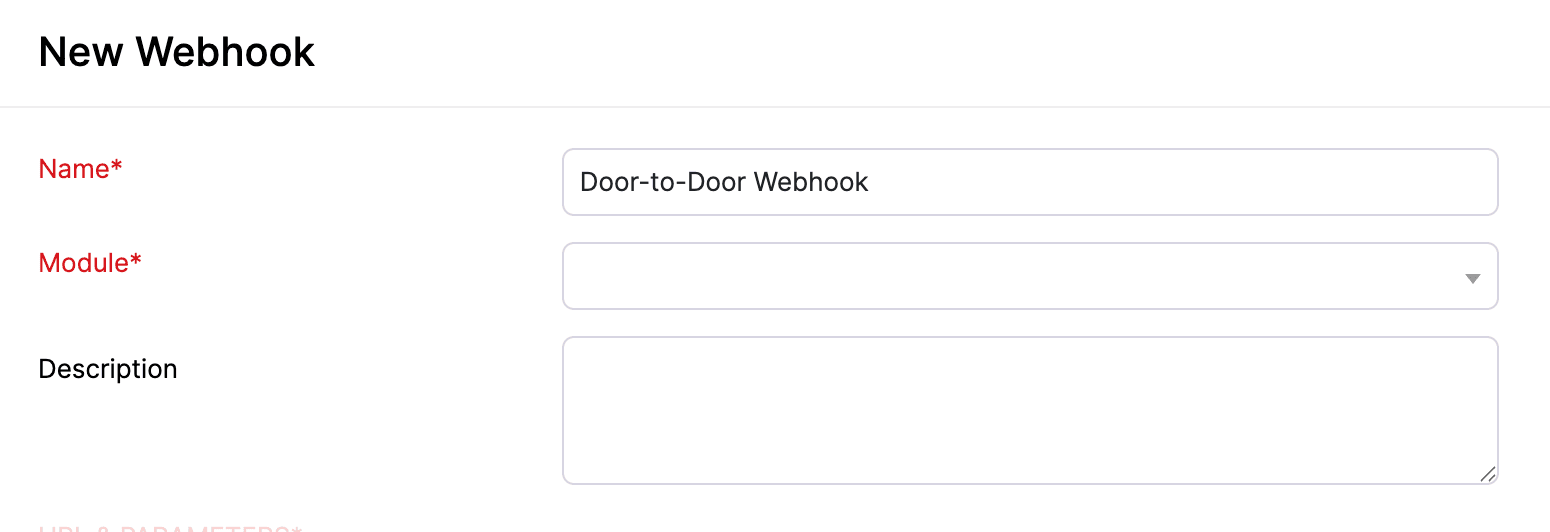
- On the New Webhook page, enter the following details:
- Name: Enter a name for the webhook.
- Module: Select the module for which you want to create the webhook from the drop-down.
- Description: Add a description about the webhook if required.
- In the URL & Parameters field, select the HTTP method and enter the URL of the third-party application. The HTTP methods available in Zoho Commerce are listed below:
- Post: Requests that the data sent be considered as new.
- Put: Requests that the data sent be considered as a modified version of the one already present.
- Delete: Requests that the data be deleted.
Note: If you want to specify a port number in the URL and Parameters field, note that Zoho Commerce only supports port numbers 80 and 443.
- You can Add Parameters if required by entering the required values in the Key and Value fields. You can add custom parameters like Auth Token, Security Token, API Key, and other parameters.

- In the Headers section, you can include any additional information that you want to be included in the HTTP request. Click + Add New Headers if you want to add additional headers.

- Check the I want to secure this webhook option if you want to secure your webhook.
- Enter the secret key in the Secret Token field. This will help to verify whether the webhook was sent from Zoho Commerce.
Note: Secret Key should be alphanumeric and range between 12-50 characters. You cannot edit or view the secret token later.

- In the Authorization Type section, choose how you want to authorize the webhook.
- Self-Authorization: Select this option to set up your webhook by providing the authorization details manually.
- Connections: Select this option to set up your webhook using a connection. Read our help document on Connections to learn how to create connections.

- In the Body section, choose how you want to send the data. You can choose from the following body parameters:
- Default Payload: In the default payload format, all the parameters associated with the module will be sent to the request body in the application/json format content type.
- form-data: Send data as text or files. If you select File, the custom fields for the attachment type created in the module for which you are creating this webhook will be listed in the dropdown.
- x-www-form-urlencoded: In the x-www-urlencoded format, the data will be encoded and sent to the server.
- Raw: In the raw format, you can choose the parameters sent to the request body. The content type will be application/JSON.

- Click Save and Execute to check if the webhook works properly, or click Save if you want to execute it later.
Once an Webhook is created, you can associate it with a workflow rule.
Note: When you set up webhooks, all your contacts’ details in your Zoho Commerce organization (name, phone number, address, and email address) will be shared with the URL you want to notify.
Delete a Webhook
- Log in to your Zoho Commerce organization.
- Click Settings in the top right corner.
- Navigate to Workflow Actions under Automation.
- Go to Webhooks.
- Hover over and select the Webhook you want to delete, and click Delete.
- In the popup, click Yes to confirm.
Custom Functions
Custom functions allows you to write small pieces of code to automate your business processes. You can simply write the logic using Deluge script and link it to a workflow rule. The automation will then run seamlessly based on the defined conditions.
What is Deluge?
Deluge(Data Enriched Language for the Universal Grid Environment) is an online scripting language integrated with Zoho Creator. It enables users to add logic to the application incrementally, making it more powerful and robust.
To know about Deluge, refer to the Deluge Reference Guide.
If you wish to learn Deluge by writing code samples, click here.
Scenario: Patricia owns a supermarket and wants to offer a 10% discount to celebrate her store’s 10th anniversary. She decides to apply the discount to all purchases of ₹2500 or more. Manually applying this discount on every invoice would be time-consuming, so she uses a custom function. By writing a small piece of code, she sets a condition where, if the invoice total exceeds ₹2500, the function automatically applies a 10% discount, saving time and ensuring consistency.
-
Custom function name: Discount.
-
Description: Apply a 10% discount when the invoice total exceeds ₹2500.
-
Module: Invoice.
Script:
//create a variable and get invoice totaltotal = invoice.get(“total”).toDecimal();//set a condition: when invoice amount is >= 2500if ( total >= 2500.00 ){adjustment = invoice.get(“adjustment”).toDecimal();adjustment = adjustment - total * 0.10;jsonstring = “{\“adjustment\”:” + adjustment + “,\“reason\”:\” DISCOUNT \"}";// To update the current recordzoho.commerce.updateRecord(“Invoices”, organisation.get(“organisation_id”), invoice.get(“invoice_id”), jsonstring.toMap());}
She then creates a workflow rule with the following parameters.
Workflow Rule Name: Anniversary discount
Module: Invoice
Workflow type: Event based
When an invoice is: created
Triggers: When total >= 2500
Actions: Custom functions - Discount
Now, when the invoice total is greater than or equal to ₹2500, the workflow will be triggered and the custom function will be executed.
To create a custom function:
- Log in to your Zoho Commerce organization.
- Click Settings in the top right corner.
- Navigate to Workflow Actions under Automation.
- Go to Custom Functions.
- Click + New Custom Function in the top right corner.

- On the New Custom Function page:
- Name: Enter a name for your custom function.
- Description: Add a description if necessary.
- Module: Select the module for which you want to create the custom function.
- Click Save to create a custom function.
Once a Custom Function is created, you can associate it with a workflow rule.
Schedules
Zoho Commerce lets you create and run predefined tasks at the specified time intervals using schedules. You can create your tasks using a deluge script and schedule this task to be executed at a particular time or on a recurring basis.
Scenario 1: Patricia runs a supermarket. At the end of every month, he wants to give a 10% off on the Next Purchase to customers whose total purchase for the month exceeds a certain amount, let’s say 1000. Peter creates a schedule to email this to selective customers on the last day of the month.
Scenario 2: Patricia runs a supermarket. At the end of every month, he wants to give a 10% off on the Next Purchase to customers whose total purchase for the month exceeds a certain amount, let’s say 1000. Peter creates a schedule to email this to selective customers on the last day of the month
Scenario 3: Patricia sets a quarterly sales target for her territorial managers. Every four months, she has to send them their Profit and Loss reports and a congratulatory email when they have achieved their target or a motivating email for them to perform better. She writes a function and schedules it to be sent to her *staff once every four months.
Creating New Schedules
To create a custom schedule:
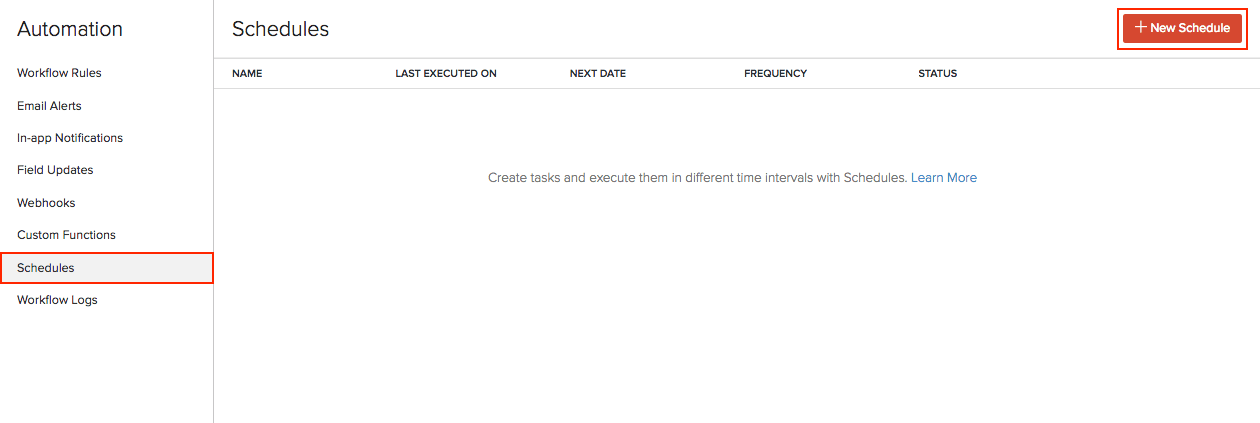
- Log in to your Zoho Commerce organization.
- Click Settings in the top right corner.
- Navigate to Schedules under Automation.
- Click + New Schedule in the top right corner.
- On the New Schedule page:
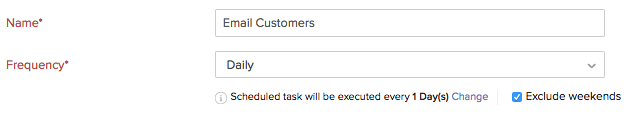
- Enter a Name for your schedule.
- Set the Frequency and recurrence pattern for the schedule to be executed. This can be Daily, Weekly, Monthly, or Yearly.
Insight: The recurrence pattern lets you decide when the custom schedule should be executed. You can choose to execute it on the set frequency.
-
Select how frequently the task should be executed.
-
Daily: The task will be executed every day (or based on your recurrence pattern). You can choose to exclude the weekends.
- Weekly: The task will be executed once a week. Select the day of the week on which the task should be executed.

- Monthly: Task will be executed once a month. This can be a specific date or a day in a month. For example, you can choose to execute it on the 5th of every month or the second Saturday of every month.

- Yearly: Task will be executed once a year. You can select the month and specify the date of execution or specify the day. For example, the task can be executed on the first Sunday in January or just January 5.

- Set the Start Date and Time.
Warning: The start date of a schedule cannot be more than one year from the creation date.
- Select when the schedule should expire. It can expire after many executions or on a set date or not expire at all.

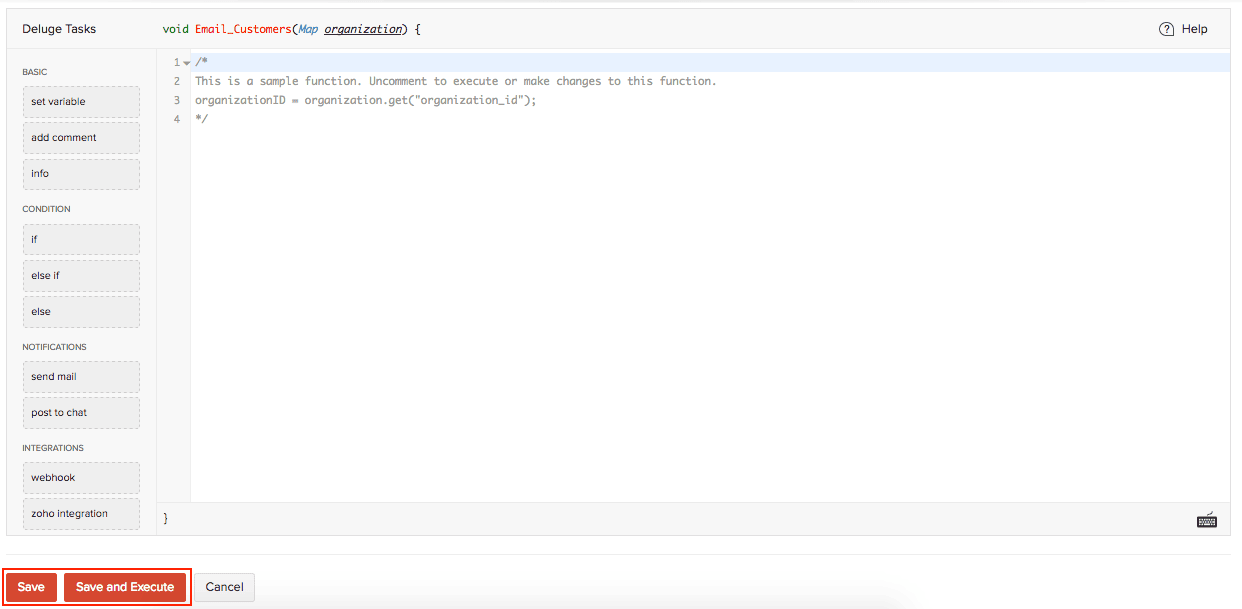
- Drag and drop options to create a Deluge function that will help to create your function.
Insight: Deluge (Data Enriched Language for the Universal Grid Environment) is an online scripting language integrated with Zoho Services. It enables you to write your own functions that let you modify the application to suit your needs incrementally, making it more powerful and robust.
- Click Save or Save and Execute to run it.
Insight: You can create a maximum of 10 custom schedules.