Customer Journey in
a Retail Industry
Objective: A retail business maps its customers' journeys to increase sales and productivity.
- Scenario
- Setting up
Scenario
A retail outlet sells food items and household products online. The customers browse their inventory, select the products they want, pay for them, and get them delivered to their address. However, the company business has not scaled with the number of customers that visit the website and like their products. A preliminary analysis revealed that many customers churned out in the middle of the sales funnel and were not followed up with by the sales team.
Though the reps tried as much as possible to engage these customers with different marketing tactics, over time they were finding it difficult to track the exact stage where the customers left the business and follow up with them accordingly. They want to pitch promotional offers, discount vouchers, and other offers based on the customers' interests and preferences in order to provide a better selling experience.
The company wants to retain existing customers in the sales process by engaging them with relevant marketing activities. To achieve this, they have to monitor individual orders and customer movements and pay attention to their overall journey.
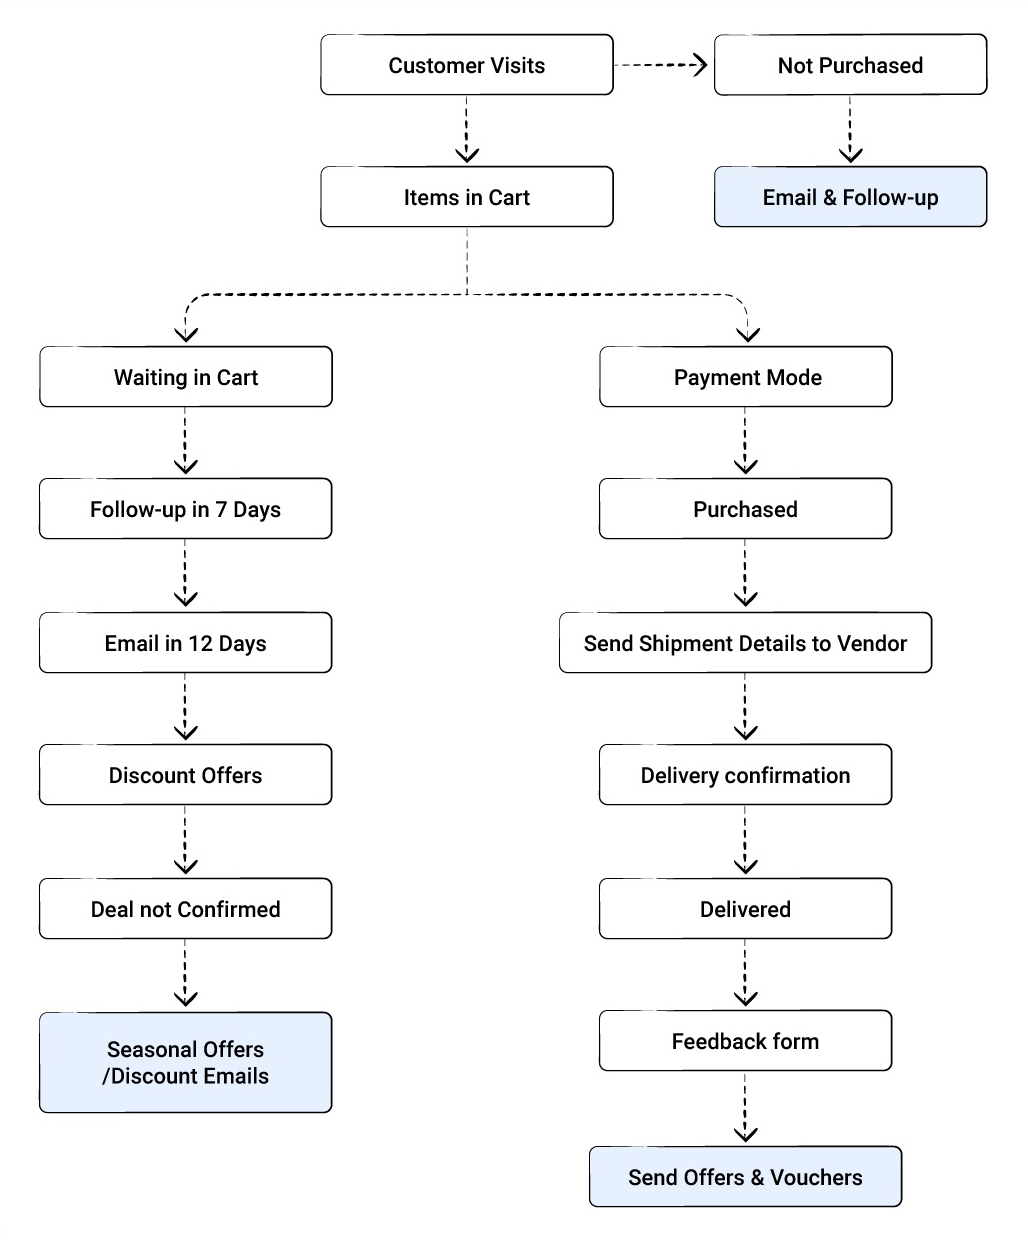
Activity Diagram:
A flowchart showing the marketing activity based on customer's response.

Flow of Events
Website visit: Customers browse the inventory and add items to their cart. If they don't select any products, an email is sent to them a day later to enquire if they encountered any problems or if they need assistance picking the right product. A follow-up call is also made after another day.
Items in cart: If the customer leaves products in their cart and does not purchase them for a week, an email is sent to remind them about the items waiting in their cart. If the purchase remains incomplete, they are periodically sent promotional emails.
Purchased: The customer makes an online payment for the items and the order details are sent to them via email. A second email is sent with a list of similar items based on their purchase history.
Shipment: Once the payment is complete, the invoice is sent to the customer and the vendor is notified of the items and the delivery address.
Delivery confirmation: Once the items are shipped, the delivery date and time is communicated to the customer.
Delivered: The items are delivered to the customer and delivery is confirmed with the customer and company.
Feedback: Once the delivery is completed, a feedback form is sent to the customer via email. Regular customers are sent seasonal vouchers, gift cards, and promotional offers as a reward for their loyalty.
Problem
As customer behavior varies based on buying pattern, requirement, and interest; it becomes challenging for the sales and marketing teams to build personalized customer retention strategies. In order to enable its teams to build such a journey, the company should:
- Pinpoint the exact stage where a customer churned out from the sales process. This information will help them understand a customer's interest and allow them to provide a more personalized selling experience and increase satisfaction.
- Visualize the entire sales process and automate a set of predefined activities based on where the customers are in the sales process. This will reduce manual effort and increase productivity.
- Focus more on their existing customer base rather than spending a fortune on marketing activities to target new customers.
Let us see how CommandCenter can help them achieve the above requirements.
Setting up CommandCenter
CommandCenter provides a unified platform to follow a sales process from its beginning to the end and gives you a complete picture of a customer's journey. For example, some customers leave products in their cart, some browse the website but don't pick a product, and some who have made a purchase in the past, do not return for a long time. By configuring CommandCenter, the company can monitor individual customers' positions in the sales process and engage them with relevant marketing actions.
The states, transitions, and actions that are configured for the process are as follows:
States
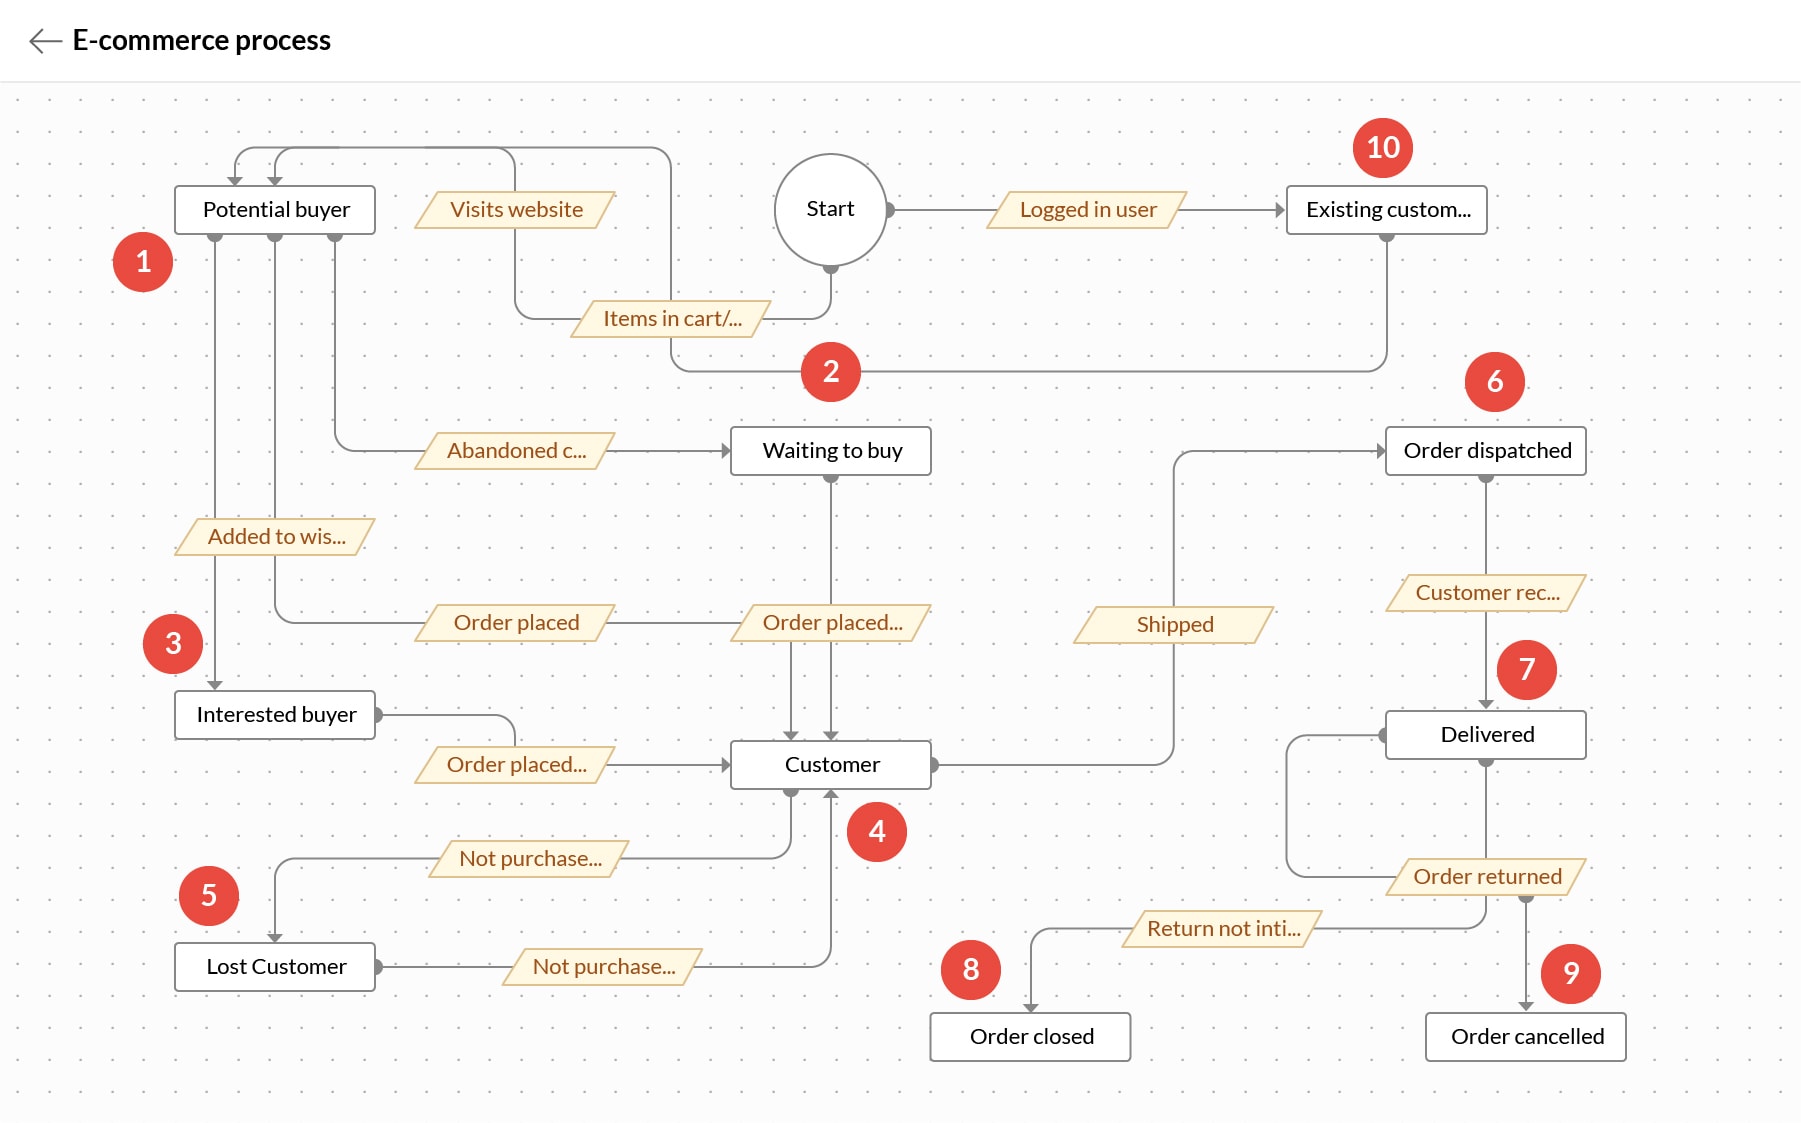
The stages that the customer moves through are called states in CommandCenter. Potential Buyer > Interested Buyer > Customer > Claim Approved > Order Dispatched > Delivered > Order Closed.
Transitions
The mandatory condition that needs to be fulfilled in order to move to the next state is called a transition. So, a customer can only move from being a potential buyer to an interested buyer if they add products to their wishlist. Adding a product to this wishlist is therefore a transition between the Potential Buyer and Interested Buyer states. We will look at all the transitions in the table below.
Actions in states and transitions
Any action that should occur automatically such as sending an email or SMS, or notifying vendors when the customer is in a particular state or transition can be configured as actions. For example, when the payment link is clicked, the payment details are sent via email to the customer. We will look at all the actions in the table below.
Here is how the CommandCenter model of the process will look like.
**The numbers represent the states and the yellow colored boxes are the

Let us see how to build the above model in CommandCenter.
- 1.Go to the CRM Setup > Process Management > CommandCenter.
- 2.Click Create Journey and enter the following information:
- Journey name: Claim management.
- Description: Journey of the customer from policy purchase to claim settlement.
- 3. Click Proceed.
- 4.In the Journey Builder page, click Click to add State.
- 5.Create State: In Create State, enter the State Name, Description, and choose the module under Type.
- 6.Click Save.
You will be redirected to the journey builder page. You can either add an Action for the created state or click + Add State, to include the next state. - 7.Action for State: Click Actions tab for the state and select from of the following action types:
- Instant
- Scheduled
- Recurring
- 8. Click Save, to save the action.
- 9. Click + Add State Repeat steps 5 to 8.
- 10.Create Transition: Click the + icon displayed between the two states, to add a Transition.
- 11.In the Transition info tab, enter the Transition name, Description, and Trigger on.
- 12. Click Save.
- 13.Action for Transition: Click Actions tab, to add an action to the transition.
- 14. Click Conditions tab, to set the transition for selected records only.
The table below shows the states, transitions, and actions configured to build the buyer's journey.
| Default State | Transition | State 1 |
|---|---|---|
Name: Start | Name: Customer visits Website When it will be triggered: When an API call is received. Automatic Action: Create a record in the Leads module using a function. | Name: Potential Buyer |
(The system will check if a user already has an account in CRM using the Email Address field, which is a default unique field. The record will be automatically merged with the existing account and displayed in the appropriate module.)
You have successfully configured customer journey for retail.