Deluge in Zoho Connect
- Zoho Connect features that support Deluge
- Related Links
Zoho Connect features that support Deluge
Zoho Connect supports Deluge in the following seven areas:
- Incoming webhooks - Execute a Deluge custom function upon an event in another service.
- Outgoing webhooks - Execute a Deluge custom function in another service upon an event in Connect.
- Function APIs - Execute a Deluge custom function to format the request and response structure of an API to match the requirements of a specific service.
- Workflow - Execute a Deluge custom function on the specified workflow.
- Scheduler - Execute a Deluge custom function based on a schedule.
- Custom Menu - Execute a Deluge custom function on a click of a custom button.
- User sync - Execute a Deluge custom function and perform customized actions on the input data.
Note:
To use custom functions that require fetching data from other services, the owner of the Connect account must hold an account in the respective Zoho products.
Incoming webhooks
Incoming Webhooks allow you to post messages from different apps to your Zoho Connect Network, so that you can stay updated on activities in other applications without leaving Connect. With Deluge, you can write custom logic that will be triggered upon an event in another application.
Navigation to Deluge
- Click the Settings icon at the top-right corner.
- Under Automation, click Incoming Webhook.
- Click Configure and enter the required details.
- Expand the Handlers section and click Write function.
Example
Let's assume that you had conducted a live workshop and collected the email addresses of the event attendees. Now, you've built a form named Feedback Form using Zoho Forms and emailed the form to your attendees. When an attendee fills in their details in the form and clicks submit, an incoming webhook will be triggered and the attendee's feedback will be added as a post inside the Feedback Group in Zoho Connect. Additionally, you can also present the feedback post in a presentable manner by using the advanced formatting options available for incoming webhooks.
See how it works
Steps to follow
The Feedback Form is used by all the event attendees to submit their valuable feedback This feedback is stored in the Feedback field in the same form. First, let's generate the Webhook URL in Connect and configure a custom function to post the required content.
Step 1: Generate webhook URL
- Click the Settings icon at the top-right corner.
- Under Automation, click Incoming Webhook.
- Click Configure and enter the required details.
- Expand the Webhook URL section. The URL will be auto-generated and you can use this URL to post messages.
Note: Ensure this URL is kept safe and regenerate it whenever you want.
- By default, the incoming webhook will be enabled. You can toggle the Enable button at the top to disable it.
Step 2: Create a feedback form using Zoho Forms
To create a form using Zoho Forms, click here. Next, let's use the generated webhook URL inside Forms to process the data collected through Zoho Forms in a defined format. Later, this data gets posted in your Zoho Connect Group.
Step 3: Configure webhook in Forms
- Click the Integrations tab from the form builder and select Webhooks from the left menu.
- Click Configure Webhook and fill in the following details:
- Webhook URL: The URL to which the form submission should be sent. Here, you need to enter the URL generated in step 1.
- Content Type: Notifications are sent to your Webhook URL through an HTTP POST request. Here, we've chosen the application/json content type.
- Under Payload Parameters, define a parameter name and choose the relevant form fields under Parameter Value.
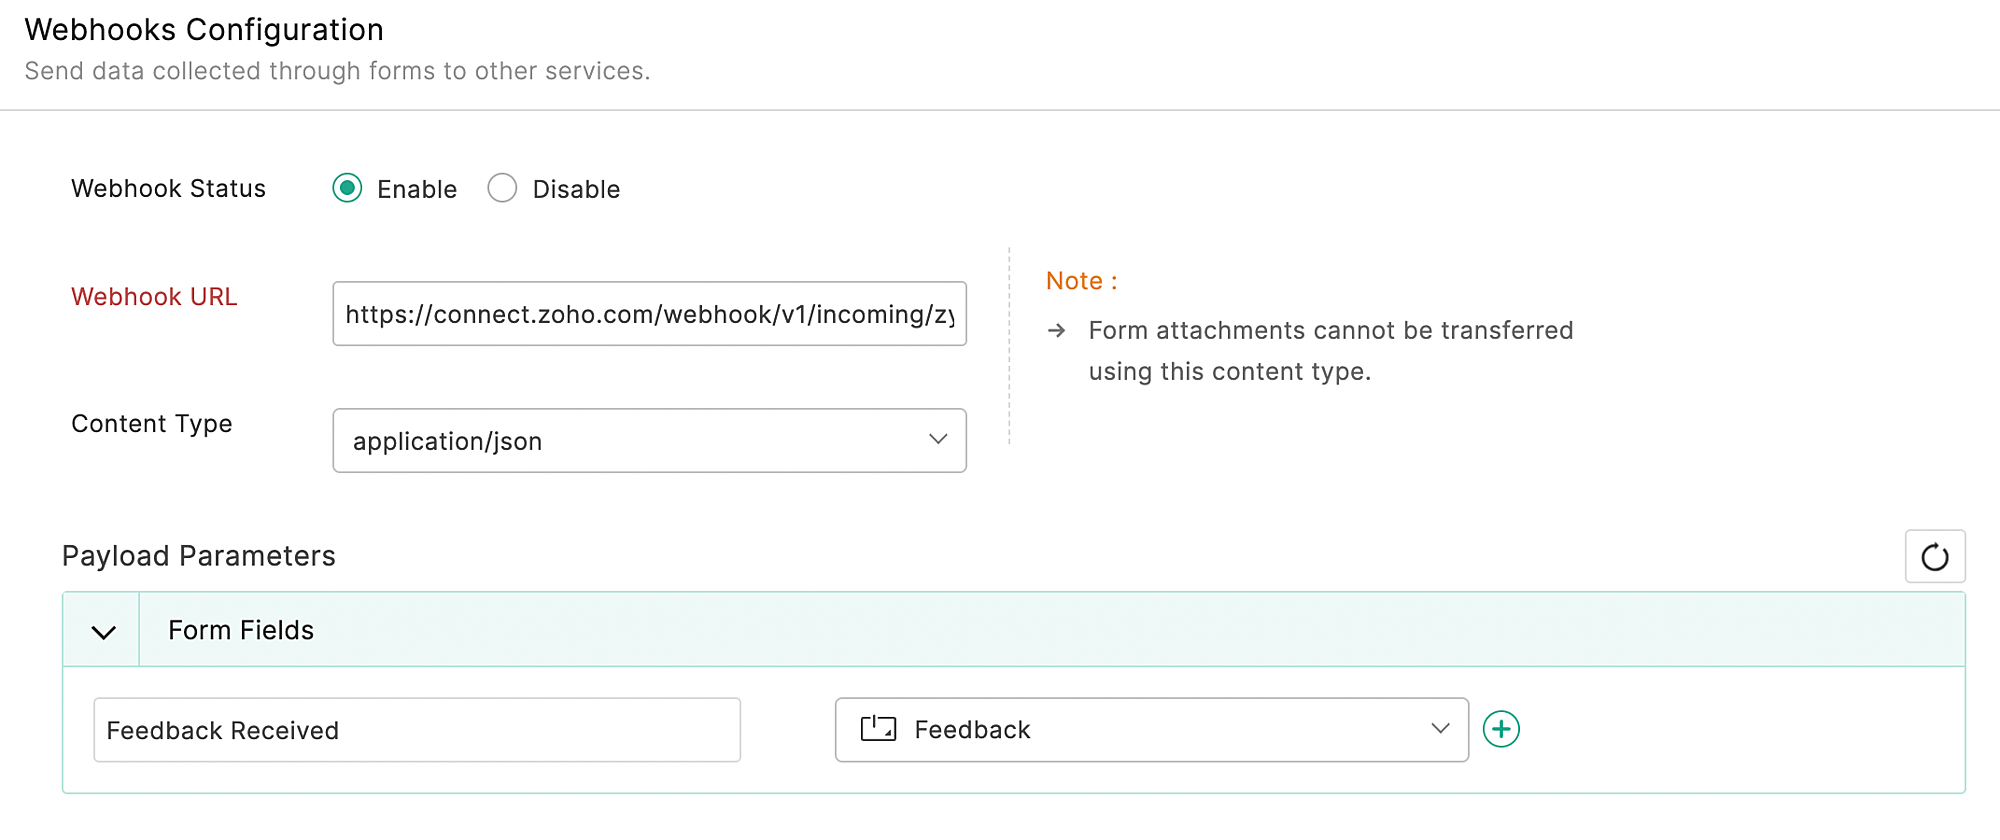
- Click Save to save your settings and the webhook will be enabled for this form.

Let's script using Deluge to fetch the feedback received via the Feedback form and post the same as a post in the Zylker Feedback group.
Step 4: Navigate to the Deluge editor
- Click the Settings icon at the top-right corner.
- Under Automation, click Incoming Webhook.
- Select the required configured webhook. Click Edit configuration in the popup will appears.
- Scroll down and click Expand beside the Handlers section.
- Click the Edit function button.
Step 5: Script using Deluge
// Construct a variable to store the feeback received from the feedback field.
feedback = body.get("Feedback Received"
);
//Construct a map to store the response
returnMap = Map();
//Construct a map to store the message in the supported format
payloadMap=Map();
payloadMap.put("message",feedback);
returnMap.put("payload",payloadMap);
returnreturnMap;
Outgoing webhooks
An outgoing webhook enables you to trigger real-time Zoho Connect updates to your other Zoho products or third-party applications. This trigger happens when updates are posted via an authenticated URL (webhook URL) obtained from the third-party application.
Navigation to Deluge
- Click the Settings icon at the top-right corner.
- Under Automation, click Outgoing Webhook.
- Click Configure and enter the required details.
- Expand the Handlers section and click Write function.
Example
Let's assume you've created a group named "Zylker Events" in your Connect Network. As an admin, you add team events (inside the Events tab) in your group and want the event data to be pushed to your Zoho Calendar account, every time an event is added. You can use the outgoing workflows to configure a custom function that pushes the required data to your Calendar account. This'll enable you to organize your team events with shareable calendars, while keeping your team in the loop.
See how it works
Steps to follow
You can create a Connect group named Zylker Events by following the steps mentioned here. Also, you (the account owner) need to have an account in Zoho Calendar to sync your event data from Connect.
Step 1: Configure webhook in Connect
- Click the Settings icon at the top-right corner.
- Under Automation, click Outgoing Webhook.
- Click Configure, enter the required details, and click Save.
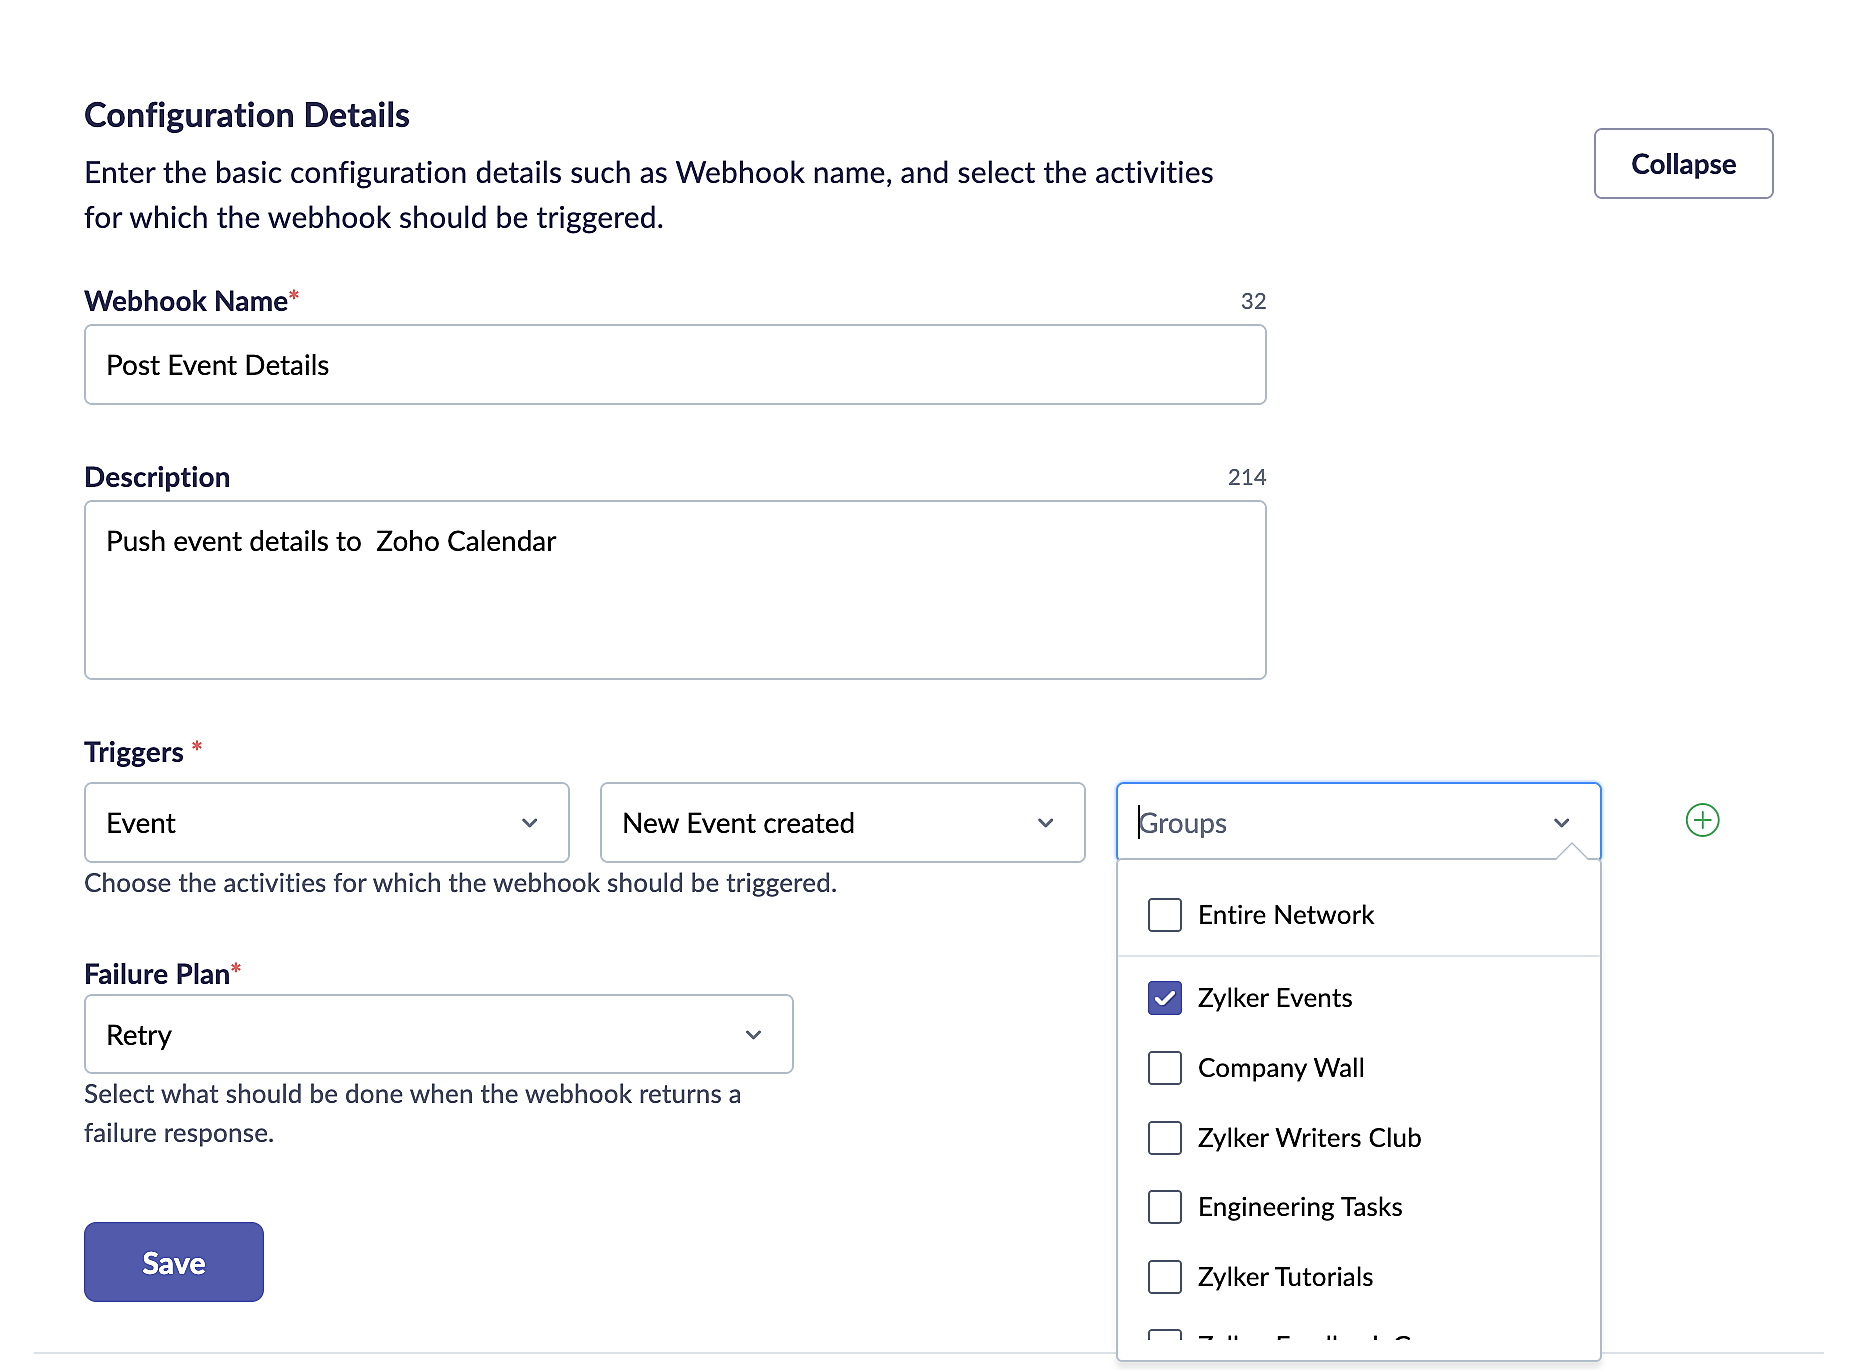
- Expand the Handlers section and click Write function. The Deluge editor will open.
- Write the script and click Save.
- Click Publish to save and use the outgoing webhook.

Step 2: Create a connection
- Navigate to the Settings page.
- Under Developer Space, click Connections.
- Click Create Connection. Select the Default Services tab under Pick Your Service.
- Select the Zoho OAuth service from the list of services.
- Enter a suitable Connection Name. Here, we named it calendar. The Connection Link Name will be auto-filled accordingly.
- Choose the following scope — ZohoCalendar.event.ALL (or) ZohoCalendar.event.CREATE. Refer to this Events API page to know about the relevant scopes.
- Click Create and Connect. You'll be redirected to the service authentication page.
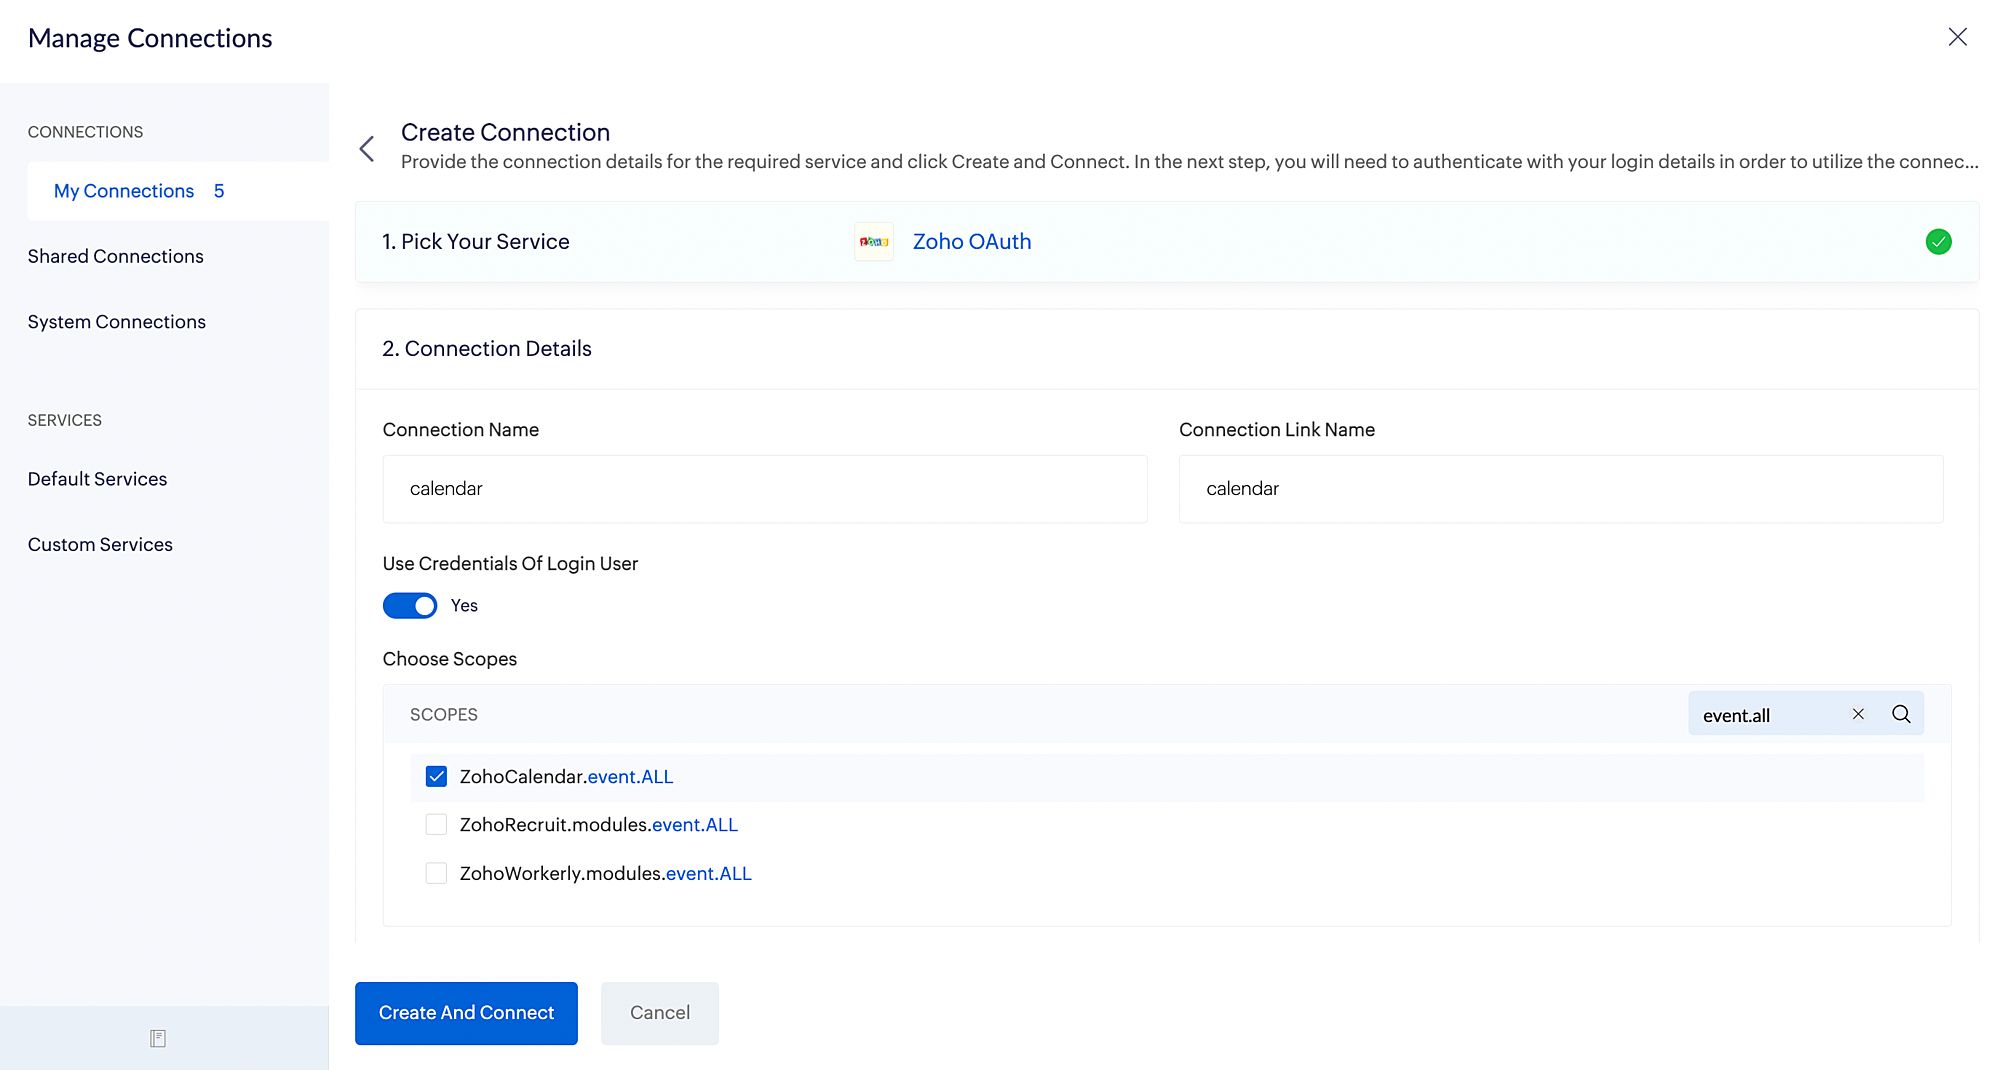
- Click Connect, then click Accept to allow DRE to access data in your Zoho account. The required connection is now created.
- The CONNECTION SUMMARY page will display your connection details.

Step 3: Script using Deluge
//Construct a map to store the response
returnMap = Map();
title = triggerData.get("payload").get("title");
start_time_in_ms = triggerData.get("payload").get("startTimeInMillis").toNumber();
start_time = toString(start_time_in_ms,"yyyyMMdd'T'HHmmss","US/Pacific");
end_time_in_ms = triggerData.get("payload").get("endTimeInMillis").toNumber();
end_time = toString(end_time_in_ms,"yyyyMMdd'T'HHmmss","US/Pacific");
dateandtime_map = Map();
dateandtime_map.put("timezone","US/Pacific");
dateandtime_map.put("start",start_time);
dateandtime_map.put("end",end_time);
isallday = triggerData.get("payload").get("isAllDay");
reminder1 = Map();
reminder1.put("action","popup");
reminder1.put("minutes","-60");
reminders_list = List();
reminders_list.add(reminder1);
eventDetails = Map();
eventDetails.put("estatus","added");
eventDetails.put("title",title);
eventDetails.put("reminders",reminders_list);
eventDetails.put("dateandtime",dateandtime_map);
eventDetails.put("isallday",isallday);
event = Map();
event.put("eventdata",eventDetails);
calendar_res = zoho.calendar.createEvent("fd8790c915414fbebc4abafbedf118f1",event,"calendar");
return returnMap;
Step 4: Create an event in Connect
- Select the required Connect group and navigate to the Events tab.
- Click the "+" icon to add a new event.
- Add the required details and click Create.
- You can navigate to your Zoho Calendar account and view the event added in the Zylker Events calendar under the Group Calendar section.
Function API's
While integrating applications using APIs, the request and response structure of one application might not usually meet the requirements of the other application. Function APIs include handlers that let you format the request and response structure of an API to match the requirements of a specific application. You can write a custom function using Deluge scripts to define how the request needs to be handled or customized by these handlers. Depending on the type of request made, the relevant handler is triggered.
Navigation to Deluge
- Click the Settings icon at the top-right corner.
- Under Developer Space, click Function API.
- Click Configure and enter the required details.
- Expand the Handlers section and click Write function.
Example
Let's imagine that you had recently organized a volunteer recruitment program among students. You have emailed them a Volunteer Recruitment Survey that covers every facet of the recruitment process to understand what draws potential volunteers to your organization. When an interested student fills in their details and submits the survey, you can configure the function API to trigger a webhook to automatically add that student to your Connect group. This is implemented using an outgoing Webhook in Zoho Survey that will make a POST request to an API endpoint in Zoho Connect.
See how it works
Steps to follow
Step 1: Create connection
Create a connection with the following details. This will be used later in the Deluge script to invoke an API.
- Select Zoho OAuth service
- Choose the following scope — zohopulse.grouplist.CREATE.
Step 2: Create a volunteer survey using Zoho survey
- While creating the survey, you need to add a Boolean question type and configure the following.
- Enter the question as Would you like to join our group for volunteers?
- Tick the checkbox beside make this question mandatory.
- Set the Display format as checkbox.
- Add an email question type and configure the following.
- Enter the question as Enter your email address and we'll add you to our group!
- Tick the checkbox beside make this question mandatory.
Step 3: Configure a function API
- Click the Settings icon at the top-right corner.
- Under Developer Space, click Function API.
- Click Configure and enter the required details.
- Expand the Handlers section and click Write function beneath POST request handler. The Deluge editor will open.
- Write the script and click Save.
- Click Publish to save and use the function API.
Step 4: Script using Deluge
//Construct a map to store the response
returnMap = Map();
// Fetch the email stored in your form's response and add the interested users to your Connect group
user_email = params.get("email");
if(params.get("Interested") =="Yes")
{
userDetails=zoho.connect.addUsersToGroup(526492000000002008,526492000000026001,user_email,"adduser");
}
//Returns the response
return returnMap;
Workflow
Workflows allow you to create a set of rules for Zoho Connect modules such as Profile, Feed, Events, Tasks, Polls, and Announcements, based on which the defined actions would be performed in a repetitive manner. These rules can automate the process of assigning tasks, creating events, and adding users to a Group or Board whenever a rule is triggered, using Deluge.
Navigation to Deluge
- Click the Settings icon at the top-right corner.
- Under Automation, click Workflows.
- Click Configure and enter the required details.
- Expand the Handlers section and click Write function.
Example
Currently, in Connect, we can enable the Moderation option to allow group admins (moderators) to approve all posts and comments made in the group before they are made visible to everyone. To automate this process, we can use the Deluge AI tasks - analyse sentiment and keyword extraction, to check the Connect posts for sentiments, and extract the keywords that deem it unsuitable to be shared with a wider audience. For example, you have created a Zylker Writers Club group in Connect that allows its members to post their write-ups on a monthly basis. A workflow can be configured to check the live posts for their content. You can write a custom function for the workflow using Deluge to send a mail to the group admin asking them to review the posted content if the posts contain sensitive/hurtful content. Additionally, you can also configure the same function to create a task to be assigned to yourself (admin) with priority set as "high" and status as "to be reviewed". If the posts do not contain any sensitive content, an email can be sent to the group admin notifying them that posts have been made live in their group.
See how it works
Steps to follow
Step 1: Create a connection
Create a connection with the following details. This will be used later in the Deluge script to invoke an API.
- Select Zoho OAuth service
- Choose the following scopes.
- ZohoPulse.tasks.READ
- ZohoPulse.tasks.CREATE
- ZohoPulse.post.CREATE
Step 2: Configure workflow
- Click the Settings icon at the top-right corner.
- Under Automation, click Workflows.
- Click Configure and provide the following information.
- Click Add Action and select Custom Function option.
- Write the script and click Save.
- Click Publish to save and use the workflow.
Step 3: Script using Deluge
title=input.title; msg=input.status; date=input.time; response=zoho.ai.analyseSentiment(msg); Negative=response.get("Probability").get("Negative").getAlphaNumeric().toLong(); Positive=response.get("Probability").get("Positive").getAlphaNumeric().toLong(); keywords=zoho.ai.extractKeywords(status); keyword=keywords.getJson("data").getJson("items").getJson("keywords"); get_keywords=Collection(); for each keyinkeyword { get_keywords.insert(key.getJson("keyword")); } if(Positive<Negative) { add_duedate=zoho.currentdate.addDay(10); day=add_duedate.getDay(); month=add_duedate.getMonth(); description="Check the content and suggest improvements. For post reference, check your email."; // Invoke the Zoho Connect API to add tasks resp=invokeurl [ url:"https://connect.zoho.com/pulse/api/addTask?scopeID=526492000000002008&title=Review+task&eyear=2023&emonth="+month+"&edate="+day+"&priority=High&userIds=705010806&desc=Check+the+content+and+suggest+improvements+and+check+your+email+for+post+reference." type:POST connection:"createtask" ]; //Send an email if the posted content contains sensitive terms sendmail [ from:zoho.adminuserid to:zoho.adminuserid subject:"Alert - A live post in your group needs content review!" message:"<div><br>A post <b>"+title+"</b> created on <b>"+date+"</b> contains certain terms - <b>"+get_keywords+", </b>that might seem inappropriate for a wider audience. Looks like you need to review the content before it can be shared outside. Please check the task added under the <i>Private tasks</i> section inside your Connect account.<br><br>Cheers!</div><div><br></div><div><br></div>" ] } //Send an email if the posted content is positive, informing the admin of new posts. else { sendmail [ from:zoho.adminuserid to:zoho.adminuserid subject:"Hurray! A new post has been made live in your group!" message:"<div><br>A post <b>"+title+"</b> created on <b>"+date+"</b> is now live in your group. Check out the post and show your encouragement in comments.</div><div><br></div><div><br></div>" ] }
Scheduler
Schedulers in Zoho Connect enable you to automate your routine tasks without any user input. You can configure your schedulers to repeat at certain intervals — such as everyday, weekly or every month and thereby save manual time and labor.
Navigation to Deluge
- Click the Settings icon at the top-right corner.
- Under Automation, click Schedulers.
- Click Configure and enter the required details.
- Expand the Handlers section and click Write function.
Example
Let's assume you (group admin) have created a Connect group for your team members, in which you add weekly/monthly tasks and assign them to the respective members. You need to remind the team members to complete their high-priority tasks well ahead of their due dates. You can configure a scheduler to run on a particular day of every week, say every Wednesday (or on the 25th of every month). In this scheduler, you can write a function using Deluge to fetch tasks with the following criteria: priority is "high", status is "For review", and due date is that week's Friday/end of that month.
See how it works
Steps to follow
Step 1: Create connection
Create a connection with the following details. This will be used later in the Deluge script to invoke an API.
- Select Zoho OAuth service
- Choose the following scopes.
- ZohoPulse.tasks.READ
- ZohoPulse.tasks.CREATE
- ZohoPulse.post.CREATE
Step 2: Configure scheduler
- Click the Settings icon at the top-right corner.
- Under Automation, click Schedulers.
- Click Configure and provide the following information.
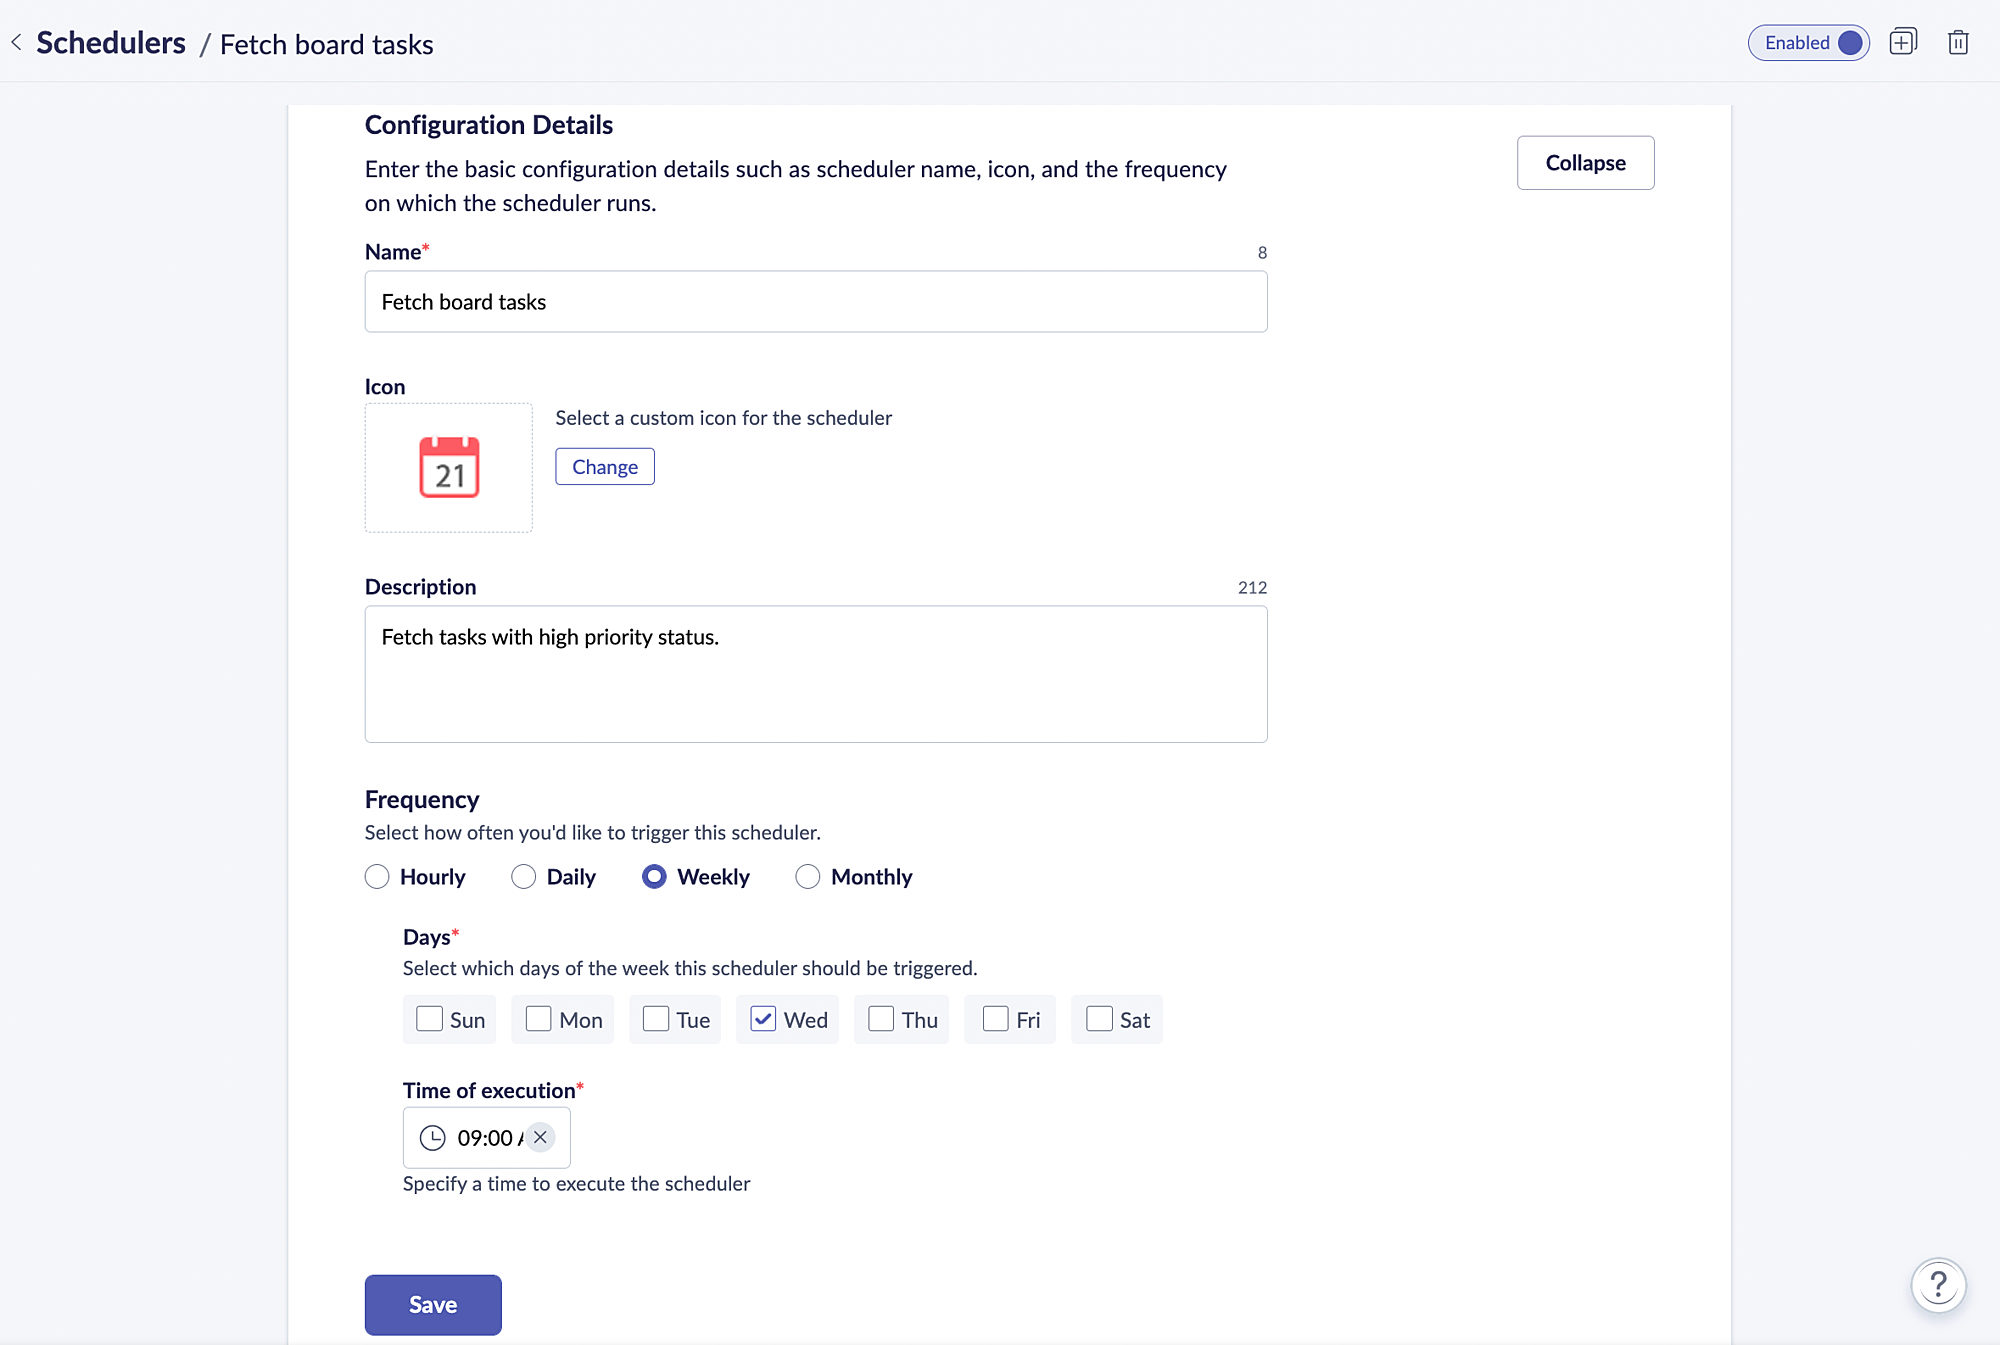
- Write the script and click Save.
- Click Publish to save and use the scheduler.

Step 3: Script using Deluge
returnMap=Map();
//Invoke the Zoho Connect task to fetch all the tasks with high priority and in to be reviewed status.
response=invokeurl
[
url:"https://connect.zoho.com/pulse/api/allTasks"
type:GET
parameters:{"scopeID":"526492000000002008","priorities":"High","percentages":"90"}  connection:"createtask"
];
taskl=response.get("allTasks");
contentList=List();
//Go over each task to fetch tasks with required criteria
for each recintaskl.get("tasks")
{
contentList.add(rec.get("title"));
}
contentMap=Map();
contentMap.put("message","These are the following tasks with high priority : "+contentList);  contentMap.put("title","Kindly check and complete the following tasks");  postingroup=zoho.connect.addPost("status",526492000000002008,526492000000026001,contentMap,"createtask");
returnreturnMap;
Custom Menu
The Custom menu option in Zoho Connect lets you add customized menus to entities such as status, tasks, and events, in addition to the default menus that are already available. You can use Deluge scripts to write a custom function and define how the custom menu should work. These custom menus can be shared with a set of users or groups and can be used to solve specific use cases.
Navigation to Deluge
- Click the Settings icon at the top-right corner.
- Under Developer Space, click Custom Menu.
- Click Configure and enter the required details.
- Expand the Handlers section and click Write function.
Example
Let's assume you've created a group named Zylker Feedback where you've configured the feedback collected from forms to be posted in this group. Now, let's assume you want to create a support ticket in Zoho Desk for the Connect feedbacks that are actionable. You can configure a custom menu named Create support ticket by defining a Deluge custom function for each of the required handlers and publish the custom menu. When you access the respective group, you can click the ellipsis (three-dots) icon beside a post and the custom menu will be listed under More option. You can click the menu, enter the required details and the ticket will be created successfully in Desk. This way, you can automate the process of ticket creation and ensure a quicker response to your customers.
See how it works
Steps to follow
Step 1: Create a connection
Create a connection with the following details. This will be used later in the Deluge script to invoke an API.
- Select Zoho OAuth service
- Choose the following scopes.
- Desk.basic.READ
- Desk.contacts.READ
- Desk.settings.READ
- Desk.tickets.CREATE
- Desk.tickets.UPDATE
Step 2: Configure the custom menu
- Refer to this section from steps 1-4 and enter the following details.

- Click Save.
- You can write a custom function for each of the required handlers using Deluge scripts to define how your custom menu should work in these handlers.
- By default, the custom menu will be enabled. You can toggle the Disable button at the top to disable it.

Step 3: Script using Deluge
Note:
- The menu click handler is mandatory as it is used to define the action that has to be performed once the user clicks the configured Custom Menu. The rest of the handlers are optional.
- In our use case, all four handlers are required.
Menu click handler
The menu click handler will be triggered whenever the user selects the configured custom menu option from the dropdown. Here, we're configuring the custom menu to open a form dialog box that receives user input.
//Invoke the Zoho Desk API to fetch organization details from your Desk account.
orgainsationsData=invokeurl
[
    url:"https://desk.zoho.com/api/v1/organizations"
    type:GET
    connection:"zohodeskoauth"
];
//Fetch the required data from the response and store it in a map
orgs=orgainsationsData.get("data");
orgOptions={};
for eachorginorgs
{
    option=Map();
    option.put("id",org.get("id"));
    orgName=org.get("companyName");
    if(orgName==null||orgName=="null")
    {
        orgName="No Name";
    }
    option.put("label",orgName);
    orgOptions.add(option);
}
fields=list();
organisationField={"hint":"Select a Zoho Desk Organisation ","type":"select","name":"organisation","label":"Organisation","mandatory":true,"triggerOnChange":true,"options":orgOptions};
departmentField={"hint":"Select a Department ","lookup":"true","type":"select","name":"department","label":"Department","mandatory":true,"triggerOnChange":true,"placeholder":"Type the department name"};
contactField={"type":"select","name":"contact","label":"Contact","placeholder":"Type the contact name","hint":"Select a contact","mandatory":true,"lookup":"true","triggerOnChange":false};
subjectField={"type":"textBox","name":"Subject","label":"Subject","mandatory":true,"value":entity.get("title")};
descField={"type":"textArea","name":"description","label":"Description","mandatory":false,"value":entity.get("plainContent")};
ownerField={"type":"select","name":"owner","label":"Ticket Owner","mandatory":false,"triggerOnChange":true,"options":{{"id":"0","label":"Team"},{"id":"1","label":"Agent"}},"hide":true};
dueDateField={"placeholder":"Due Date","type":"dateTime","name":"dueDate","label":"Due Date","mandatory":false};
//Autofill organization field if user is part of only one organization. Otherwise, hide all other fields until user selects an organization.
if(orgOptions.size()==1)
{
    orgId=orgOptions.get(0).get("id");
    organisationField.put("value",orgId);
}
else
{
    departmentField.put("hide",true);
    contactField.put("hide",true);
    subjectField.put("hide",true);
    descField.put("hide",true);
    ownerField.put("hide",true);
    dueDateField.put("hide",true);
}
fields.add(organisationField);
fields.add(departmentField);
fields.add(contactField);
fields.add(subjectField);
fields.add(descField);
fields.add(ownerField);
fields.add(dueDateField);
//Specify the required details for the custom menu
form={"title":"Add a Support Ticket","hint":"Add a ticket in Zoho Desk","fields":fields};
form.put("buttonLabel",{"done":"Add Ticket"});
returnMap=Map();
returnMap.put("form",form);
//Returns the returnMap collection
returnreturnMap;
Form Change Handler
The form change handler can be used when the fields in the form dialog box should dynamically change values based on the user input. It can be also used to validate the user input and display an error message in case the input doesn't match with the criteria set by the menu creator.
// Construct a map store the form values
returnMap=Map();
targetEle=target.get("name");
formValues=form.get("values");
currentFields=form.get("fields");
fields={};
orgId=formValues.get("organisation").get("id");
if(targetEle=="department")
{
    fields.add({"name":"owner","hide":false,"value":"1"});
    fields.add({"name":"agents","label":"Agents","placeholder":"Type the agent name","lookup":"true","after":"owner","type":"select","options":{},"hide":"false"});
    fields.add({"name":"teams","label":"Teams","placeholder":"Type the team name","lookup":"true","after":"owner","type":"select","hide":"true","options":{}});
}
else if(targetEle=="owner")
{
    ownerOption=target.get("value");
    if(ownerOption!=null)
    {
        if(ownerOption.get("id")=="0")
        {
            fields.add({"name":"agents","hide":"true"});
            fields.add({"name":"teams","hide":"false"});
        }
        else
        {
            fields.add({"name":"agents","hide":"false"});
            fields.add({"name":"teams","hide":"true"});
        }
    }
    else
    {
        fields.add({"name":"agents","hide":"true"});
        fields.add({"name":"teams","hide":"true"});
    }
}
else if(targetEle=="organisation")
{
    fields.add({"name":"department","options":{},"hide":"false","value":""});
    fields.add({"name":"contact","options":{},"value":"","hide":"false","lookup":true});
    fields.add({"name":"owner","hide":"true"});
    fields.add({"name":"agents","options":{},"hide":"true"});
    fields.add({"name":"teams","options":{},"hide":"true","lookup":true});
    fields.add({"name":"Subject","hide":"false"});
    fields.add({"name":"description","hide":"false"});
    fields.add({"name":"dueDate","hide":"false"});
}
returnMap=Map();
if(fields.size()>0)
{
    returnMap.put("fields",fields);
}
returnreturnMap;
Field Lookup Handler
The field lookup handler can be used to fetch values for field options from external services in real time. This handler is executed when the user starts typing the search string in the field. Here, the field lookup handler is used in the following fields — contact, departments, teams, and agents, to get details from Desk. In each of these fields, (excluding contact and team), the user input is used to search and fetch relevant results.
targetField=target.get("name");
query=target.get("query").trim();
if(query==null||query.length()==0)
{
    query=" ";
}
query="*"+query+"*";
orgId=form.get("values").get("organisation").get("id");
returnMap=Map();
if(targetField=="department")
{
    departmentsData=zoho.desk.getRecords(orgId,"departments",0,200,{"searchStr":query},"zohodeskoauth");
    departments=departmentsData.get("data");
    deptOptions={};
    for eachdepartmentindepartments
    {
        option=Map();
        option.put("id",department.get("id"));
        option.put("label",department.get("name"));
        deptOptions.add(option);
    }
    returnMap.put("options",deptOptions);
}
else if(targetField=="contact")
{
    from=1;
    limit=100;
    indexs={0,1,2,3,4};
    contactOptions={};
    for each  indexinindexs
    {
        parameter=Map();
        parameter.put("from",from+index*limit);
        parameter.put("limit",limit);
        contactsData=invokeurl
        [
            url:"https://desk.zoho.com/api/v1/contacts"
            type:GET
            parameters:parameter
            connection:"zohodeskoauth"
        ];
        contacts=contactsData.get("data");
        for each  contactincontacts
        {
            option=Map();
            option.put("id",contact.get("id"));
            name="";
            if(contact.get("firstName")!=null)
            {
                name=name+contact.get("firstName");
            }
            if(contact.get("lastName")!=null)
            {
                name=name+contact.get("lastName");
            }
            option.put("label",name);
            contactOptions.add(option);
        }
        if(contacts!=null&&contacts.length()<100)
        {
            break;
        }
    }
    returnMap.put("options",contactOptions);
    returnMap.put("lookup",false);
}
else if(targetField=="agents")
{
    departmentId=form.get("values").get("department").get("id");
    agentsMap={"departmentIds":departmentId,"searchStr":query};
    agentsData=zoho.desk.getRecords(orgId,"agents",0,200,agentsMap,"zohodeskoauth");
    agents=agentsData.get("data");
    agentOptions={};
    for each  agentinagents
    {
        option=Map();
        option.put("id",agent.get("id"));
        option.put("value",agent.get("emailId"));
        option.put("label",agent.get("name"));
        photoUrl=agent.get("photoURL");
        if(photoUrl==null||photoUrl.trim()=="")
        {
            photoUrl="https://cdn1.iconfinder.com/data/icons/dashboard-ui-vol-1/48/JD-33-512.png";
        }
        option.put("iconUrl",photoUrl);
        agentOptions.add(option);
    }
    returnMap.put("options",agentOptions);
}
else if(targetField=="teams")
{
    from=1;
    limit=100;
    indexs={0,1,2,3,4};
    teamOptions={};
    departmentId=form.get("values").get("department").get("id");
    departmentName=form.get("values").get("department").get("label");
    for each  indexinindexs
    {
        parameter=Map();
        parameter.put("from",from+index*limit);
        parameter.put("limit",limit);
        header=Map();
        header.put("orgId",orgId);
        url="https://desk.zoho.com/api/v1/departments/"+departmentId+"/teams";
        teamsData=invokeurl
        [
            url:url
            type:GET
            headers:header
            connection:"zohodeskoauth"
        ];
        teams=teamsData.get("teams");
        for each  teaminteams
        {
            option=Map();
            option.put("id",team.get("id"));
            option.put("label",team.get("name"));
            teamOptions.add(option);
        }
        if(teams.length()<100)
        {
            break;
        }
    }
    returnMap.put("options",teamOptions);
    if(teamOptions.length()==0)
    {
        returnMap.put("info","No teams available in "+departmentName);
    }
    returnMap.put("lookup",false);
}
returnreturnMap;
Form Submit Handler
The form submit handler is triggered when the user clicks the submit button in the form. This handler is used to validate the input data entered by the user and perform the custom menu's intended action. Here, this handler will collect the input data and make an API call to create the support ticket.
formValues=form.get("values");
orgId=formValues.get("organisation").get("id");
departmentId=formValues.get("department").get("id");
contactId=formValues.get("contact").get("id");
subject=formValues.get("Subject");
dataMap=Map();
dataMap.put("departmentId",departmentId);
dataMap.put("contactId",contactId);
dataMap.put("subject",subject);
if(formValues.containKey("description"))
{
    dataMap.put("description",formValues.get("description"));
}
if(formValues.containKey("teams"))
{
    dataMap.put("teamId",formValues.get("teams"));
}
if(formValues.containKey("agents"))
{
    dataMap.put("assigneeId",formValues.get("agents").get("id"));
}
if(formValues.containKey("dueDate"))
{
    dueDate=formValues.get("dueDate").toDateTime();
    day=dueDate.getDay();
    month=dueDate.getMonth();
    year=dueDate.getYear();
    hour=dueDate.getHour();
    minute=dueDate.getMinutes();
    if(month.length()<2)
    {
        month="0"+month;
    }
    if(day.length()<2)
    {
        day="0"+day;
    }
    if(hour.length()<2)
    {
        hour="0"+hour;
    }
    if(minute.length()<2)
    {
        minute="0"+minute;
    }
    dueDateDate=year+"-"+month+"-"+day+"T"+hour+":"+minute+":00.000Z";
    //yyyy-MM-dd'T'HH:mm:ss
    dataMap.put("dueDate",dueDateDate);
}
header=Map();
header.put("orgId",orgId);
response=invokeurl
[
    url:"https://desk.zoho.com/api/v1/tickets"
    type:POST
    parameters:dataMap.toString()
    headers:header
    connection:"zohodeskoauth"
    content-type:"text/json"
];
// response = zoho.desk.create(orgId,"tickets",dataMap,"zohodeskoauth");
if(response.containKey("id"))
{
    returnMap=Map();
    returnMap.put("result","success");
    returnMap.put("message","Ticket created successfully.");
}
else
{
    returnMap=Map();
    returnMap.put("error","Sorry, we’re unable to create a ticket in Zoho Desk at this moment. Please try again later.");
}
returnreturnMap;
User sync
Most organizations use enterprise directory systems (such as Active Directory or LDAP) to maintain employees, groups, and applications' information. For larger organizations, it can be difficult to manually add and manage users in the network, as user numbers are high. Zoho Connect's User Sync option simplifies these processes. This option enables you to add, update, and disable user profiles in bulk using a .CSV file.
Handlers in User Sync enable you to perform customized actions on the input data. You'll define the necessary action by using the Deluge script to write a custom function in these handlers. Currently, User Sync has two handlers: Function Handler and Post-Function Handler. Logs in each handler store the details of the action performed and its results. You can use these logs to keep track of actions, as well as analyze and debug issues.
- Function Handler: This handler enables you to define the action to be executed before syncing the user details with the Zoho Connect network. Ideally, this handler is triggered once a CSV file is uploaded. You can use this handler to make changes to the data in the CSV file. For example, you can write a function to change the email domain based on the location or reorder the first name and last name to align with local usage.
- Post-Function Handler: This handler enables you to define the action to be executed after syncing the user details with the Zoho Connect network. You can use this handler to notify the admin that the user details are synced or send a welcome email to the newly added members.