
Automation
All bugs pose unique challenges. However, repetitive functions can be automated by setting up business rules, SLAs, webhooks, and notifications.
Notifications
Staying upto date with about bugs is important. However, not all notifications are relevant. You can setup notifications to only receive updates that are essential to your work.
- Navigate to Projects > Bugs >
 (in the upper-right corner) > Bug Settings > Automation > Notifications.
 - Toggle ON/OFF switch to turn notifications on.
- Select the notification(s) you want to receive.
- Select or create an email template.
- Select the person who should be notified when the bug event takes place.
- Select others users to be notified if required.
- Click Save.
 (in the upper-right corner) > Bug Settings > Automation > Notifications.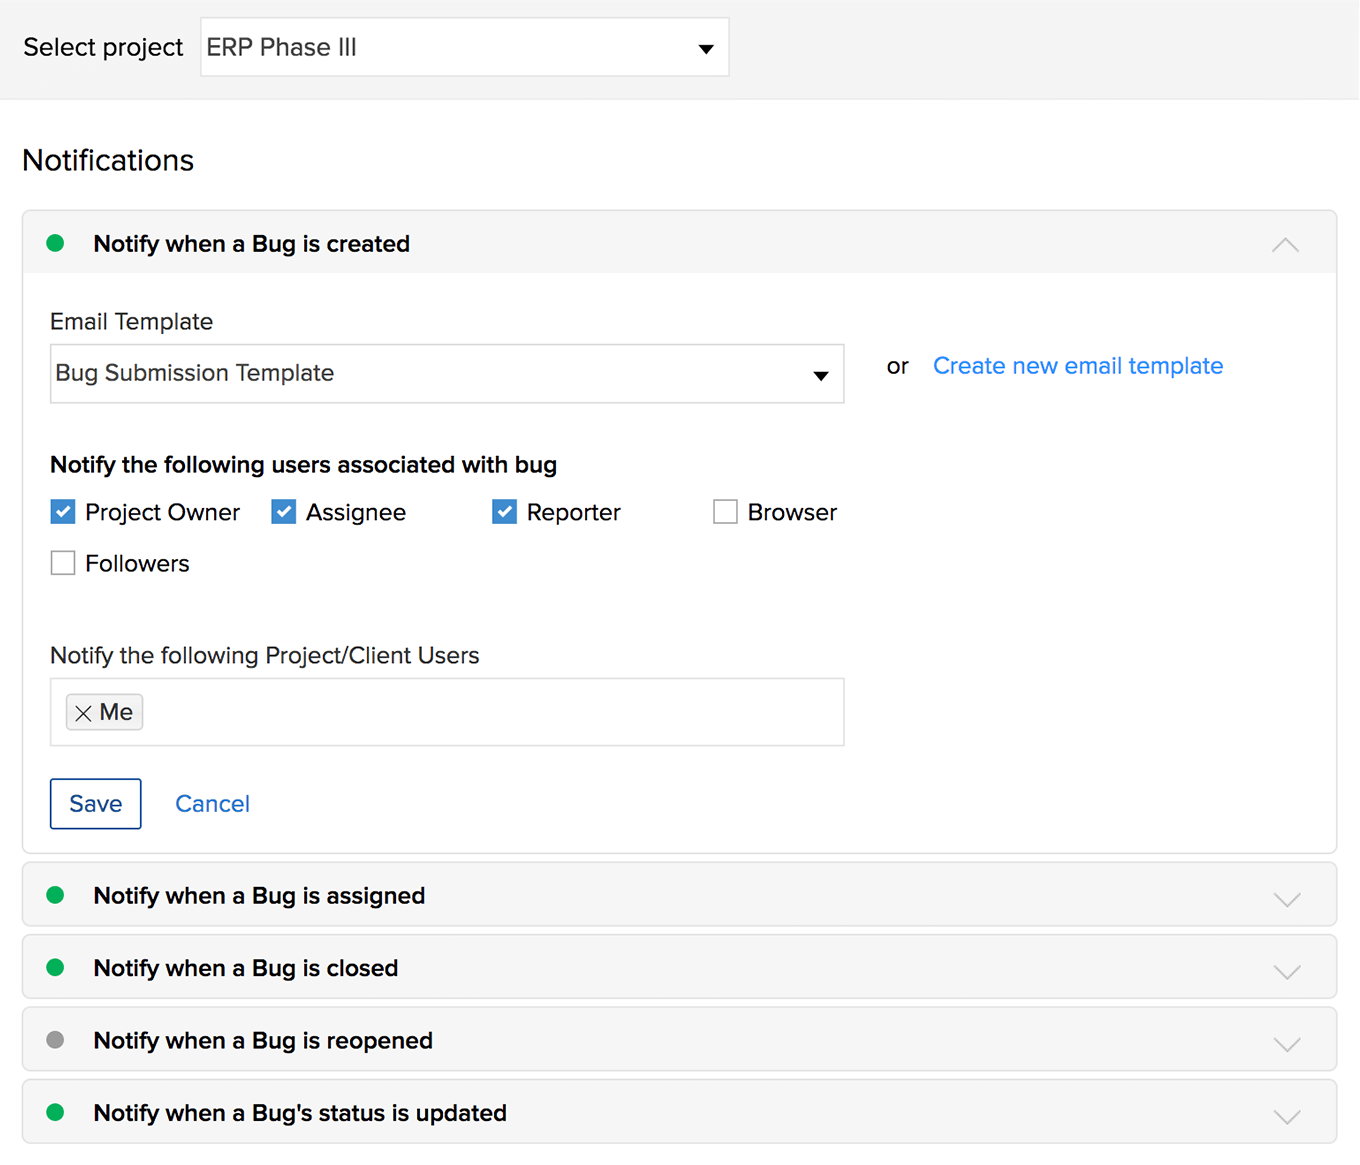
Notification Helper
Notification Helper will tell you whether a particular user or client in your portal will receive bug event notification.
- Navigate to Projects > Bugs > (in the upper-right corner) > Bug Settings > Automation > Notifications.
- Click in the upper-right corner and select Notification Helper.
- Select the user, bug, and notification event.
- Click Submit to check whether the user will get notifications when the specific bug event is triggered.
Business Rules
Business Rules allows you to organize the bugs more efficiently by setting criteria that match your project requirement. Business Rules are applied to bugs based on the rule list order when there are multiple business rules. You can add, edit and deactivate a business rule.

Add a Business Rule
- Navigate to Projects > Bugs > (in the upper-right corner) > Bug Settings > Automation > Business Rule.
- Click Add Rule.
- Enter Name and select the trigger for the rule to Execute On.
- Click Next.
- Choose the Criteria based on the trigger and click Next.
- Click
 to add criteria.
- Click
- Select the field and enter the value to update when the business rule is triggered.
- Setup webhooks to call them when the rule is triggered.
- Click Save Rule.
 to add criteria.
Edit or Delete Business Rule
Hover over the business rule and click  or
or  to edit or delete the rule.
Reorder Business Rule
- Click
 and then drag and drop business rule to reorder them.
 - Click Save Order.
Webhooks
Webhooks are a developer-friendly module that facilitates automated HTTP notifications to third party applications from Zoho BugTracker. Using Webhooks, you can configure your own HTTP URLs and associate them to specific business rules in order to automate the entire notification process related to bugs. To learn more about Webhooks, click here.
- Configure Webhooks
- Associate Webhooks to a Business Rule
- Test webhook integration
- Known Limitations
- Error Codes
- Business Scenario
Service Level Agreement (SLA)
Service Level Agreement (SLA) defines the level of service that can be expected from the service provider to the customer. Zoho BugTracker supports SLA and it is user-defined. You can create escalation procedures in terms of which bugs are subject to escalation, the escalation criteria to be applied, and the action to execute upon a specific escalation level. SLAs are applied automatically to tickets that match the defined parameters or criteria. You can also send alerts to selected resources when there is a potential SLA violation.

Create an SLA
You can create as many SLA rules as desired for the bugs.
- Navigate to Projects > Bugs > (in the upper-right corner) > Bug Settings > Automation > SLA and click Create SLA.
- Enter a Name.
- Select the desired option for the rule to Execute On and then click Add targets for this SLA.
- Select the criteria as to when the SLA must be executed for the bugs.
Note:
- You can choose your criterion from the various options that are displayed.You can set targets to view only bugs based on Modified Date, Last Closed Date, Milestone, Severity, and so on.
- Select the due date or the target time for the SLA.
Note:
- In Target Action, you can choose Close Before or Resolve Before and set their respective target field and target time based on the Calendar or Business hours.
- If you choose Resolve Before, the custom date field is also displayed in the Target Field. This helps in escalating the bug if it is not resolved within the set target time.
- If you choose Close Before, it helps in escalating the bug, if it is not closed within the set target time.
- Specify Escalate on as to when to escalate the bug. You can specify a maximum of four levels if the ticket exceeds the target time.
- Specify Escalate to as to whom to escalate the bug. You can choose Assignee, Project Owner, or any of the project users from Users section, or any of the users from the User PickList section.
- Select an existing Email Template from the drop-down or create a new Email template. Learn More about Email Templates.
- Configure the action to be taken for the escalation. You can specify a maximum of 10 actions.
- Click Save.
The escalation levels are highlighted in color next to each bug in the List view and bug details view.
SLA Notifications
Any update to a bug will be notified to all the concerned users.
- If there is a breach in SLA, the escalation will appear in Feeds.
- The updates can also be found in the Notifications tab.
Validations for escalation
An SLA is constructed to achieve the expected output or target within a defined time period. So, any SLA will have time and a target for the time, constructed with various criterion. An SLA assures that bugs will be closed within a defined time period.
- You can have more than one criteria for the same bug. However, a bug is tracked based on the first criteria that it matches in the existing SLA list.
- You can create your escalation workflow for bug transitions based on your business values, and set different escalation schedules for critical and non-critical bugs.
- Any combination of criteria is possible.
- You can configure notification emails to be escalated for any bugs after it's target time, to the required project member or the bug owner or the assignee.
Example:
If a bug is not closed within it's defined target time, the SLA that matches the bug will trigger the escalation actions.
Edit / Delete an SLA
Click and modify the SLA and save. You can also click to delete the SLA permanently.
Reorder SLAs
Click  and then drag and drop the SLAs and save the new SLA order.
Deactivate SLA
Click Deactivate to deactivate the SLA.
More about SLAs
- Decrease the customer waiting time for any bug by defining appropriate SLAs.
- Construct well-defined SLAs for increased customer satisfaction.
- A good SLA must be based on a constant parameter that does not vary during the bug's life cycle like the Title, Reporter, Module, Submitted Date, etc.
- Parameters like Status, Severity, Is it Reproducible, etc are subject to change.
- Automatically assign SLAs to tickets based on the various defined parameters.
- Manage SLA with multi-level escalations, if the ticket is not closed within the defined target time.
- Activate or Deactivate SLAs you have created.
- Send email alerts to selected resources when there is a potential SLA violation.
Custom Functions
Automate your bugs workflow using Custom Functions.
- What Is a Custom Function?
- Business Scenarios
- Add a Custom Function
- Associate a Custom Function With a Business Rule
- Execute a Custom Function
- Test Custom Function Integration
What Is a Custom Function?
A custom function is a piece of code that can be used for automating a process. You can write your own function in Deluge and call it from one or more business rules. It is similar to the built-in functions in Javascript like DATE, CONCAT, REPLACE, etc. In Zoho BugTracker, you can update the bug fields automatically using business rules. With the help of custom functions, you can automate a notification, call a webhook, or perform logic right after a business rule is triggered.
- Feature Availability: Enterprise plan only
Business Scenarios
- When an bug is escalated, its project manager can be notified via an SMS, an email or a Zoho Chat using custom functions.
- When an bug's severity is updated, a relevant comment can be added to the bug via a custom function.
- Integration can be done with Zoho Apps and third party apps in a custom function.
Add a Custom Function
- Navigate to Projects > Bugs > (in the upper-right corner) > Bug Settings > Automation.
- Select Custom Functions from the left panel.
- Click New Custom Function in the upper-right corner of the page.
- Enter a Function Name and a Description.
- Set the Arguments.
- Type in your code in the Deluge script editor or drag and drop the parameters available in the left panel of the editor and customize them.
- Click Save.
Helen wants to notify a set of users in her project about the change of bug owner for a specific bug upon escalation. She might have to send the notification very often to the same set of users on this subject in the future as well. So, Helen decides to create a custom function and get it called through one of the business rules. This is how her custom function will look.

Associate a Custom Function With a Business Rule
- Navigate to Projects > Bugs > (in the upper-right corner) > Bug Settings > Automation.
- Select Business Rules from the left panel.
- Select a rule and navigate to Rule details > Criteria > Actions.
- In Actions, click Call Custom Function.
- Click the plus icon to create a new custom function or click the chain icon
 to call an existing function from the business rule.
 - Click Save Rule.
 to call an existing function from the business rule.
Learn More about configuring business rules.
Execute a Custom Function
- Navigate to Projects > Bugs > (in the upper-right corner) > Bug Settings > Automation > Custom Functions.

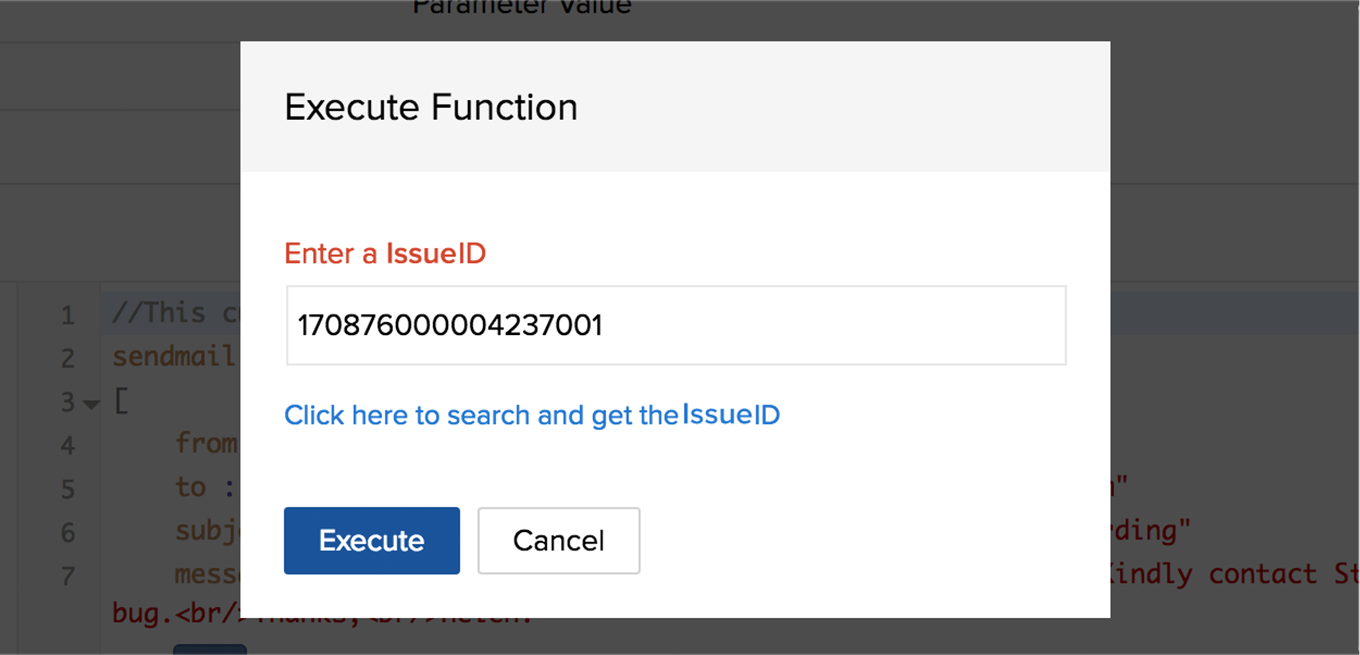
- Click the function that you would like to execute. Here, Helen tries to execute the function "Send_Mail".
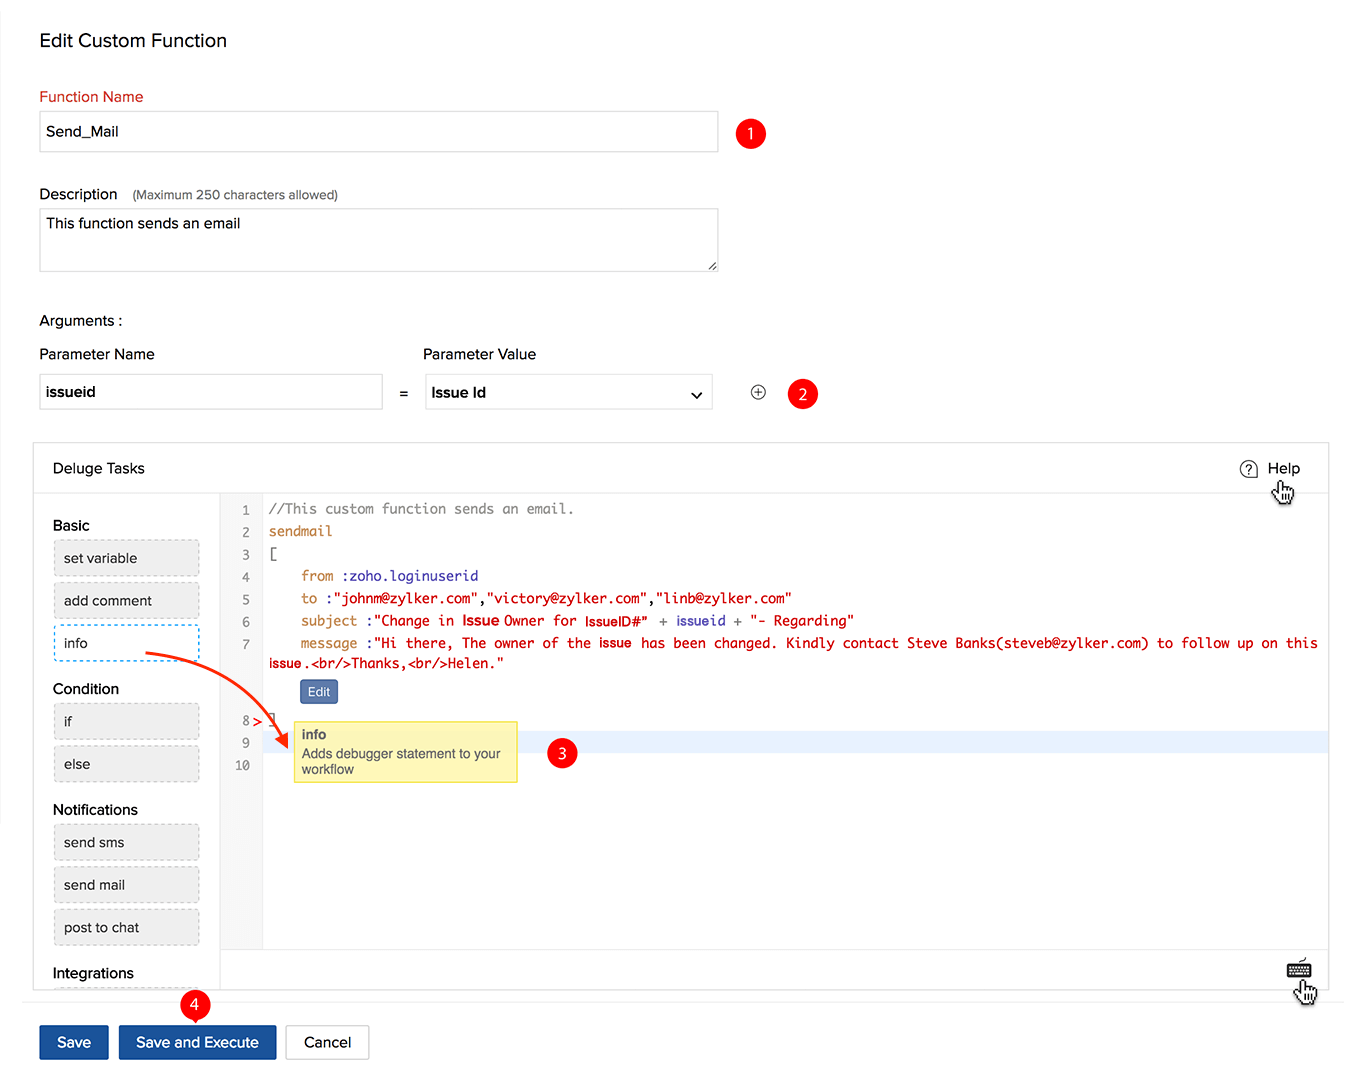
- Click Save and Execute at the bottom.
- Enter the Bug ID (i.e, the argument).
- Click Execute.
Test Custom Function Integration
- Add test data in Zoho BugTracker that match your business rule criteria.
- Check for updates received from Zoho BugTracker in your application via a notification triggered through your custom function.
- If there is an error, modify your custom function in Zoho BugTracker and retest.
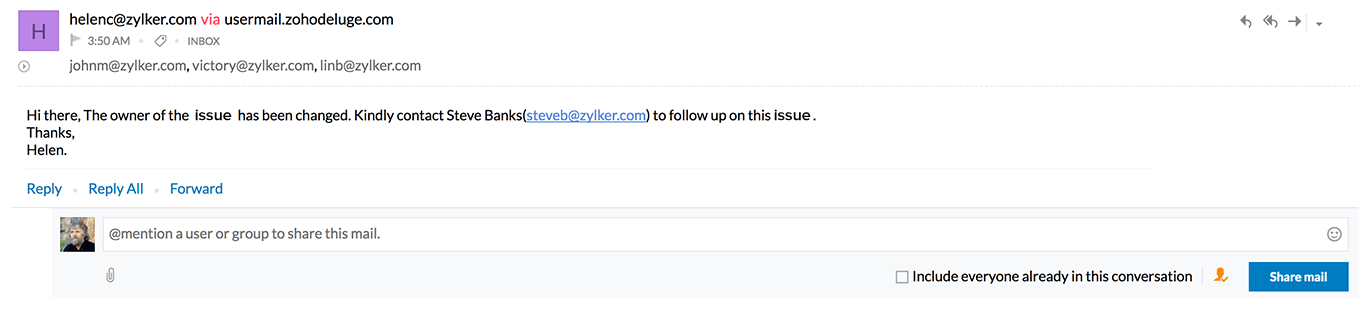
- Continue testing until you get the correct output. Here, John Marsh, Victor Young, and Lin Brenn receive a notification from Helen on the change in bug ownership.
- You can add upto 10 arguments only.