
I forgot my password. How do I recover it?
Follow the steps given below to recover your password.
- Visit https://www.zoho.com/people/login.html
- Click Forgot Password link to go to Zoho accounts page
- Provide Registered Email and complete theimage verification
- Click Request; you will receive an e-mail from Zoho Accounts to your registered e-mail address with a reset password link
- Click the link and create a new password
You can sign in to Zoho People using the new password.
How can I reset the password of users as an administrator?
To reset the password of other users in your organization, log into Zoho Mail as administrator.
- Login to https://mail.zoho.com/biz/index.do
- Click on Control Panel
- Click on User Details on the left
- Click on individual user's profile
- Click on Change Password
- Give the new(temporary) password along with your admin password
- Click Ok
Where do I see who the other administrators are?
- From home, go to Settings (gear icon) > Employee > Users
- Use the filter icon to filter user based on role
- Under Role selectAdmin, you will be able to see the list of administrators in your organization
Alternatively, you can create a new view to see the list of administrators of your organization. Follow the steps given below.
- From your home page, go to Organization > Employee
- Under the employee tab, go to the View drop-down and select create view
- Give the view name as Admin users
- Under Permission, define who needs to be able to see this view
- From the list of columns, select First name, last name and other fields that are required and click the right arrow
- Under Criteria, select the Field name as Role, Condition as Is and Value as Admin
- Click Save
Under this view, you will be able to see all the administrators of your organization listed.
Can an Admin change the Super-Administrator of the account?
There are two ways to do this.
Method 1:
- From your home page, go to Settings (Gear Icon) > Organization > Company Profile
- Click Modify Settings
- Under Super Administrator go to the email field and click on 'Transfer admin rights'
You will see the list of all employees of the organization.
- Use the search icon to search to select the employee who you would like to be made as Super Administrator
- Click Save Changes
The selected employee becomes the Admin and the Super Admin.
Method 2:
- From your home page, go to Settings (Gear Icon) > Organization > Company Profile
- Click Modify Settings
- Click on the email id drop down under 'Super Administrator'
The Drop down will list only admin users.
- Select the admin user who needs to be made as Super Admin and click on the Tick mark
- Click Save Changes
The selected admin becomes the Super Administrator.
What is the difference between super-administrator and an administrator?
There are only two differences between an administrator and a super administrator.
- There can be only one super-admin in an organization whereas, there can be more than one administrator in an organization
- All license related emails would be sent to the Super admin's email id
How many admins can I have in my account?
The number of admins you can have in your account depends on the plan you have purchased.
Click here to know more about plans and pricing.
How can I have the domain verified?
You will have to first add your domain onto the system. Once this is done, a mail will be automatically sent to support@zohopeople.com. The domain will be verified and you will be notified of this. Follow the steps given below to add your domain.
- From your home page, go to Settings (Gear icon) > Organization > Domains
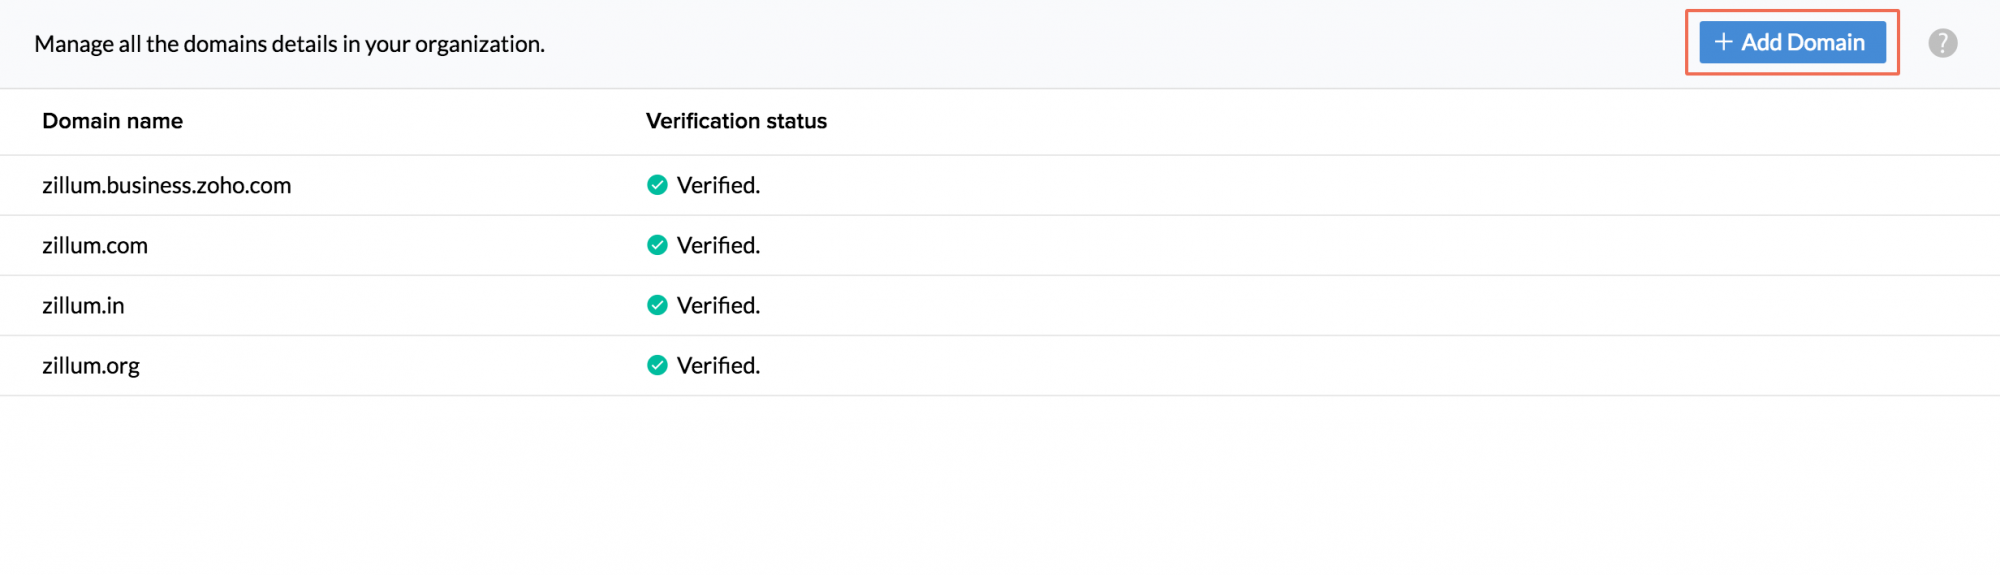
- Click Add Domain
- Enter your domain name
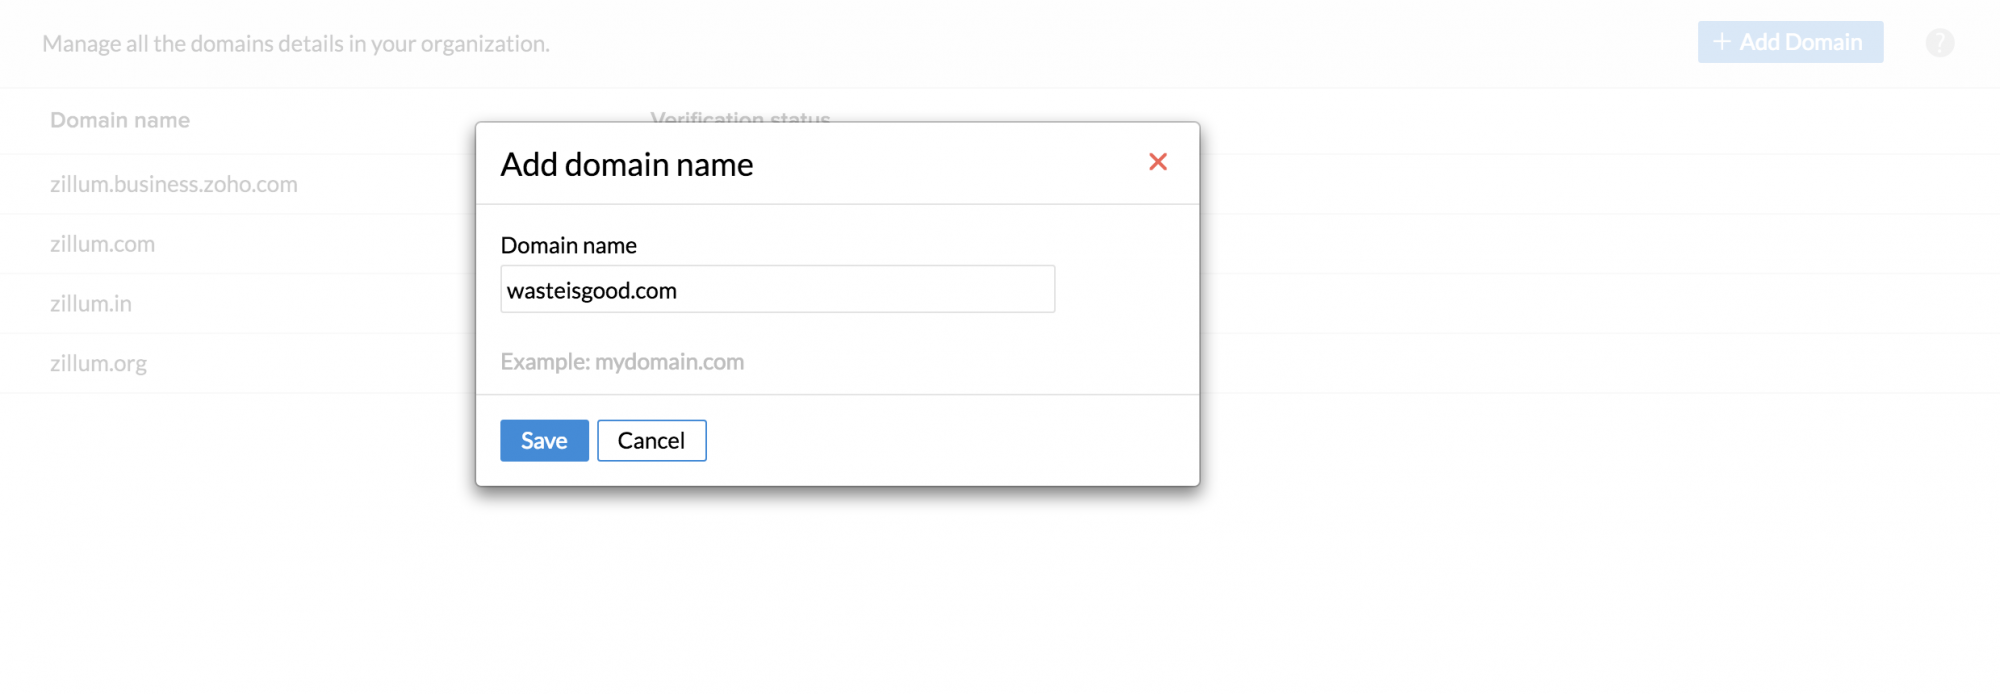
- Click Save
What are the major modules or functionalities supported?
- Leave Tracker
- Attendance Tracker (Including geo location tracking)
- Time Tracker
- Performance Management
- Form customization
- User Access Control
- Document Management
- Checklists
- Approvals
- Workflows (Reminders and email Alerts)
- Employee collaboration
- Integration with Third-party applications
- Reports Integration
- Integration with other Zoho Services like Zoho CRM, Zoho Invoice etc
- Mobile App
How is Zoho People integrated with other applications or services of Zoho?
Integration with Zoho Invoice and Zoho Books
Zoho People Time Tracker module lets you generate bills for the jobs done. After generating the bill, you can push it to Zoho Invoice for invoicing purpose. While pushing the bill, Contacts, Tax, Invoice, Currency and Client details will be also pushed to Zoho Books.
Integration with Zoho Mail
Zoho People's integration with Zoho Mail makes it easy to sync users of Zoho Mail with Zoho People. This integration prevents time taken in adding employees one by one into your account. Any number of Zoho Mail users can be syncronized with Zoho People at one shot.
Integration with Zoho CRM
With the help of integration, Time Tracker lets you log time for your CRM accounts. You will be able to look up for your CRM clients name from your Zoho People account. In CRM, when you go to your client list, you will be able to see the jobs done for that particular client.
Integration with Zoho Recruit
Zoho Recruit integration allows you to convert every successful hire into an employee. When you convert a candidate into an employee, it gets automatically updated in your Zoho People account thereby, letting you do maintain the employee's details accurately on the system. This helps you save the time involved in entering candidates' details all over again into another HR software. Once the candidate is converted as an employee, you will be able to utilize all the modules like Leave, Attendance, Performance etc for the candidate using one software. Click here to know more on how to integrate Zoho Recruit with your Zoho People account.
Integration with Zoho Expense
With the help of integration with Zoho Expense, you can track expenses better. With every update that is made in the employee database in People, Zoho Expense gets automatically updated, ensuring that the approvals are going to the right person. With this integration, you can track all your expenses and get a clear idea of how much is spent by each user/department/project etc.
Integration with Zoho Reports
Zoho People's integration with Zoho Reports helps you generate custom reports as per your needs other than the set of reports that are available in the modules. The reports thus created under the Analtics module can be shared with specific users, departments, roles, locations etc.
Where can I set up basic details of my organization like the address, logo etc?
You can replace the Zoho People logo with your own custom logo. Your company logo will appear at the top of your Zoho People account. Your logo must be the same size as specified. Create your logo in the 80 * 55 size for the best resolution.
- From home, go to Settings (gear icon) > Organization > Company Profile
- By default, Zoho People logo will be here. Click Change Logo
- Click Choose File and select your own custom logo from your computer
- Click Upload logo
- Give other details like Phone number, website URL, Address etc
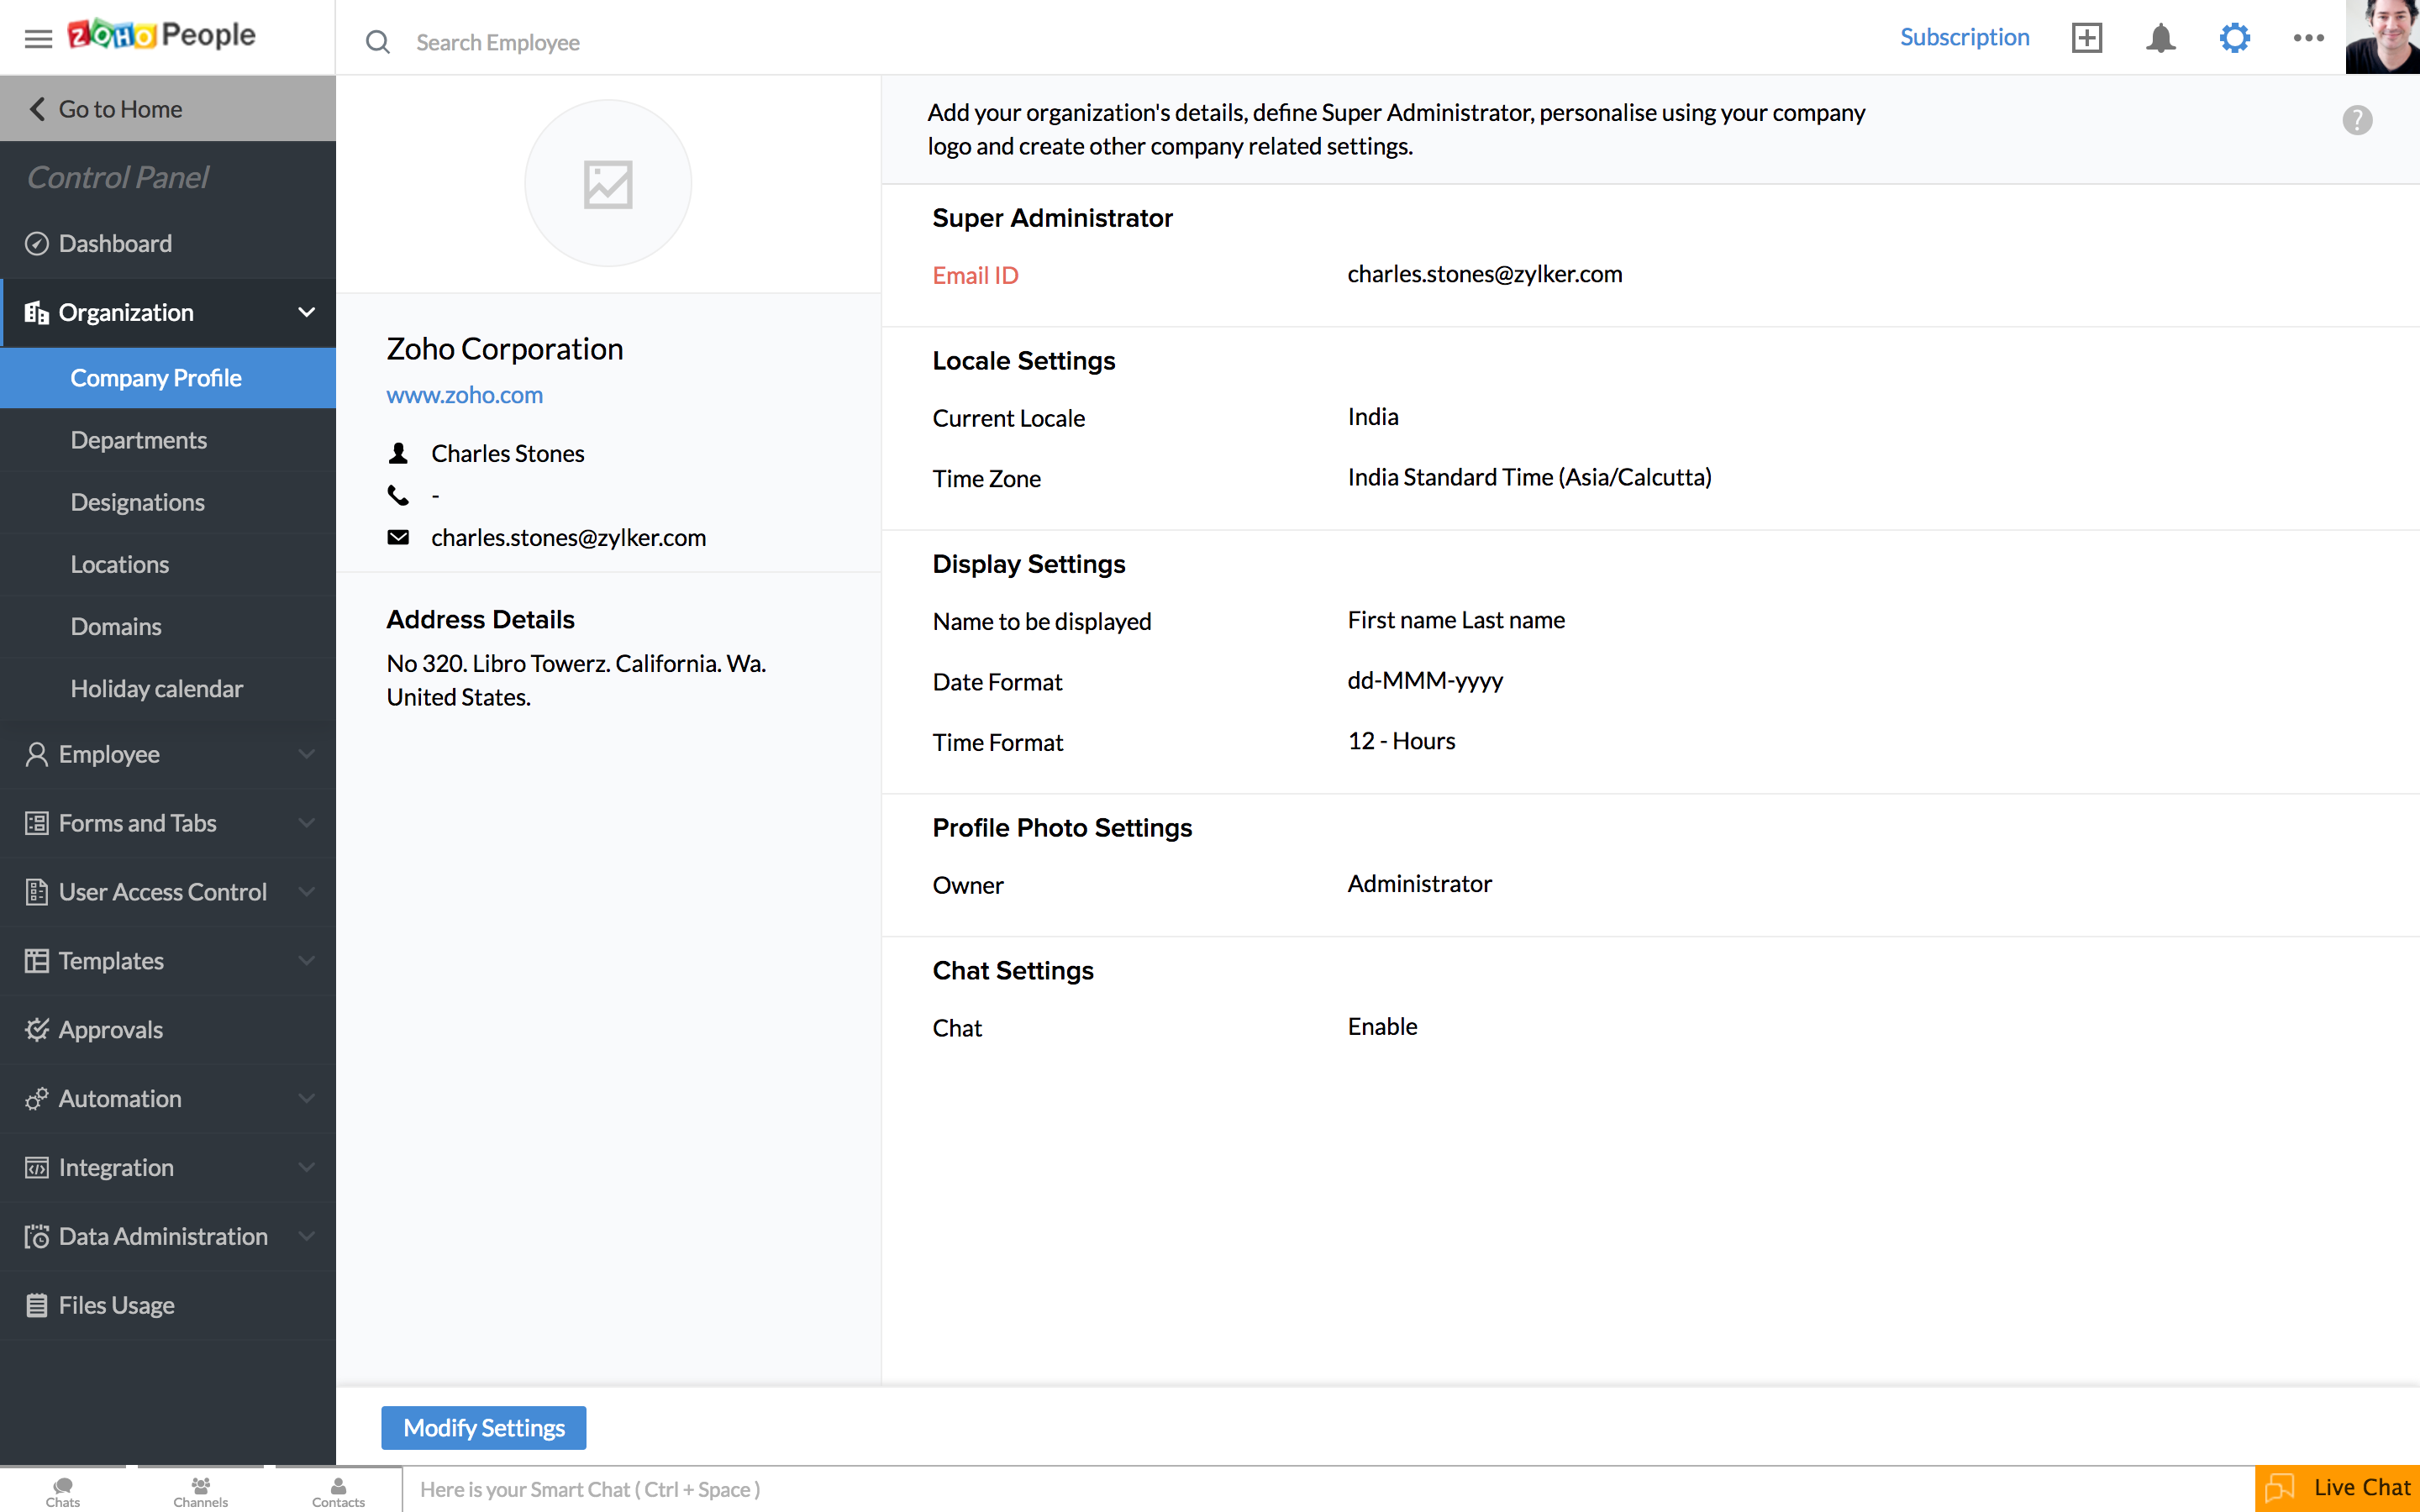
- Click Submit
How do I change the time zone and date format?
- From home, go to Settings (gear icon) > Organization > Company Profile > Locale Settings
- Click Modify Settings at the bottom
- Select the Current Locale from the drop down
- Under Time Zone you can define your time zone
- Click Save Changes
I want to change the way in which employee names are displayed. Is this possible?
You can have the names of the employees displayed in the four different ways as mentioned below.
- First Name
- Last Name
- First Name Last Name
- Last Name First Name
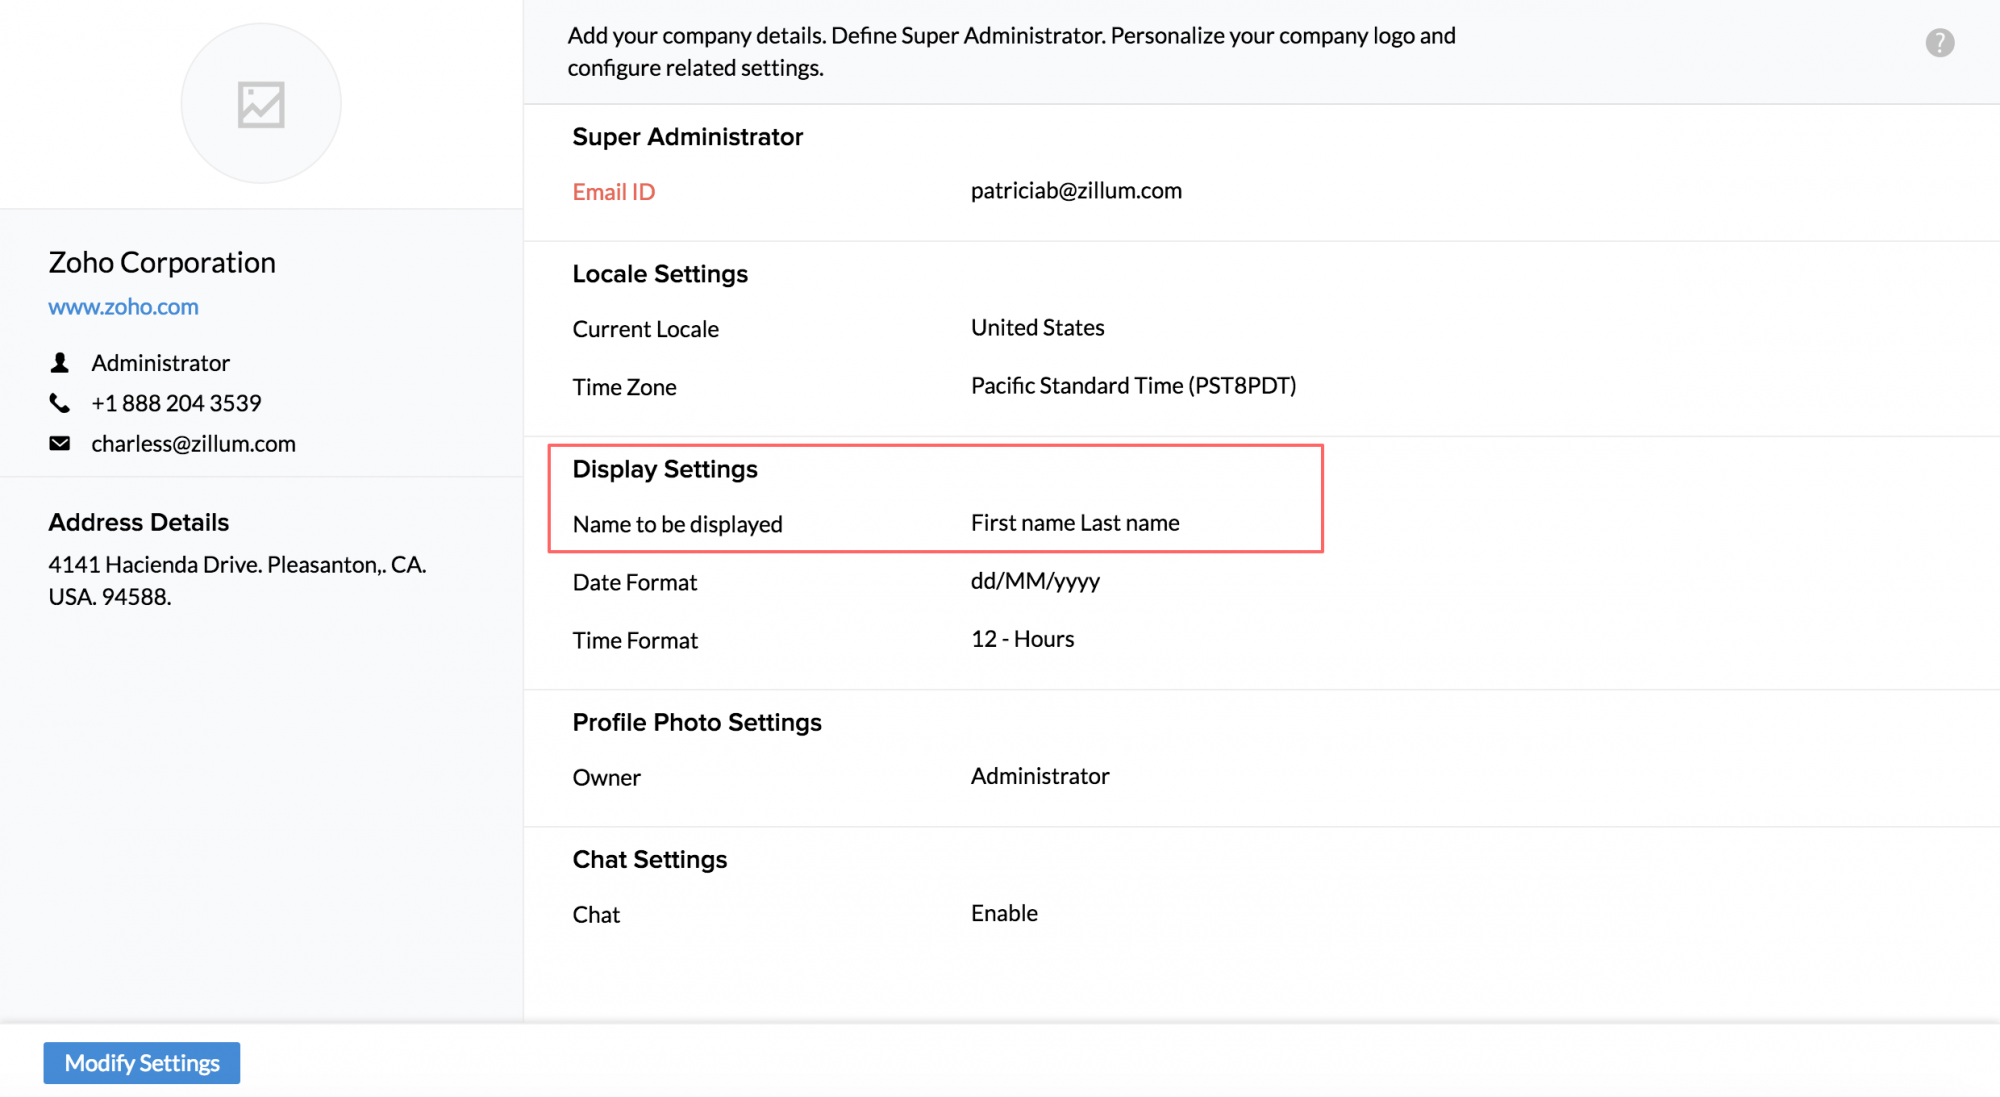
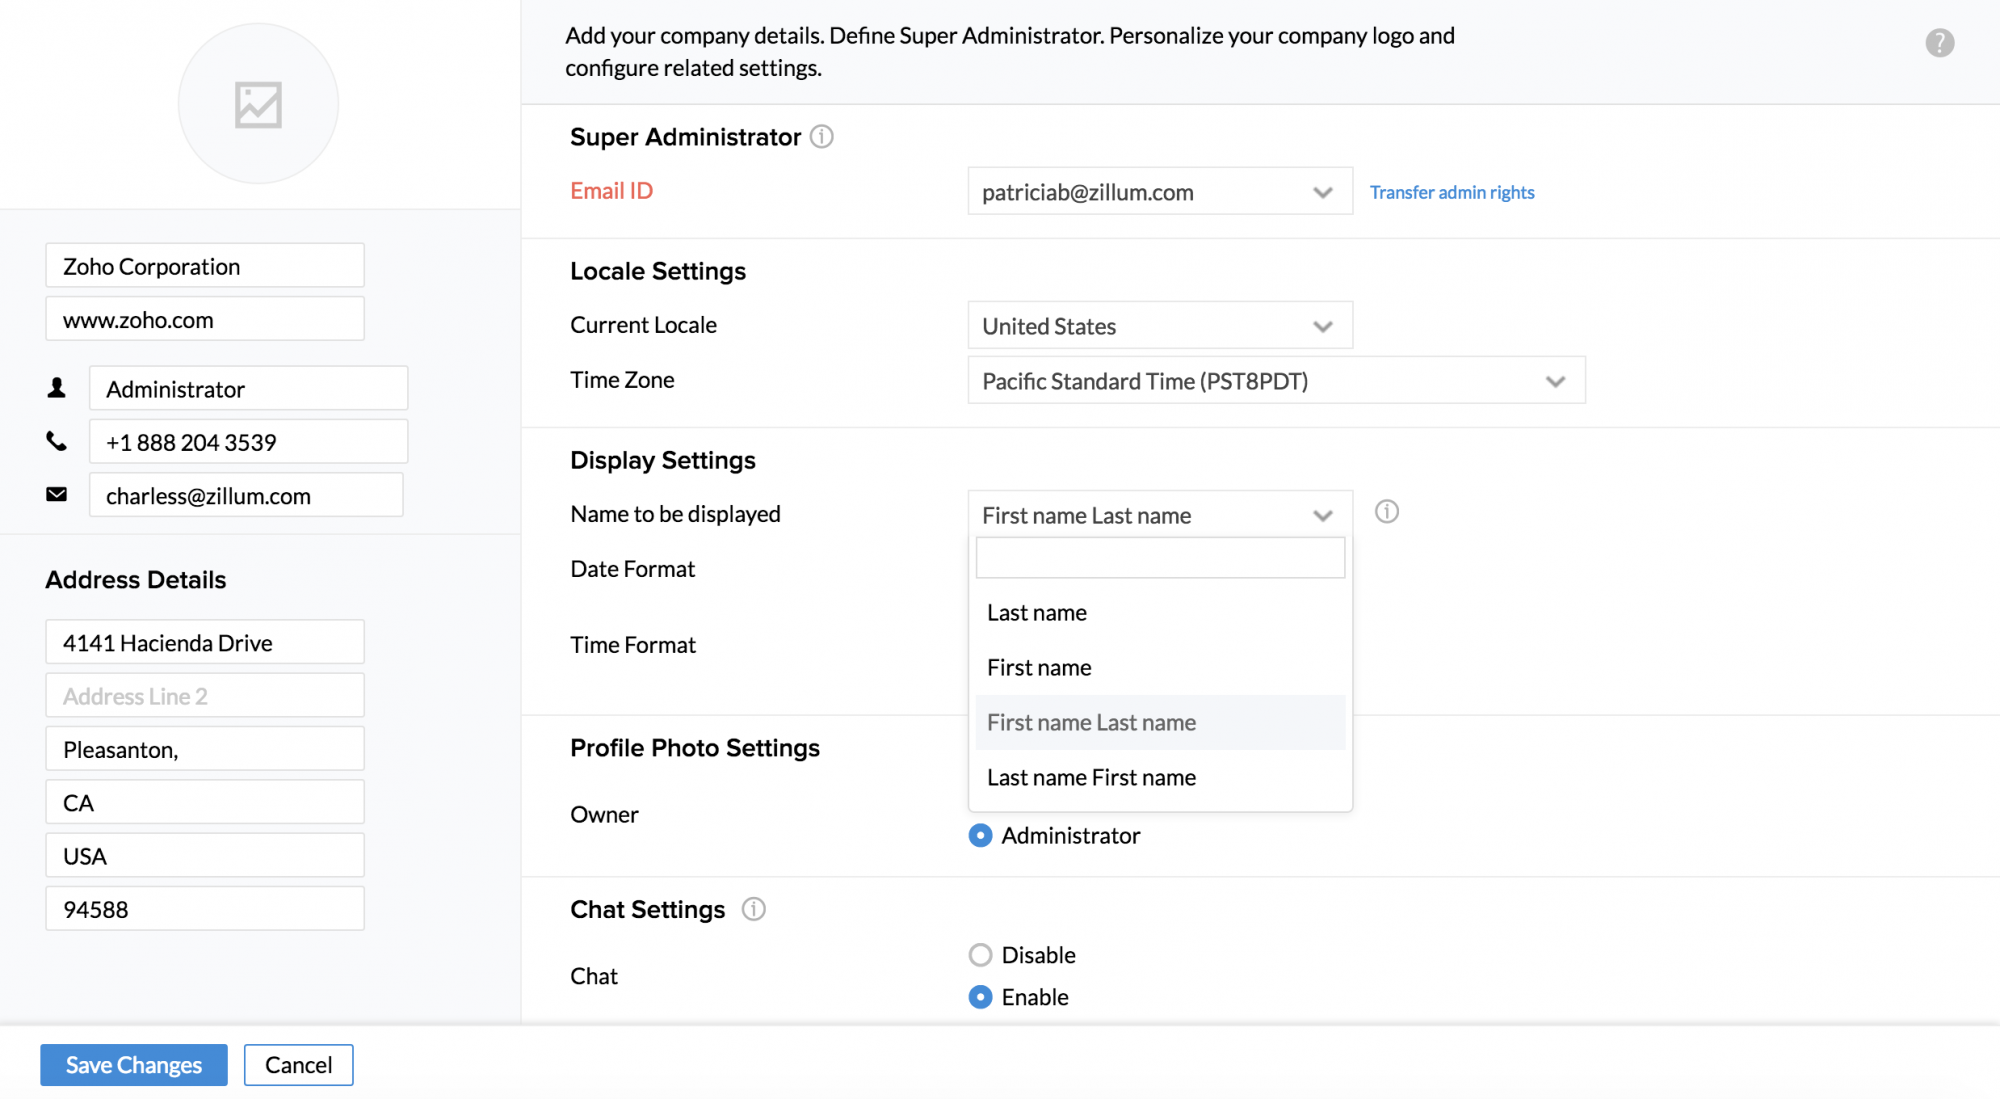
You can change this under Settings (gear icon)> Organization > Company Profile > Display Settings > Name to be displayed
How can I add users to my organization?
Users can be added to your organization using the methods listed below:
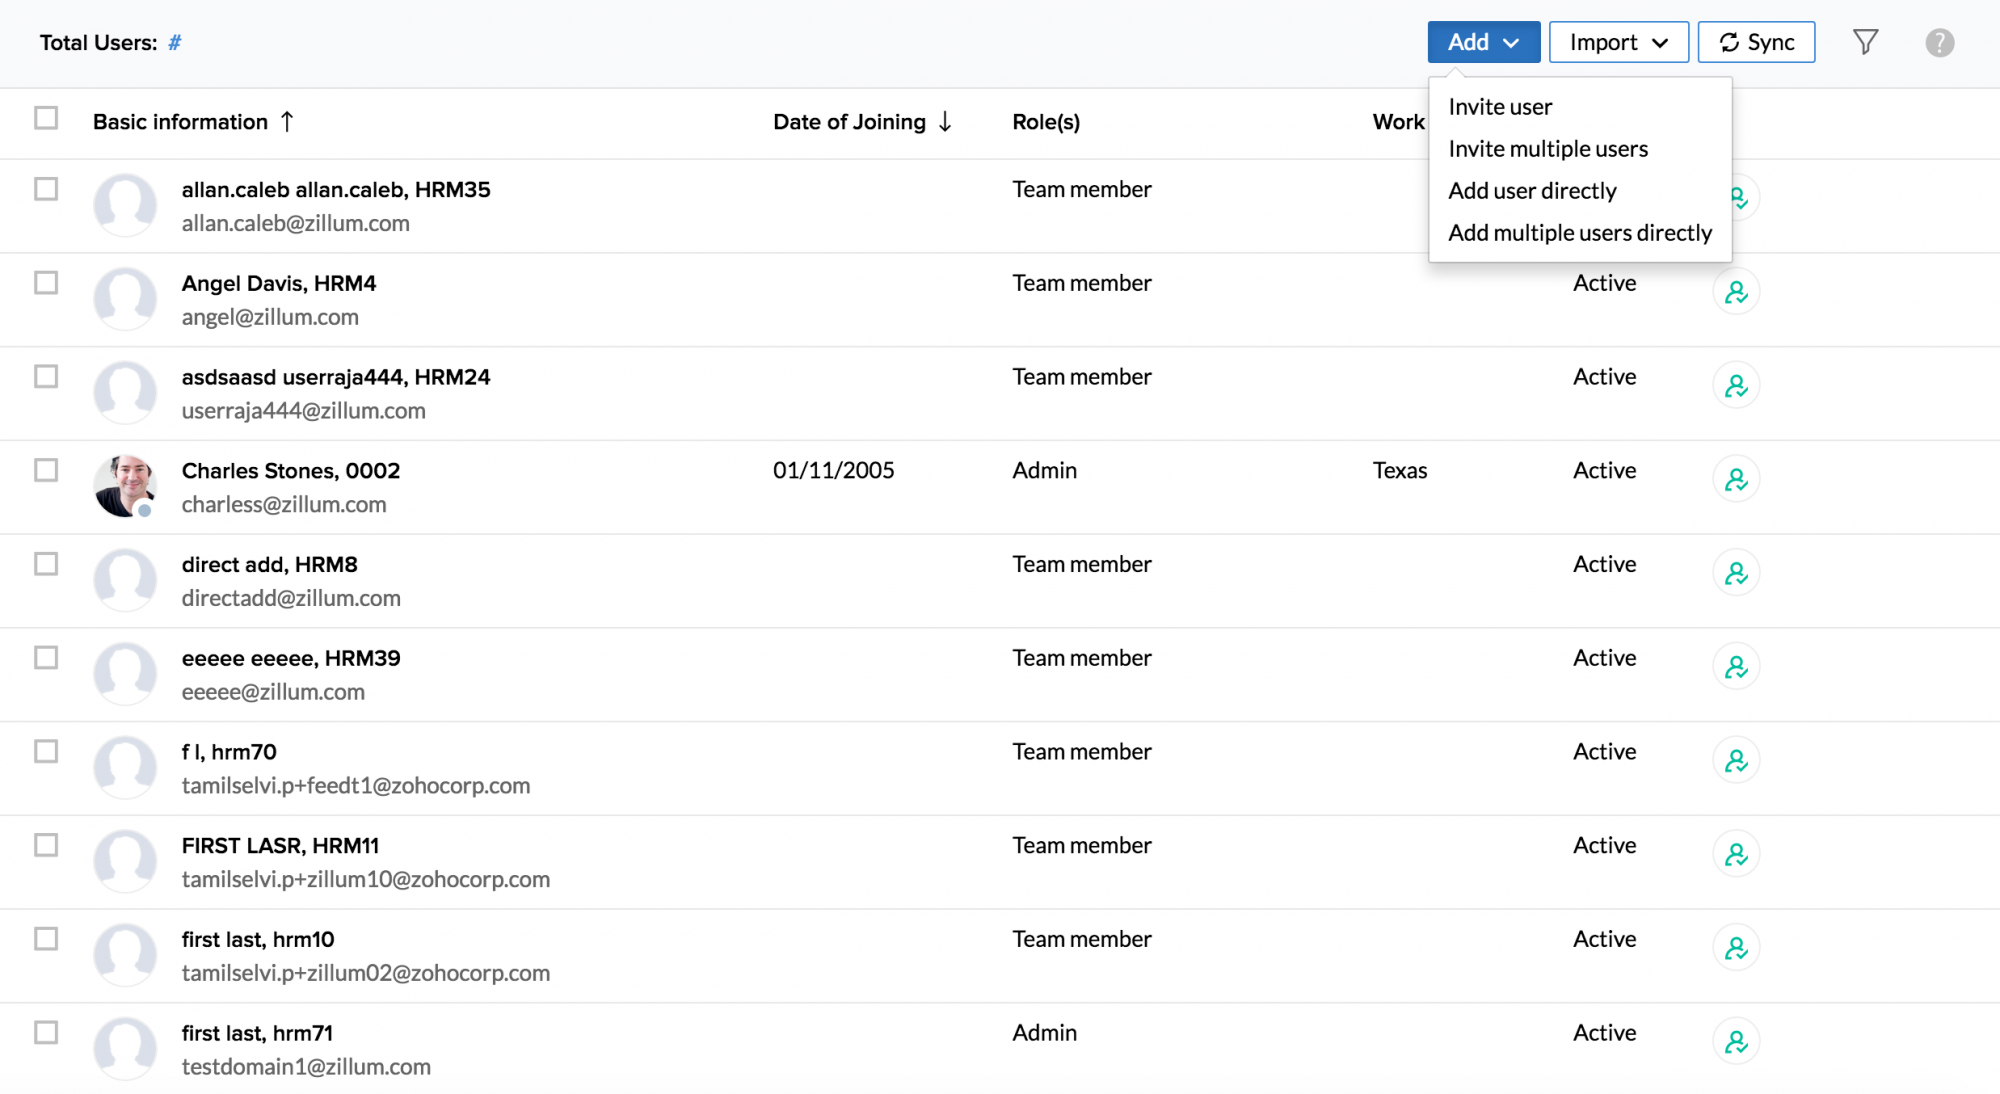
- Add Users directly - This option is useful if you have a verified domain. You can add users directly to your organization.
- Invite users - In this method, invitations are sent to users. Once they accept the invitation, they will become part of the organization.
- Sync users - This method is used to importing users directly from Zoho mail, Google apps etc.
- Import users - Using this method, you can import users from Zoho mail, google apps etc. This helps when your users are in large numbers.
What are the user roles that are configured already on the system?
There are totally five default user roles:
- Administrator
- Manager
- Team Member
- Director
- Team Incharge
You can edit the role name of Director and Team Incharge whereas you cannot edit the role name of Administrator, Manager, and Team Member, as they are the standard roles .
Can I import users from my existing files?
Yes. It is possible to import users from your existing files without the need to add users manually.
- From home,go to Settings (gear icon) > Employee > Users > Import
- Click Import User
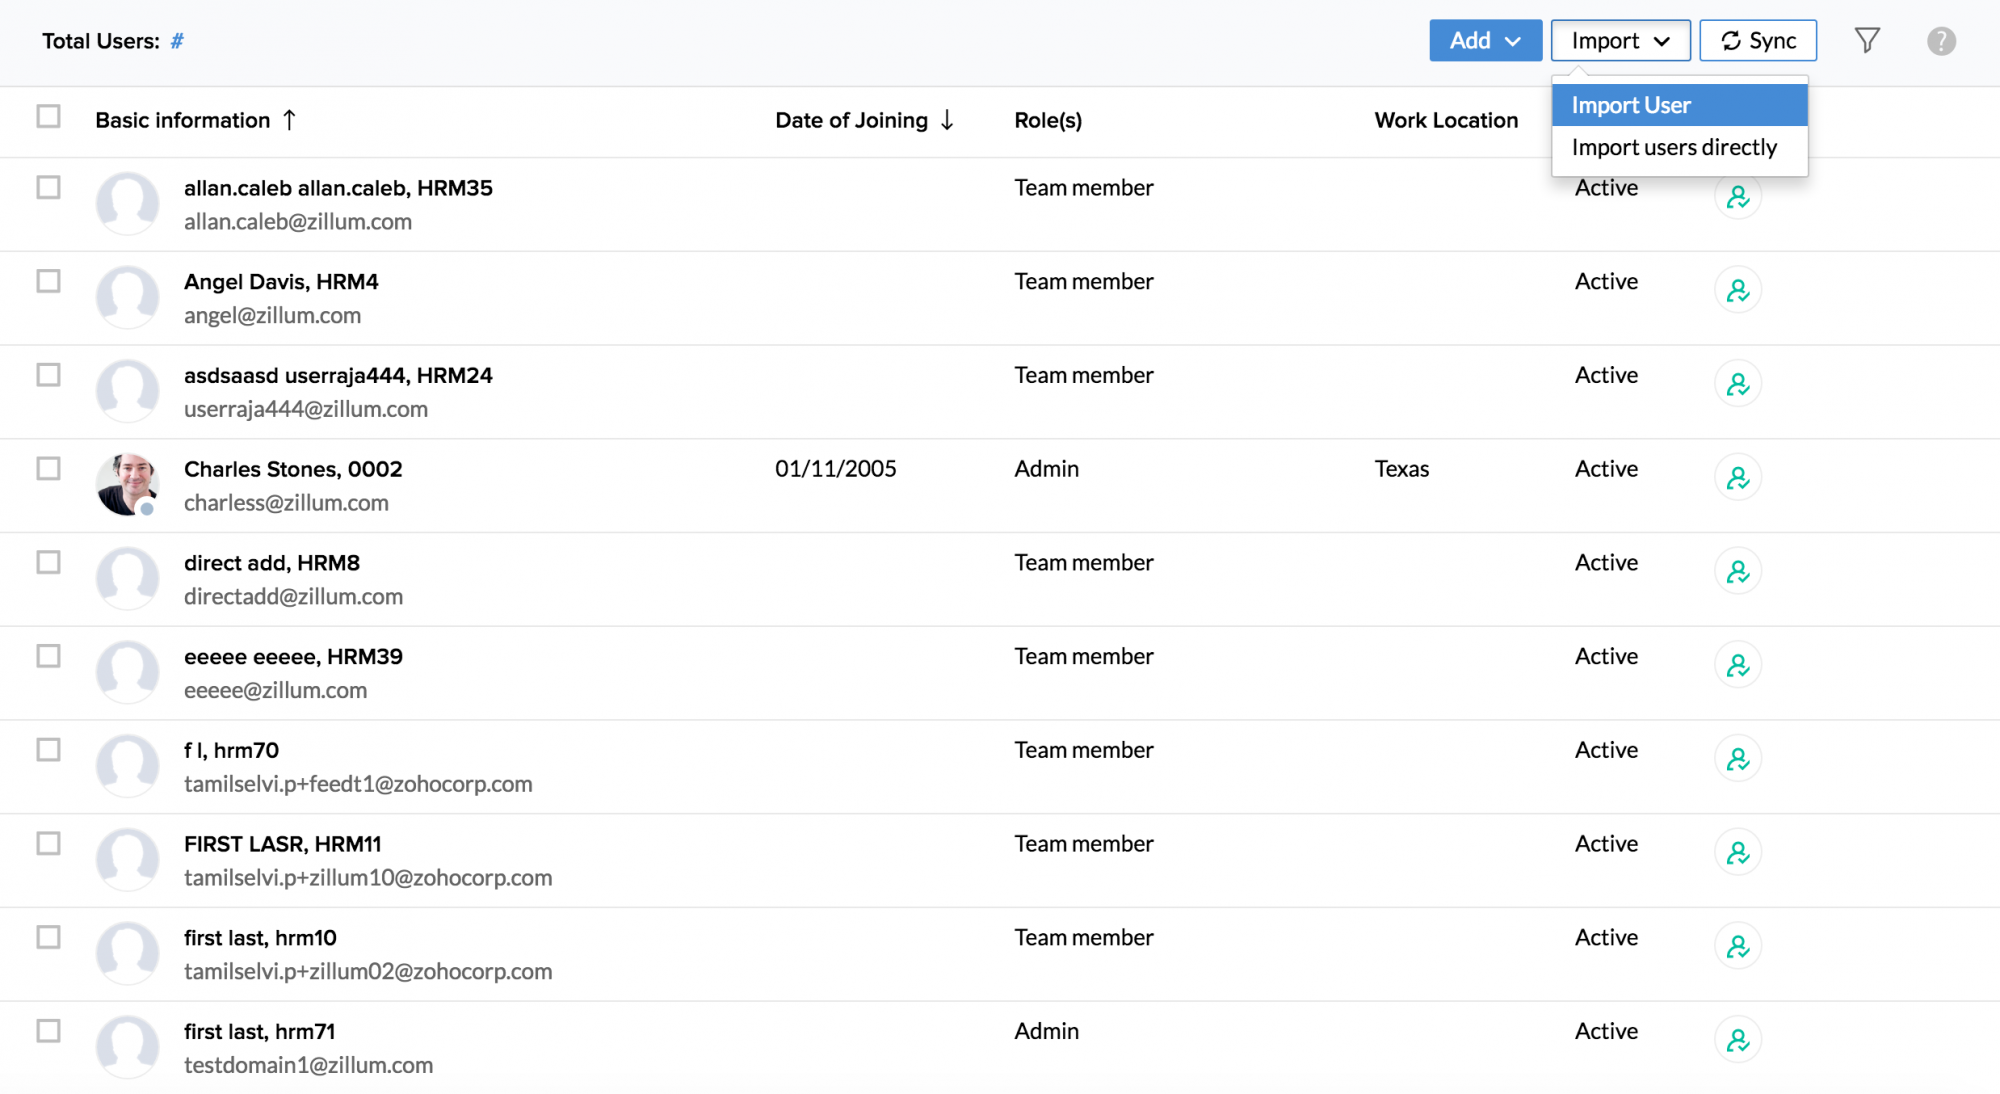
- Clickupload file andclick Next
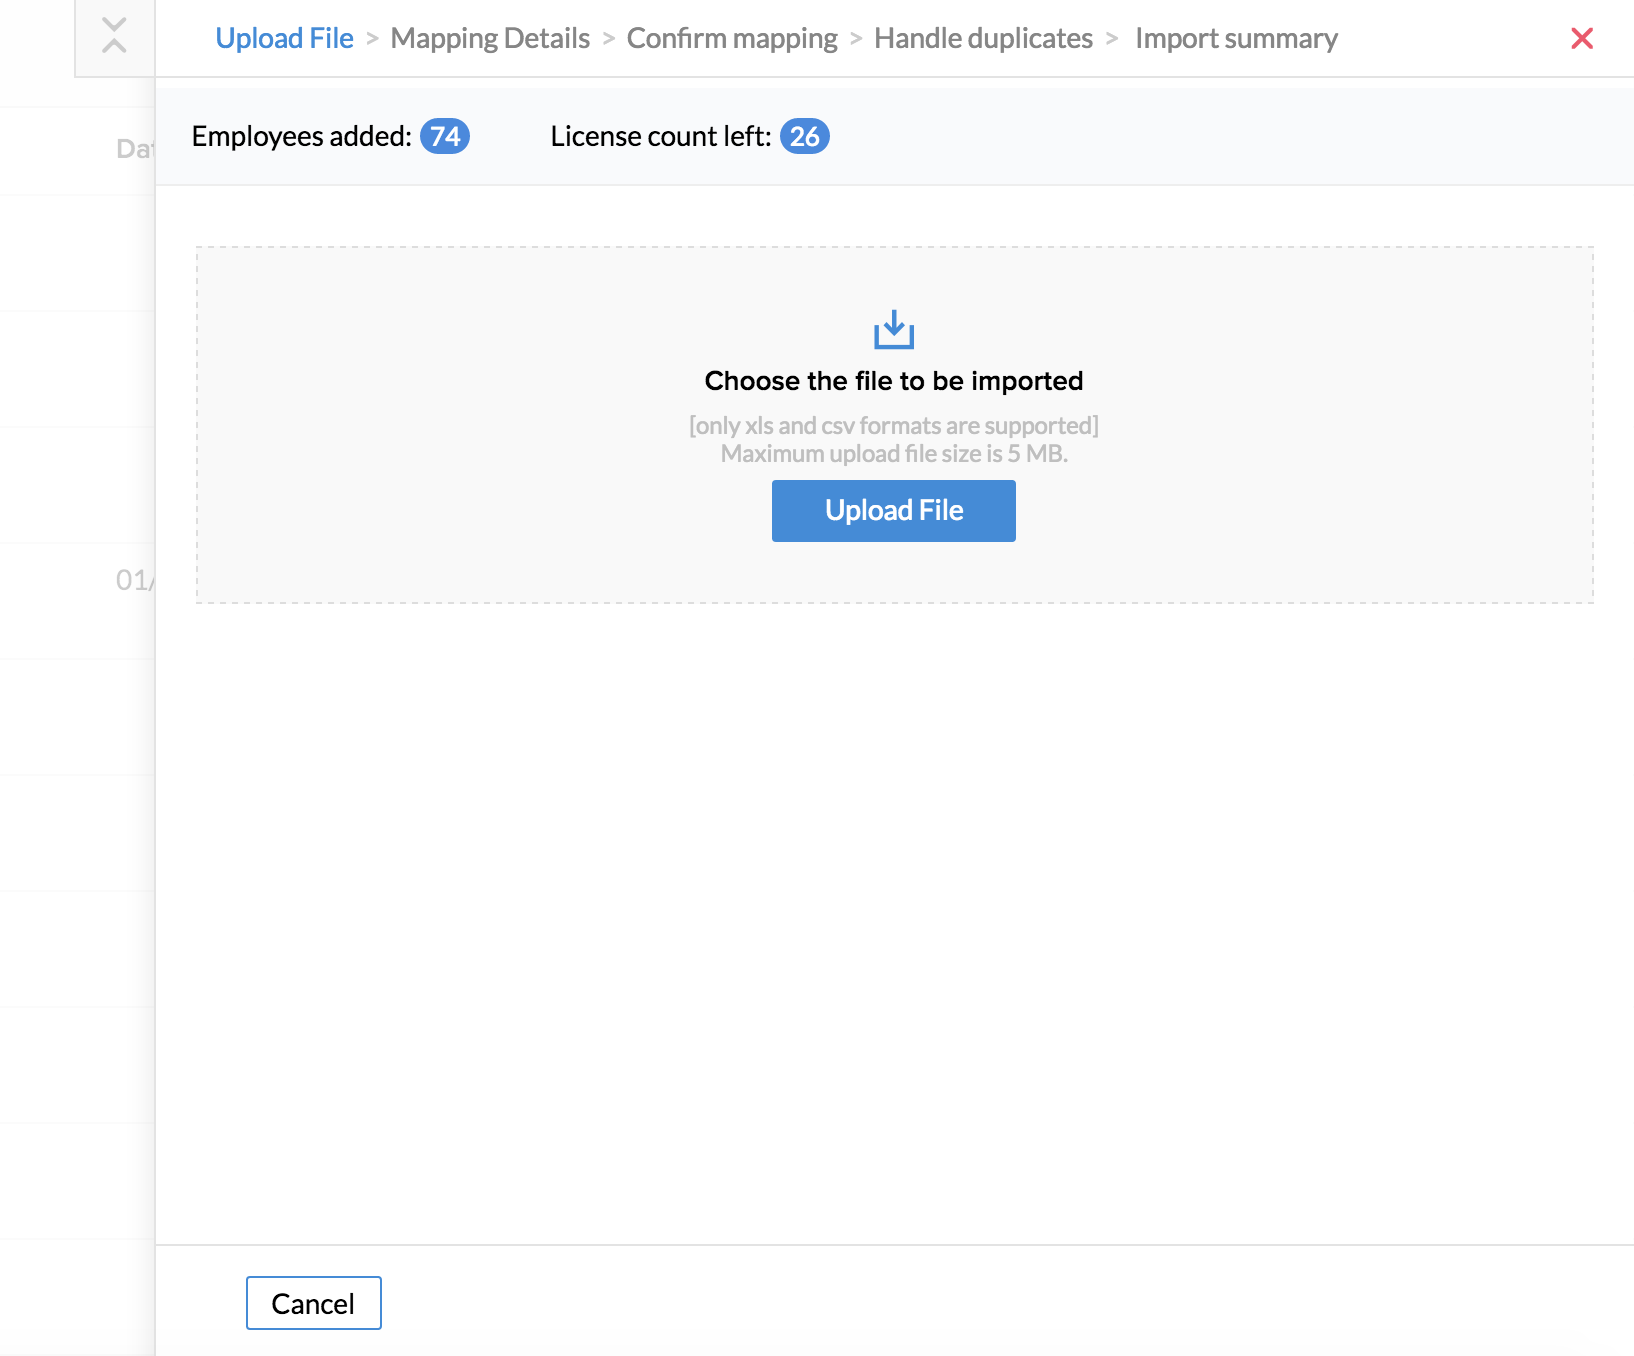
- Map the fields, confirm the mapping and handle the duplicates if any
- Click Next
How can I create, edit and delete departments?
To add department:
- From home, go to Settings (gear icon) > Organization > Department
- Click Add Department
- Enter the department name
- Enter the mail alias
- Select the Department Lead from the drop down
- Select the Parent Department
- Click Submit
To edit details of a department:
- From home, go to Settings (gear icon)> Organization > Department
- Click the Edit icon at the end of the department name that you would like to edit
- Edit the details that are required
- Click Submit
To delete department:
- From home, go to Settings (gear icon) > Organization > Department
- Click the Delete iconat the end of the department name that you would like to delete
Your department gets deleted.
How can I create, edit and delete designations?
To add designation:
- From home, go to Setup (gear icon) > Organization > Designation
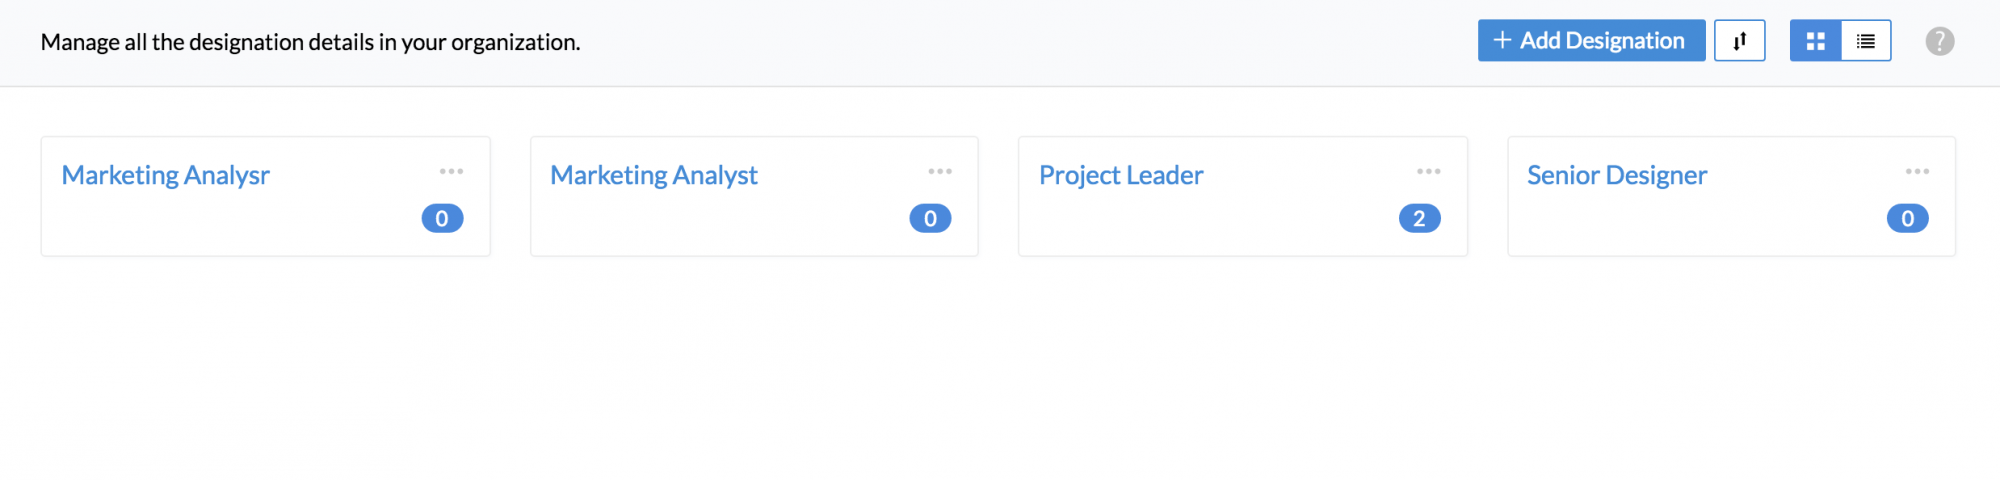
- Click Add Designation
- Enter the designation name
- Enter the mail alias
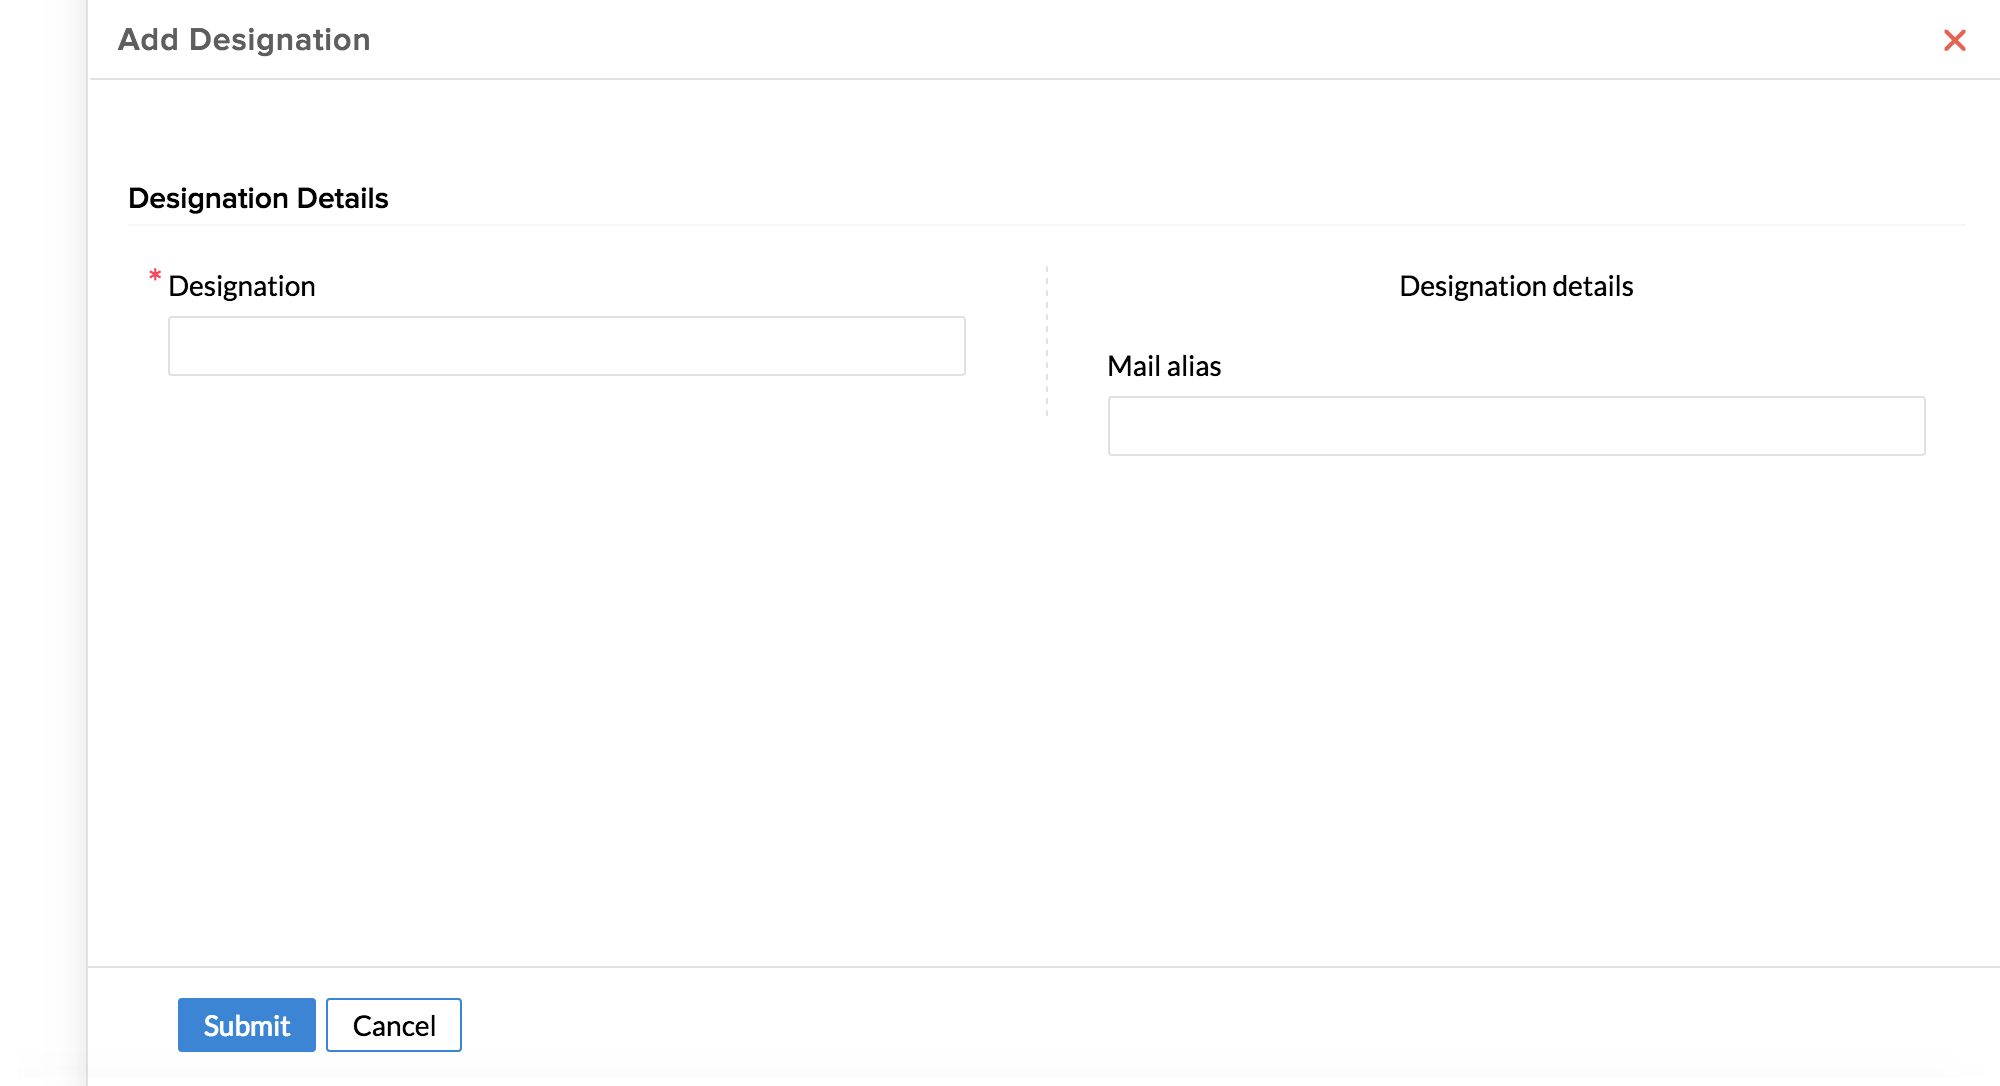
- Click Submit
To edit a designation:
- From home, go to Settings (gear icon) > Organization > Designation
- Click the Edit icon at the end of the designation name that you would like to edit
- Edit the details that are required
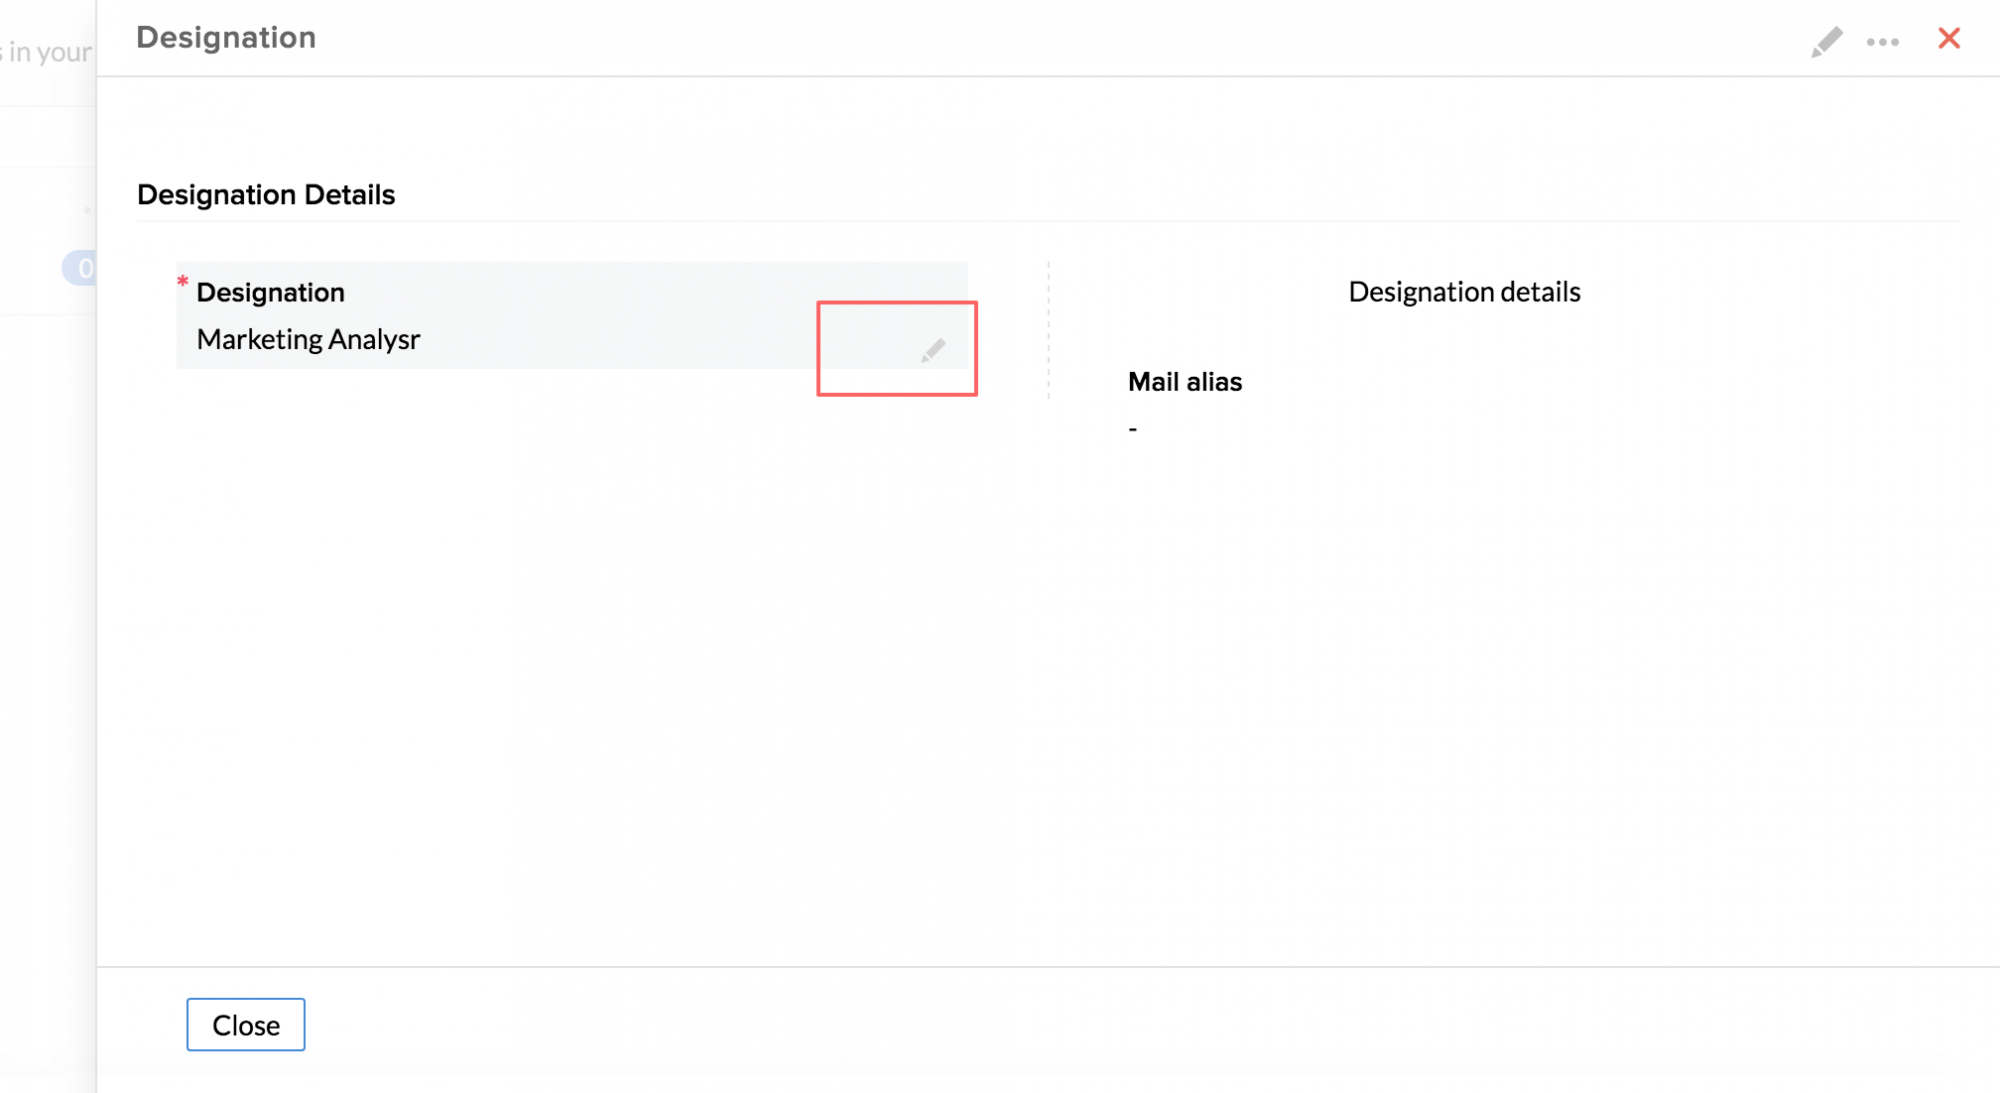
- Click Submit
To delete a designation:
- From home, go to Settings (gear icon) > Organization > Designation
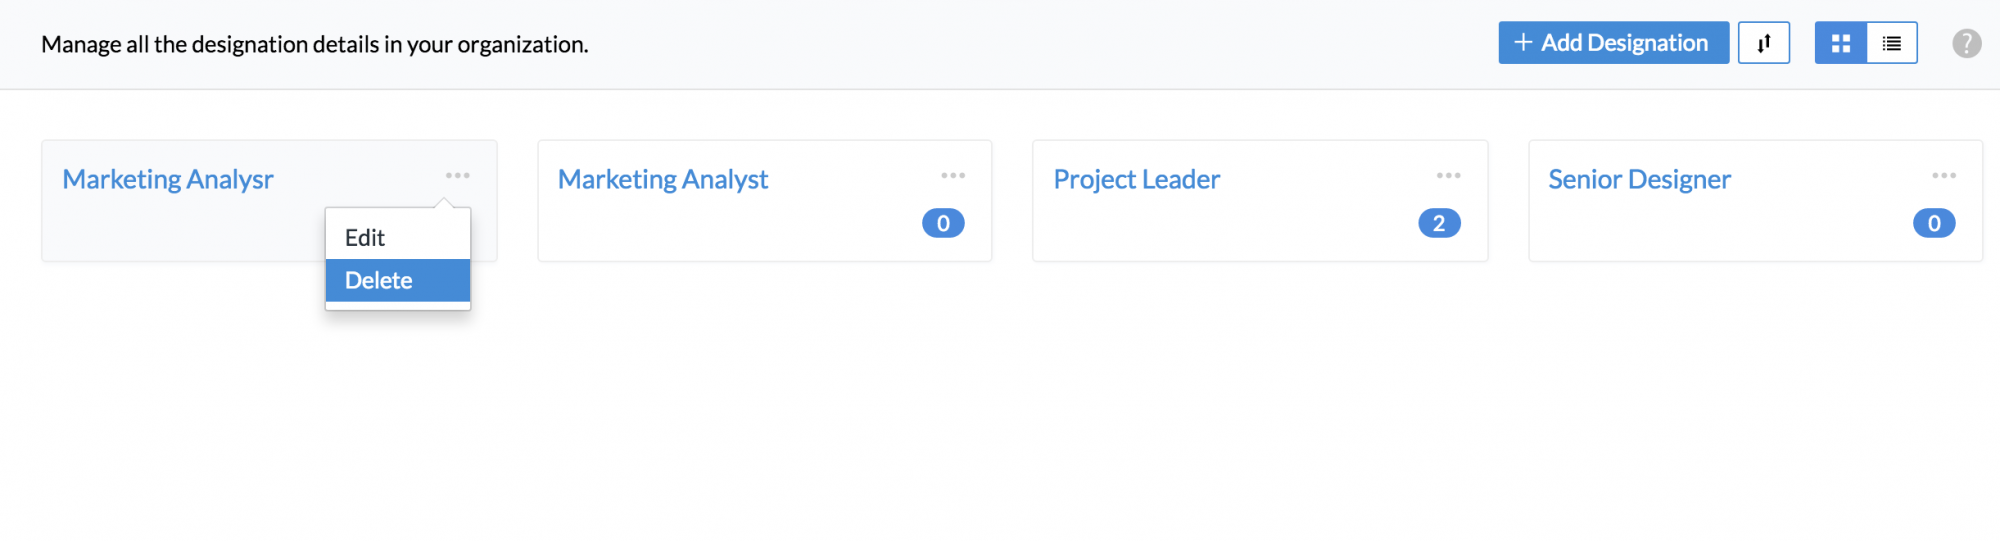
- Click the Delete icon at the end of the designation name that you would like to delete
The designation gets deleted.
Where can I create holiday lists?
To create holiday lists:
- From home, go to Settings (Gear Icon) > Organization > Holiday Calendar > Add
- EnterName of the holiday and thedate
- Check the box if it is a restricted holiday
- Define if the holiday has to be a half day bychecking the box
- Select the locations for which the holiday is applicable
- Give a description if needed
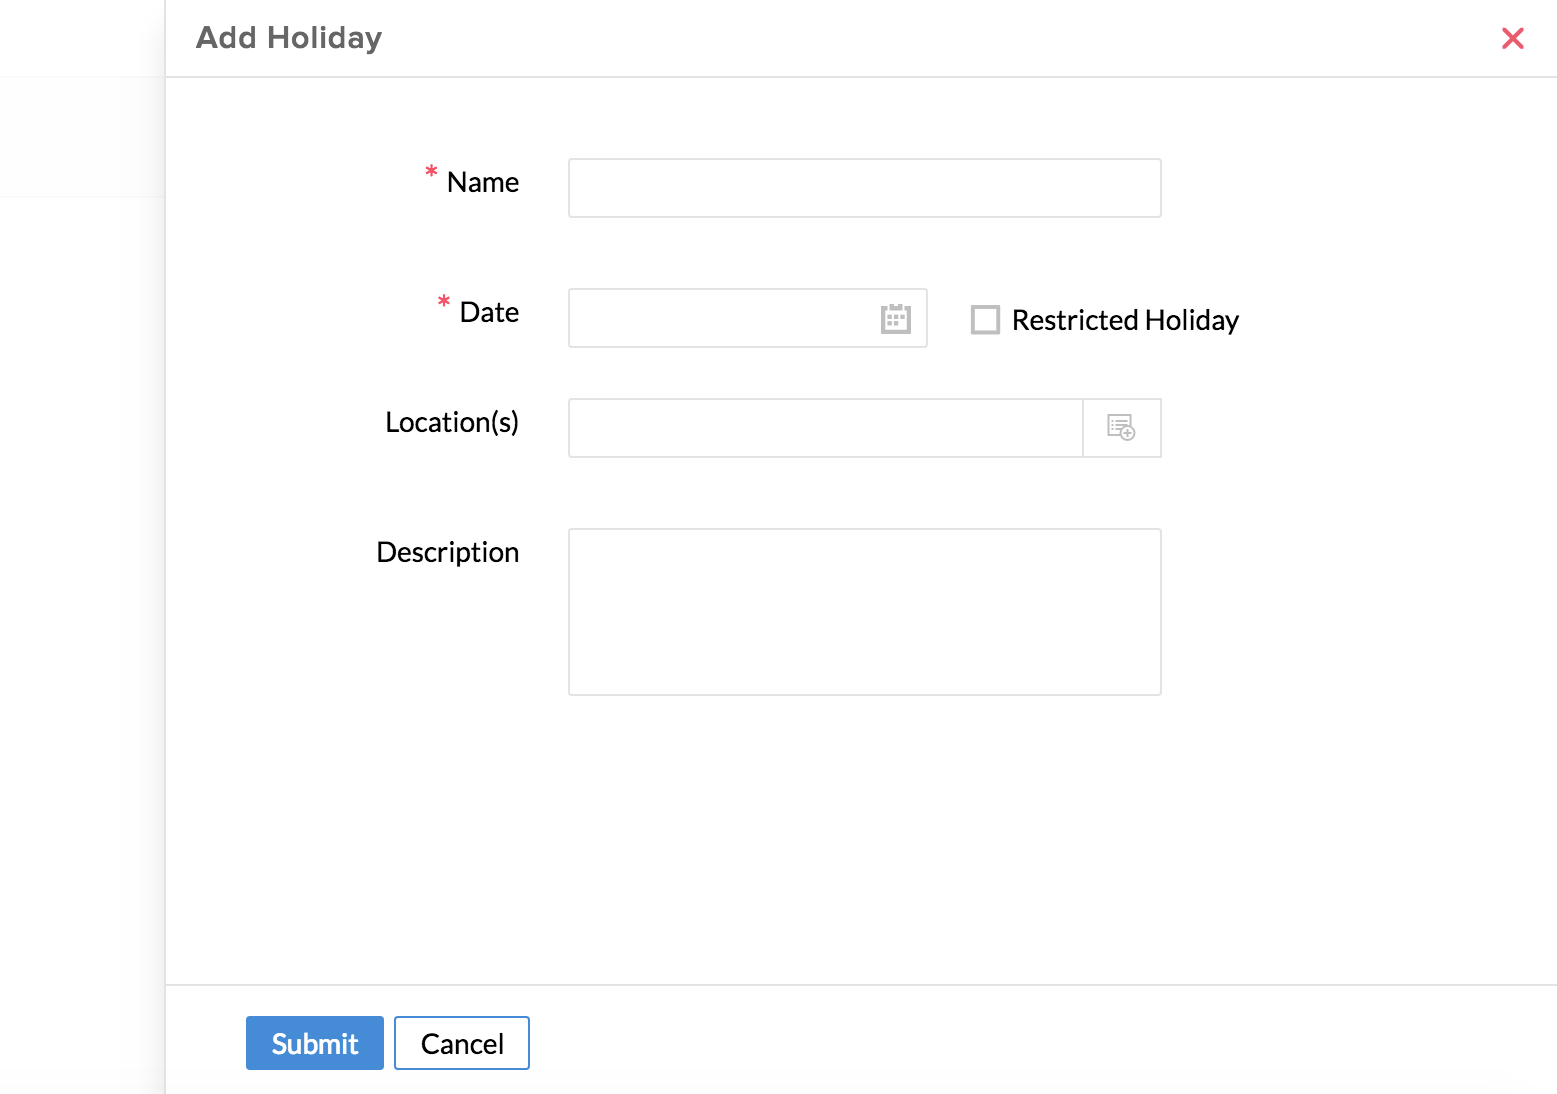
- Click Submit
Where can I add multiple location details for the organization?
If your organization has set up office in more than one location, you will have to create multiple locations. Follow the steps given below for doing this:
- From home, go to Settings (gear icon) > Organization> Location > Add
- Enterlocation name and select the country
- Enter other details likeMail alias and description
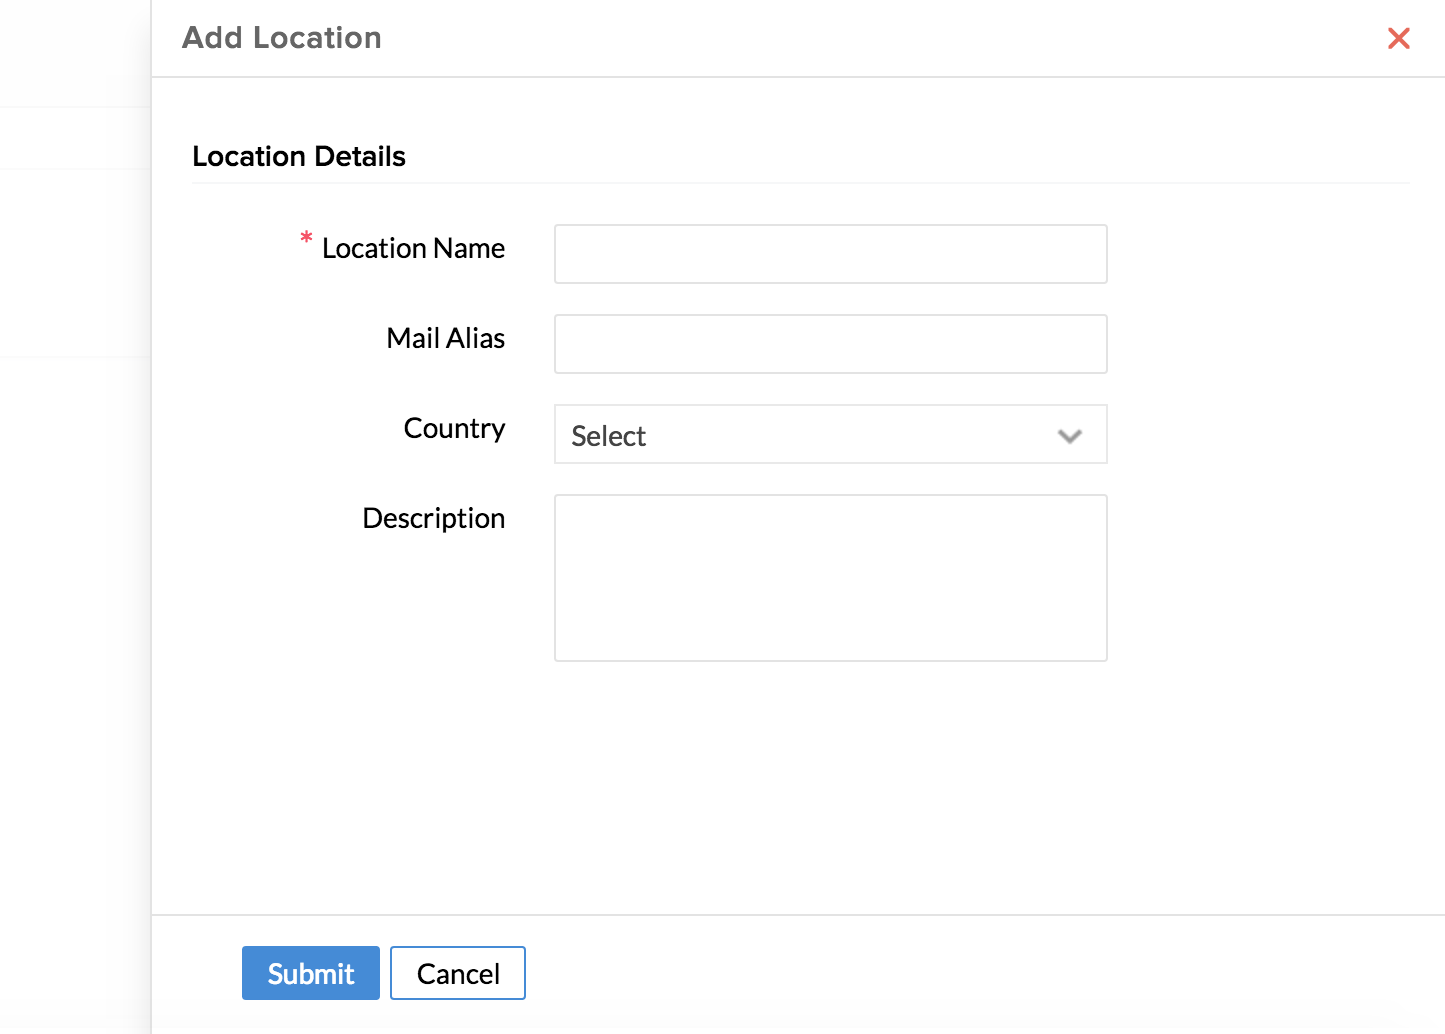
- Click Submit
What is the purpose of creating a group?
Groups are useful in the following scenarios
- When you want to post a message or announcement for a particular group, you can do so by selecting 'Users' in the drop down and mentioning the group name in the message. In this case, the message can be seen just by the members of the group
Note: You should be a part of the group that you are mentioning while posting the message. Even as an administrator, you will be able to post message only to the group that you are a part of.
If an user selects 'Department' from the drop down, and posts a message tagging a group, then the posted message will be seen by the department members (of the user) and by the member of the group that is mentioned.
- When you have to get approvals from a group of people across different departments of an organization. In such cases, a group can be created and approvals can be sent to this group.
I would like to have leave applications approved by a set of people in the HR team apart from the reporting manager. How can I do it?
Follow the steps given below to do this.
- From your home page, go to Approval > Add Approval
- Select the Leave form under 'Form Name' and give a name for the approval
- Click on 'Configure Approver' and select 'Reporting to' 'Single Level'
- Click the + icon to add another level of approver
- Under the first drop down, select 'Group' and under the second drop down select the desired group name

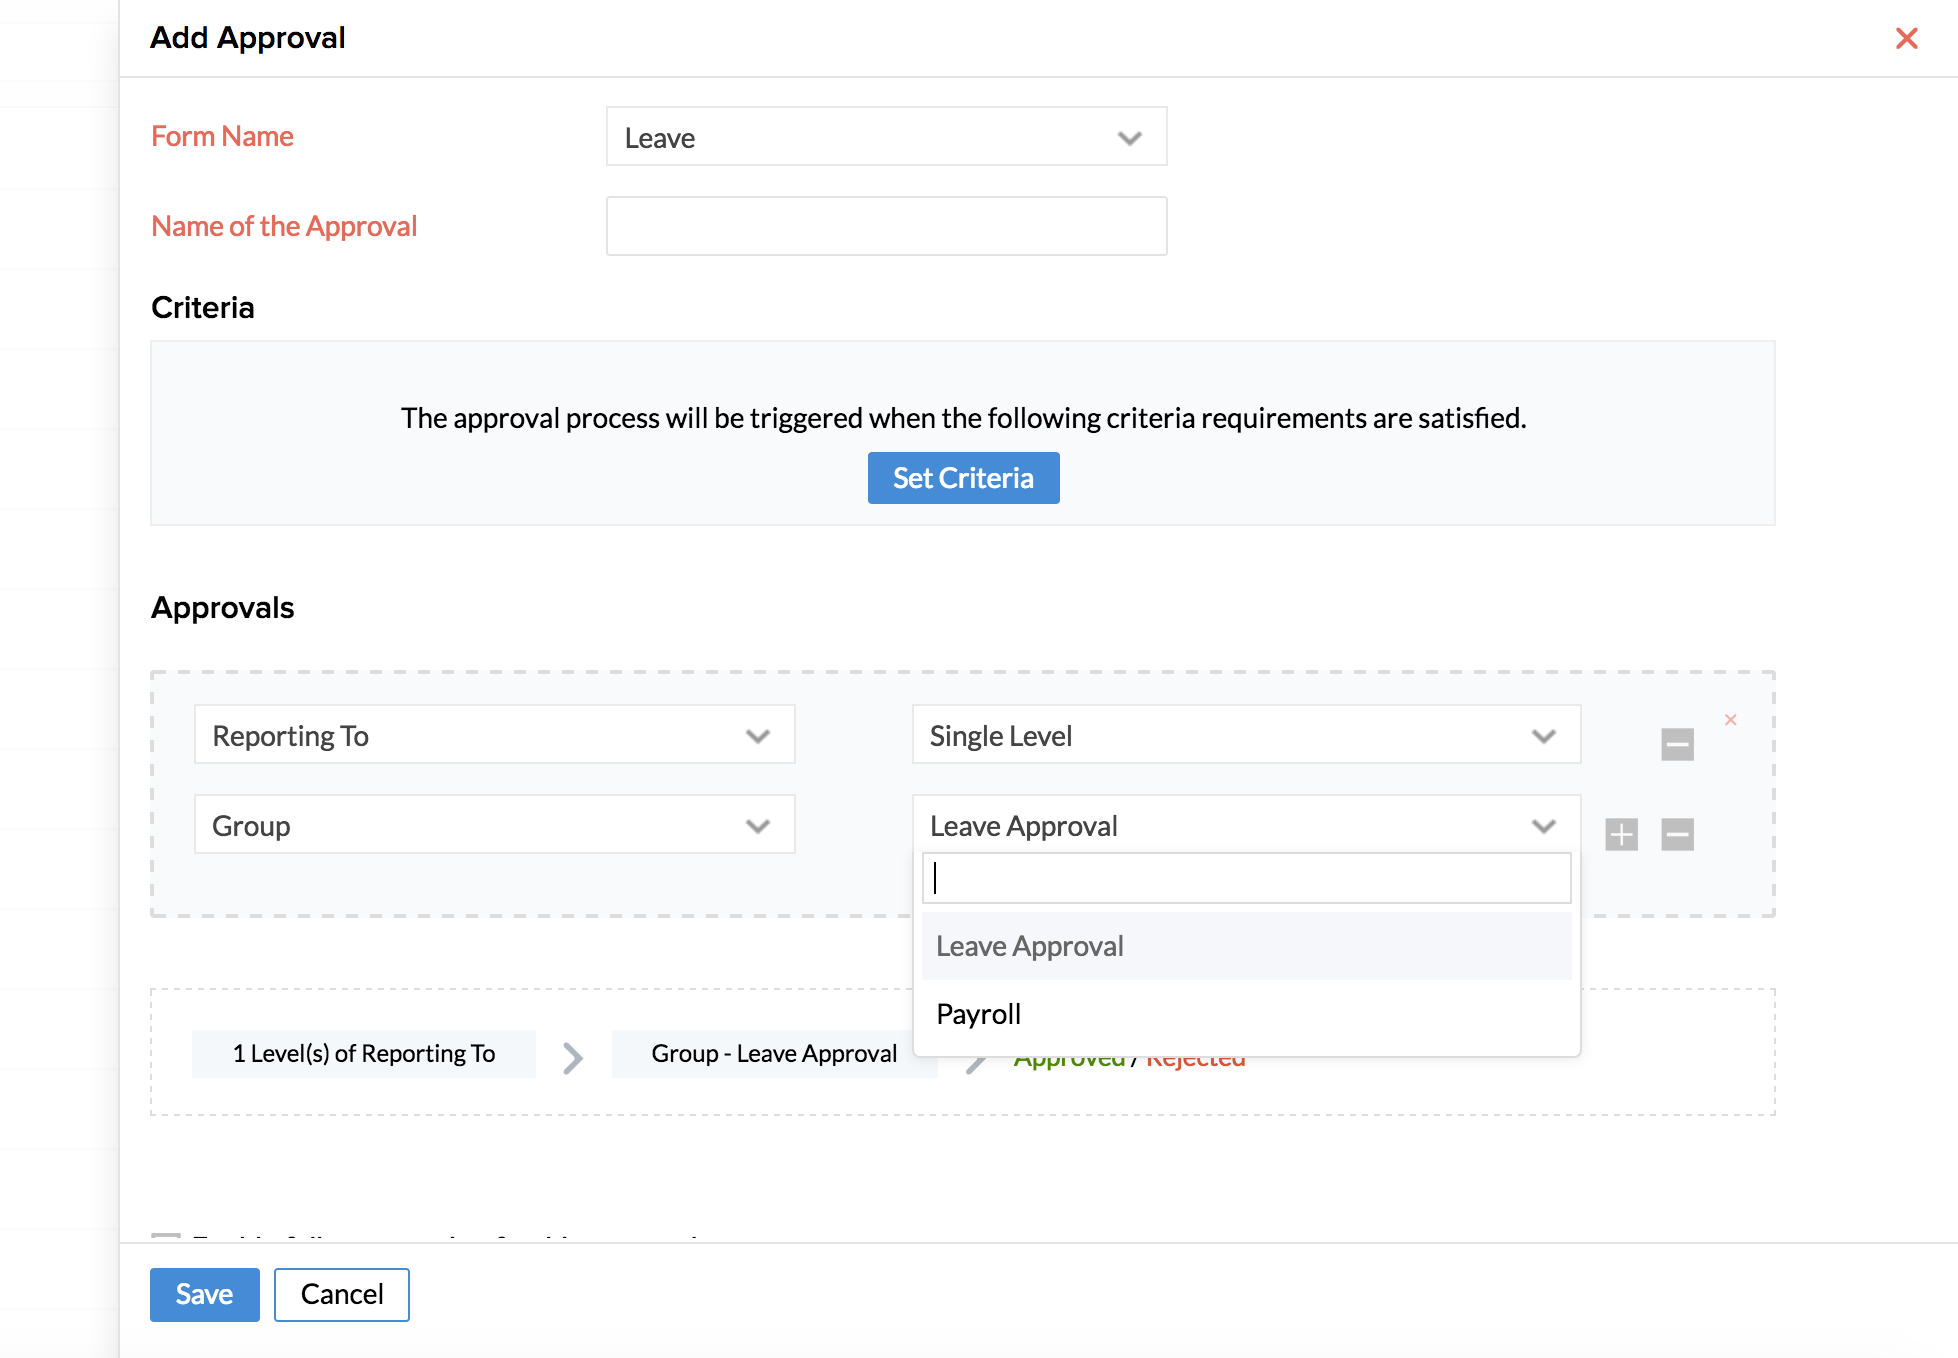
- Enable follow up if needed
- Configure a suitable message for approval
- Click Save
Now, based on the priority set under the Approval tab, leave requests will go to the reporting manager and to the group members for approval.
How do I edit/delete a group?
- From your home page, go to Settings (gear icon) > Organization > Groups > All Groups
You will be able to see the list of groups. You can also do this from Self Service > Organization > Groups > All Groups.
- Click on the edit/delete icon of the respective group
Note: The Admin of the group can also edit or delete the group.
How do I get to know the groups that I am part of?
- From your home page, go to Organization > Groups > My Groups
You will be able to see the list of your groups you are part of. You can also view this from Self Service > Organization > Groups > My Groups.
How do I get to see all the groups of the organization?
- From your home page, go to Settings (Gear Icon) > Organization > Groups > All Groups
You will be able to see all the groups that are created. You can also see this from Self Service > Organization > Groups > All Groups.
What is the benefit of configuring a pay period?
Creating a pay period can help you do the following:
1. Your payroll data report can be run automatically with the help of schedulers for the defined pay period
2. You can lock your payroll data thereby preventing any edits made to the data for the pay period defined
How can I configure a pay period?
Follow the steps given below to configure a pay period.
- From your home page, go to Settings (Gear icon) > Organization > Pay Period Settings
- Click on 'Configure Pay Period'
- Give pay period name and select the cycle
- Give an end day for the pay period
The start day will get populated automatically.
Note: The pay period will be dependant on the values you select here. For eg, if you would like to process payment for the month of Feb, with your pay period ending on 25th of Feb, then you have to select 25 in the End day. This means that the salary processed will be from the 26th of the previous month until the 25th of the current month.
- Select the processing day - employee pay will be processed on this day of the month/week for the chosen pay period. For eg - If you want the salary to be processed on 26th of every month, then the processing day should be selected as 26. Similarly, you can set a weekly period too
- Check the 'lock' box if needed
Note: Edits cannot be made to the attendance data of the pay period after the processing day set here.
However, in case of any adjustments, the admin will be able to edit data until the end of the consecutive pay period. I.e - edits for Feb month can be made until the 26th of March (Considering the processing day as 26th of every month)
- Under Applicable Location, select the location for which the pay period is applicable
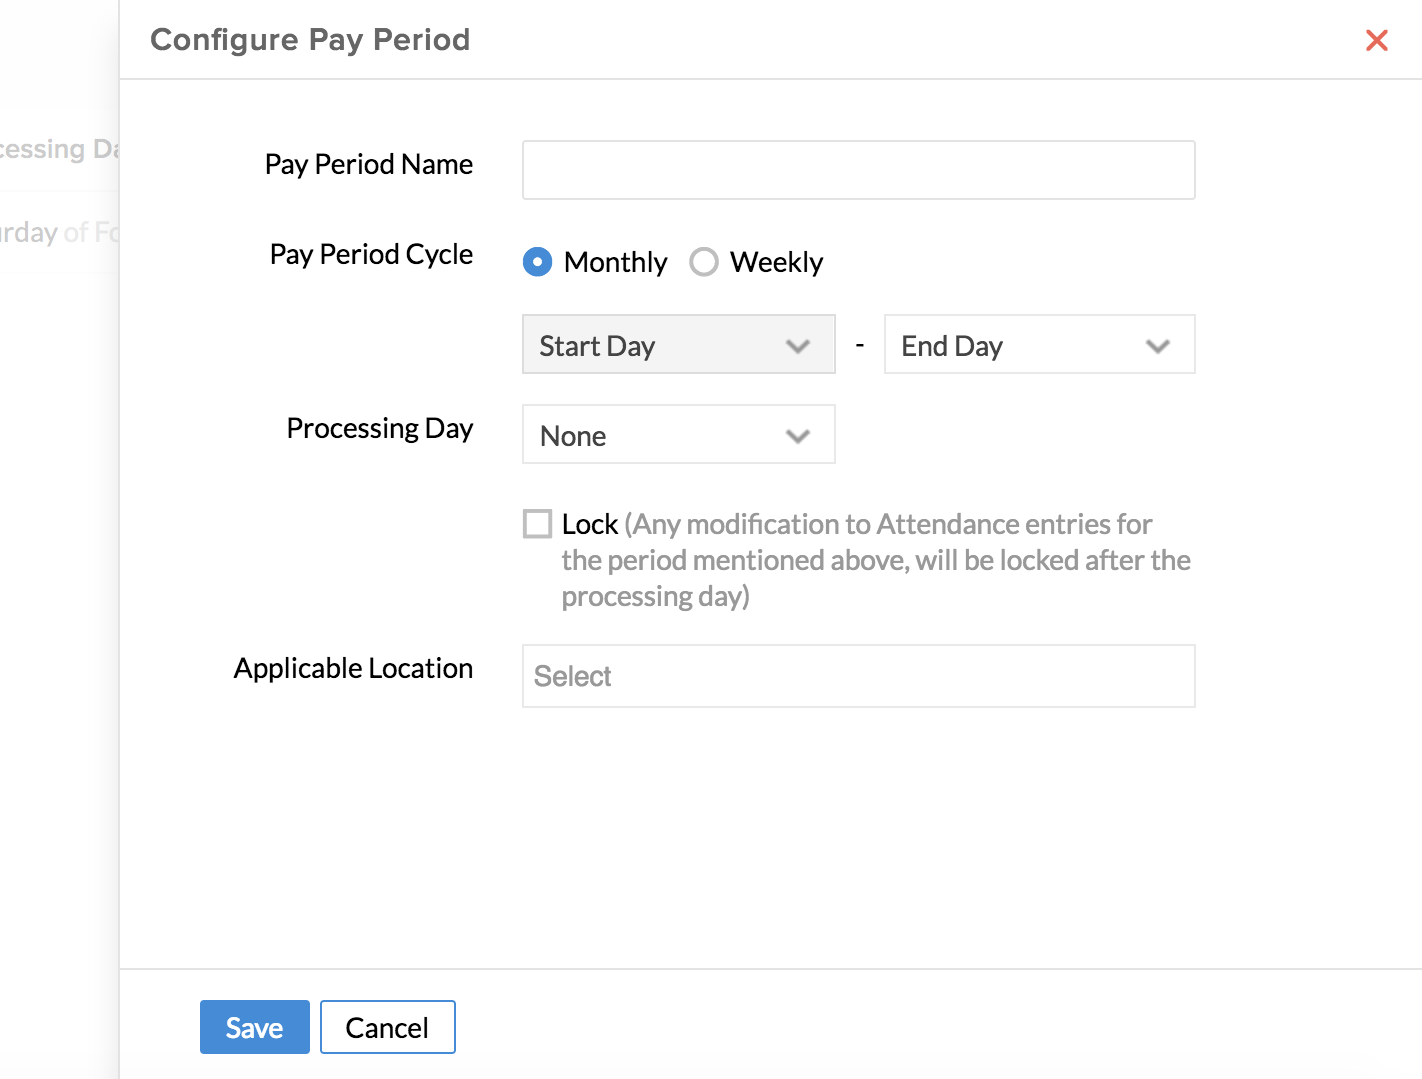
- Click Save
Can I disable chat for an employee?
As an administrator, you can define whether your employees need chat access or not.
- From home, go to Settings (Gear Icon) > Organization > Company Profile
- ClickModify settings
- UnderChat settings ,click Disable
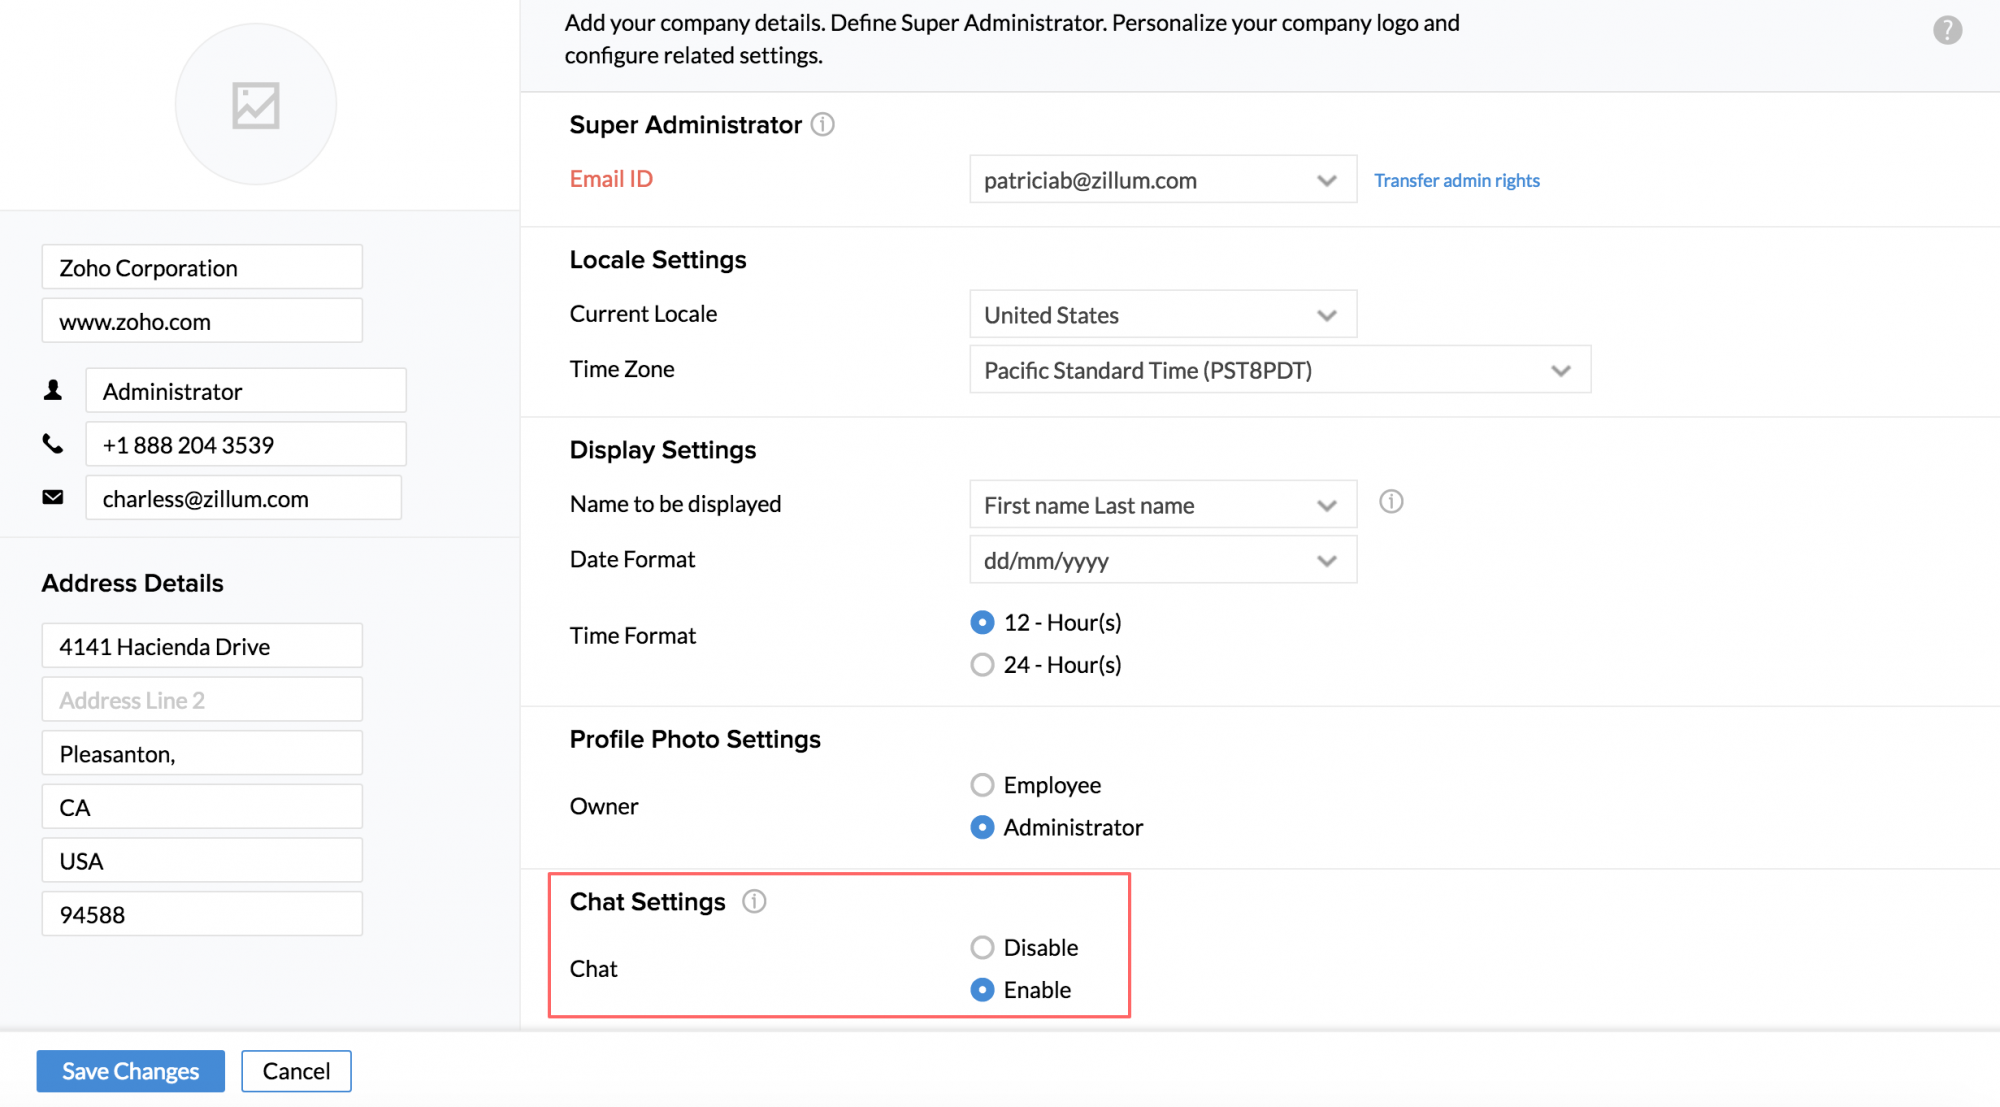
- Click Save Changes
Can I disable an employee from changing profile picture?
The permission to change profile picture can be given to employees or retained with the administrator. To disable an employee from changing profile picture:
- From home, go to Settings (Gear icon) > Organization > Company Profile
- Click Modify settings
- Under Profile Photo settings click Administrator
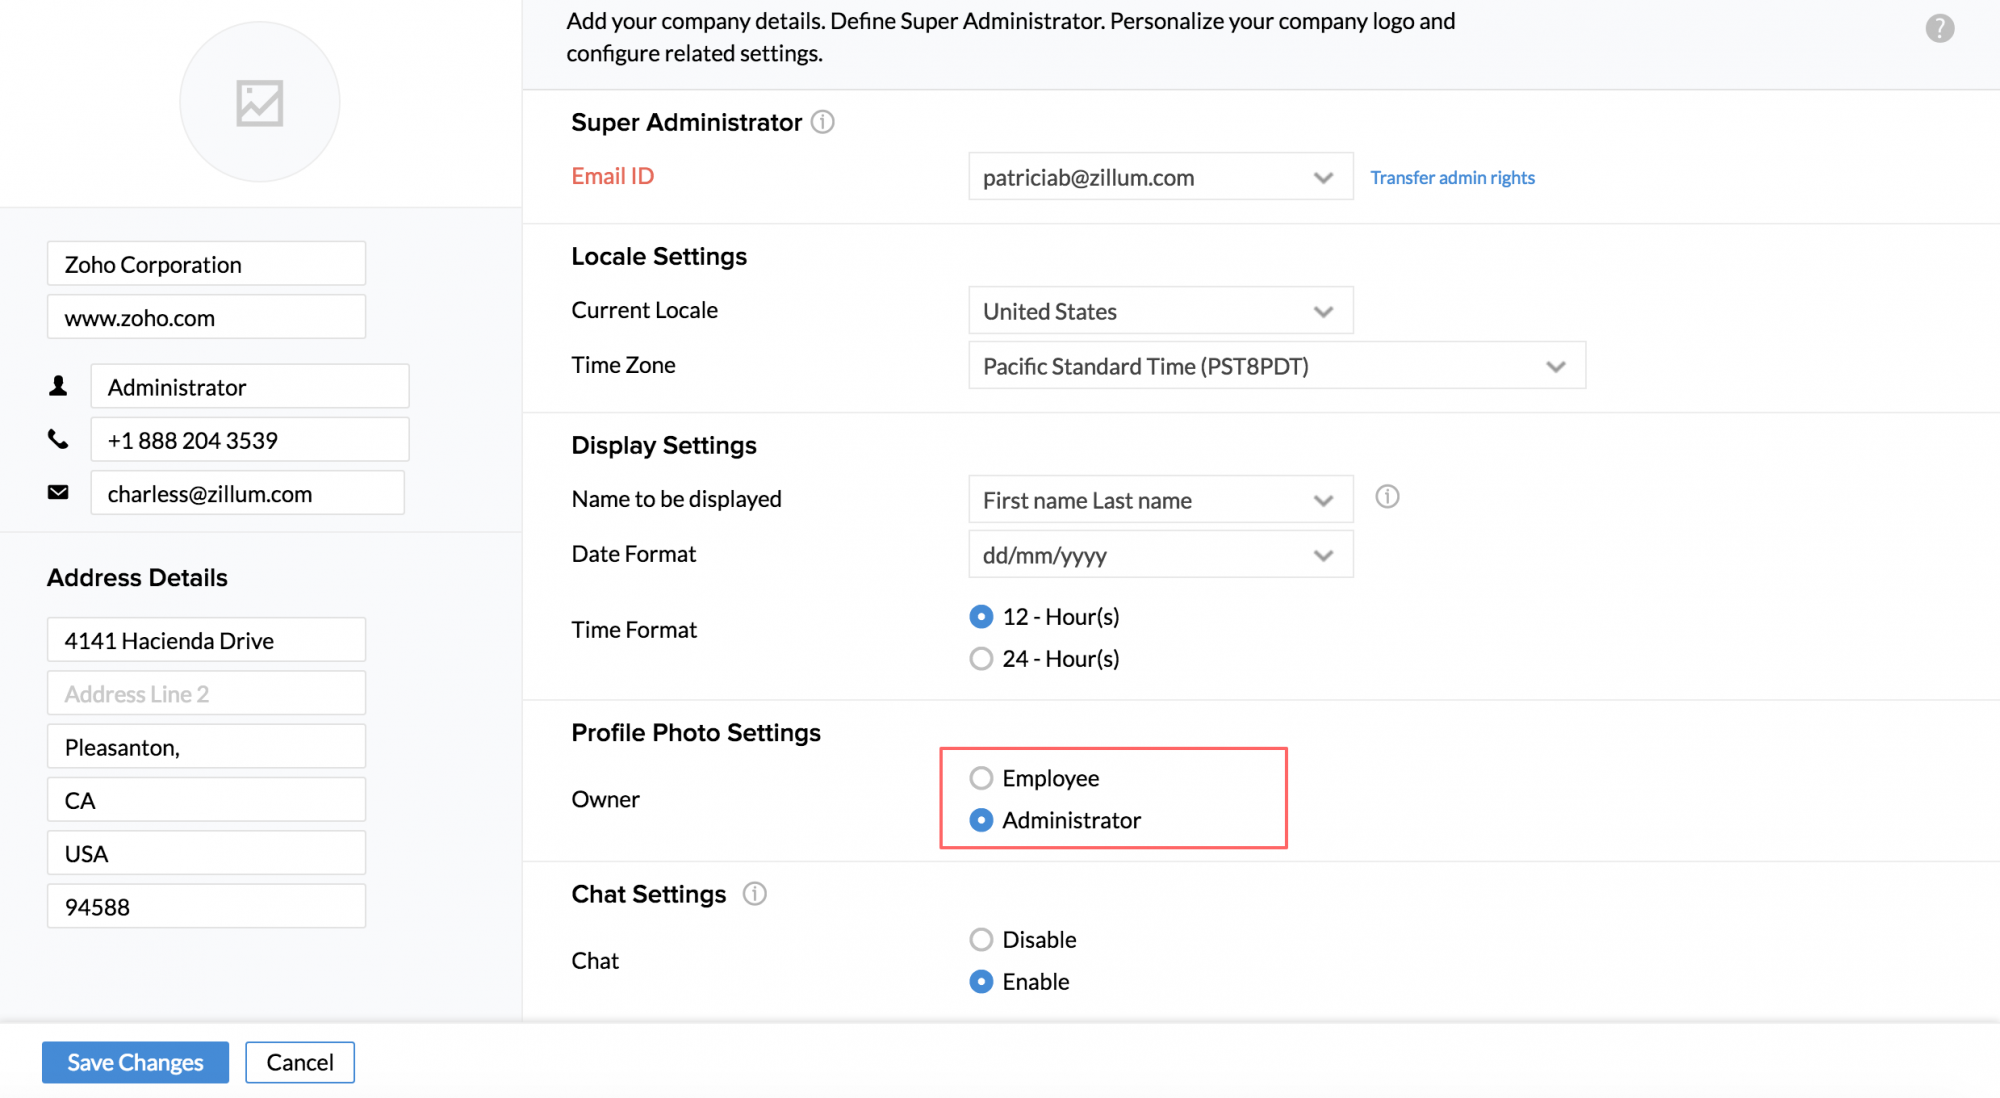
- Click Save Changes
How do I maintain details of non-users or temporary staff on the system?
Temporary staff can be added as Employee Profiles in your account. These staffs does not have access to the system. However, their details will be there for you to maintain their leave, personal information etc.
Where can I define the weekends and weekdays for each location of my organization?
If your organization has offices around the globe, there is a possibility that your weekends will be different according to the country in which the office is located. In this case, you will have the need to define weekends and weekdays separately for your various locations.
Week Definition:
Here you can define your weekdays based on the starting and ending days of your work week.
- From home, go to Settings (gear icon)> Organization > Holiday Calendar > Calendar Settings
- Under Applicable For Location, select the Location
- Under Week definition, select the day on which the week starts
- Likewise, select the day on which the workweek starts and ends as shown in the image below:
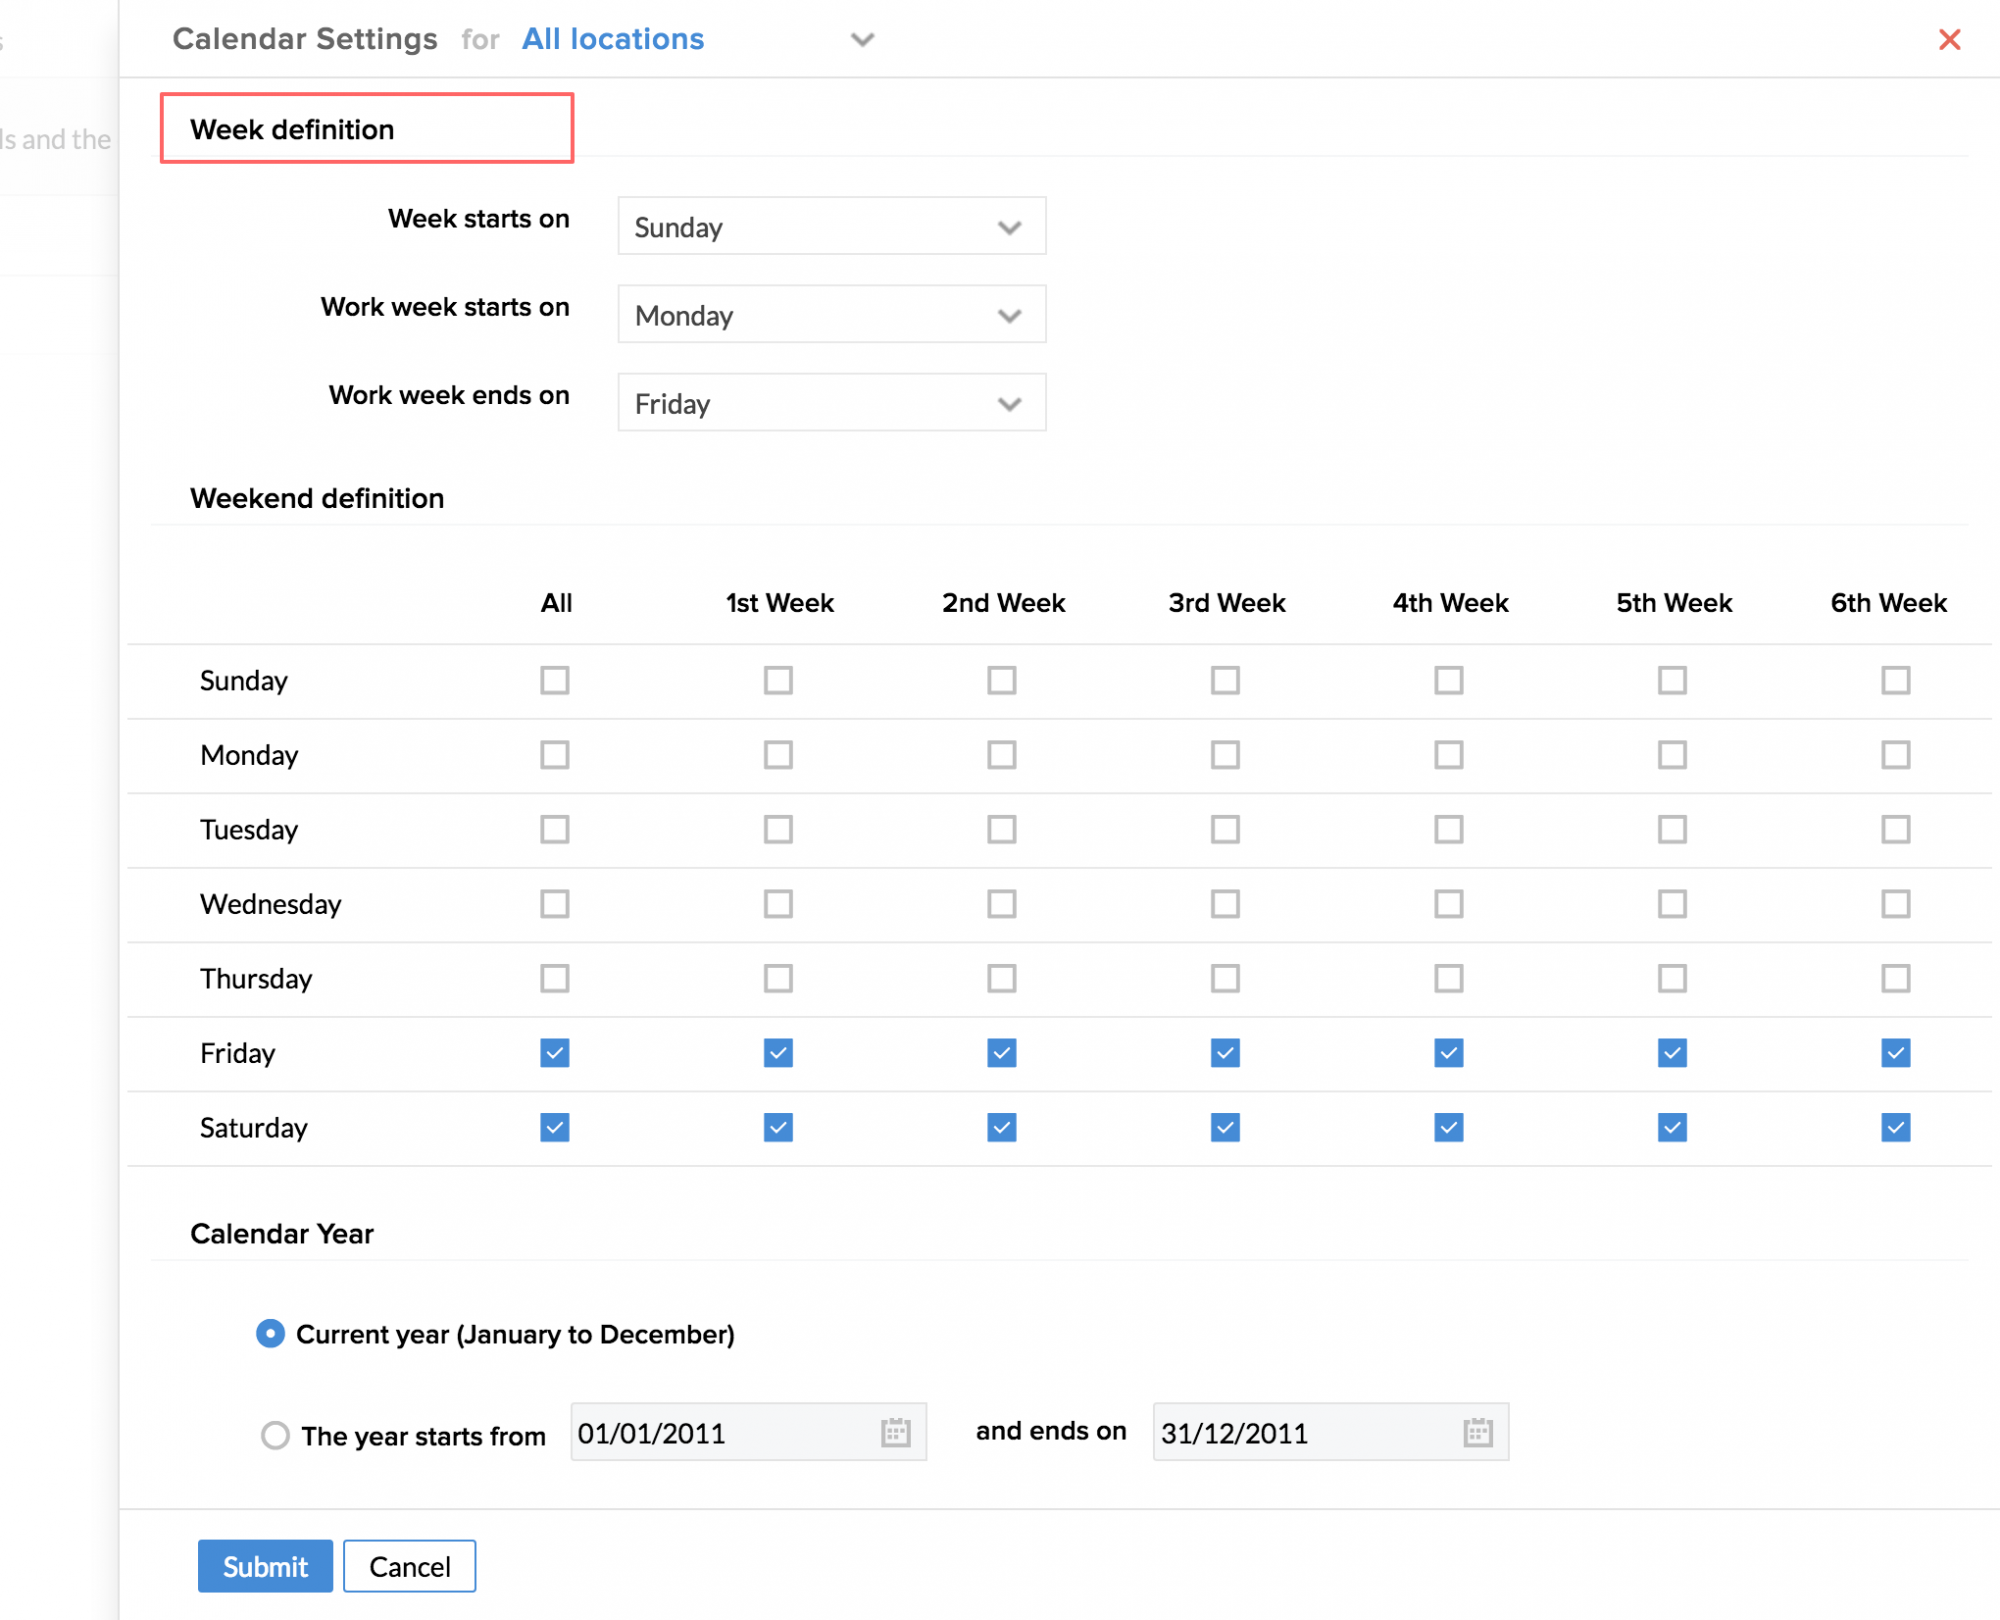
- Click Update
Weekend Definition:
Here you can define your weekends. For example, if your organization doesn't work on Saturdays and Sundays, you can define it by editing the weekend definition.
- From home, go to Settings (gear icon) > Organization > Holiday Calendar > Calendar Settings
- Select the Location for which this weekend is applicable
- Click Edit on Weekend definition
- Click to mark the weekend in each week (refer image above)
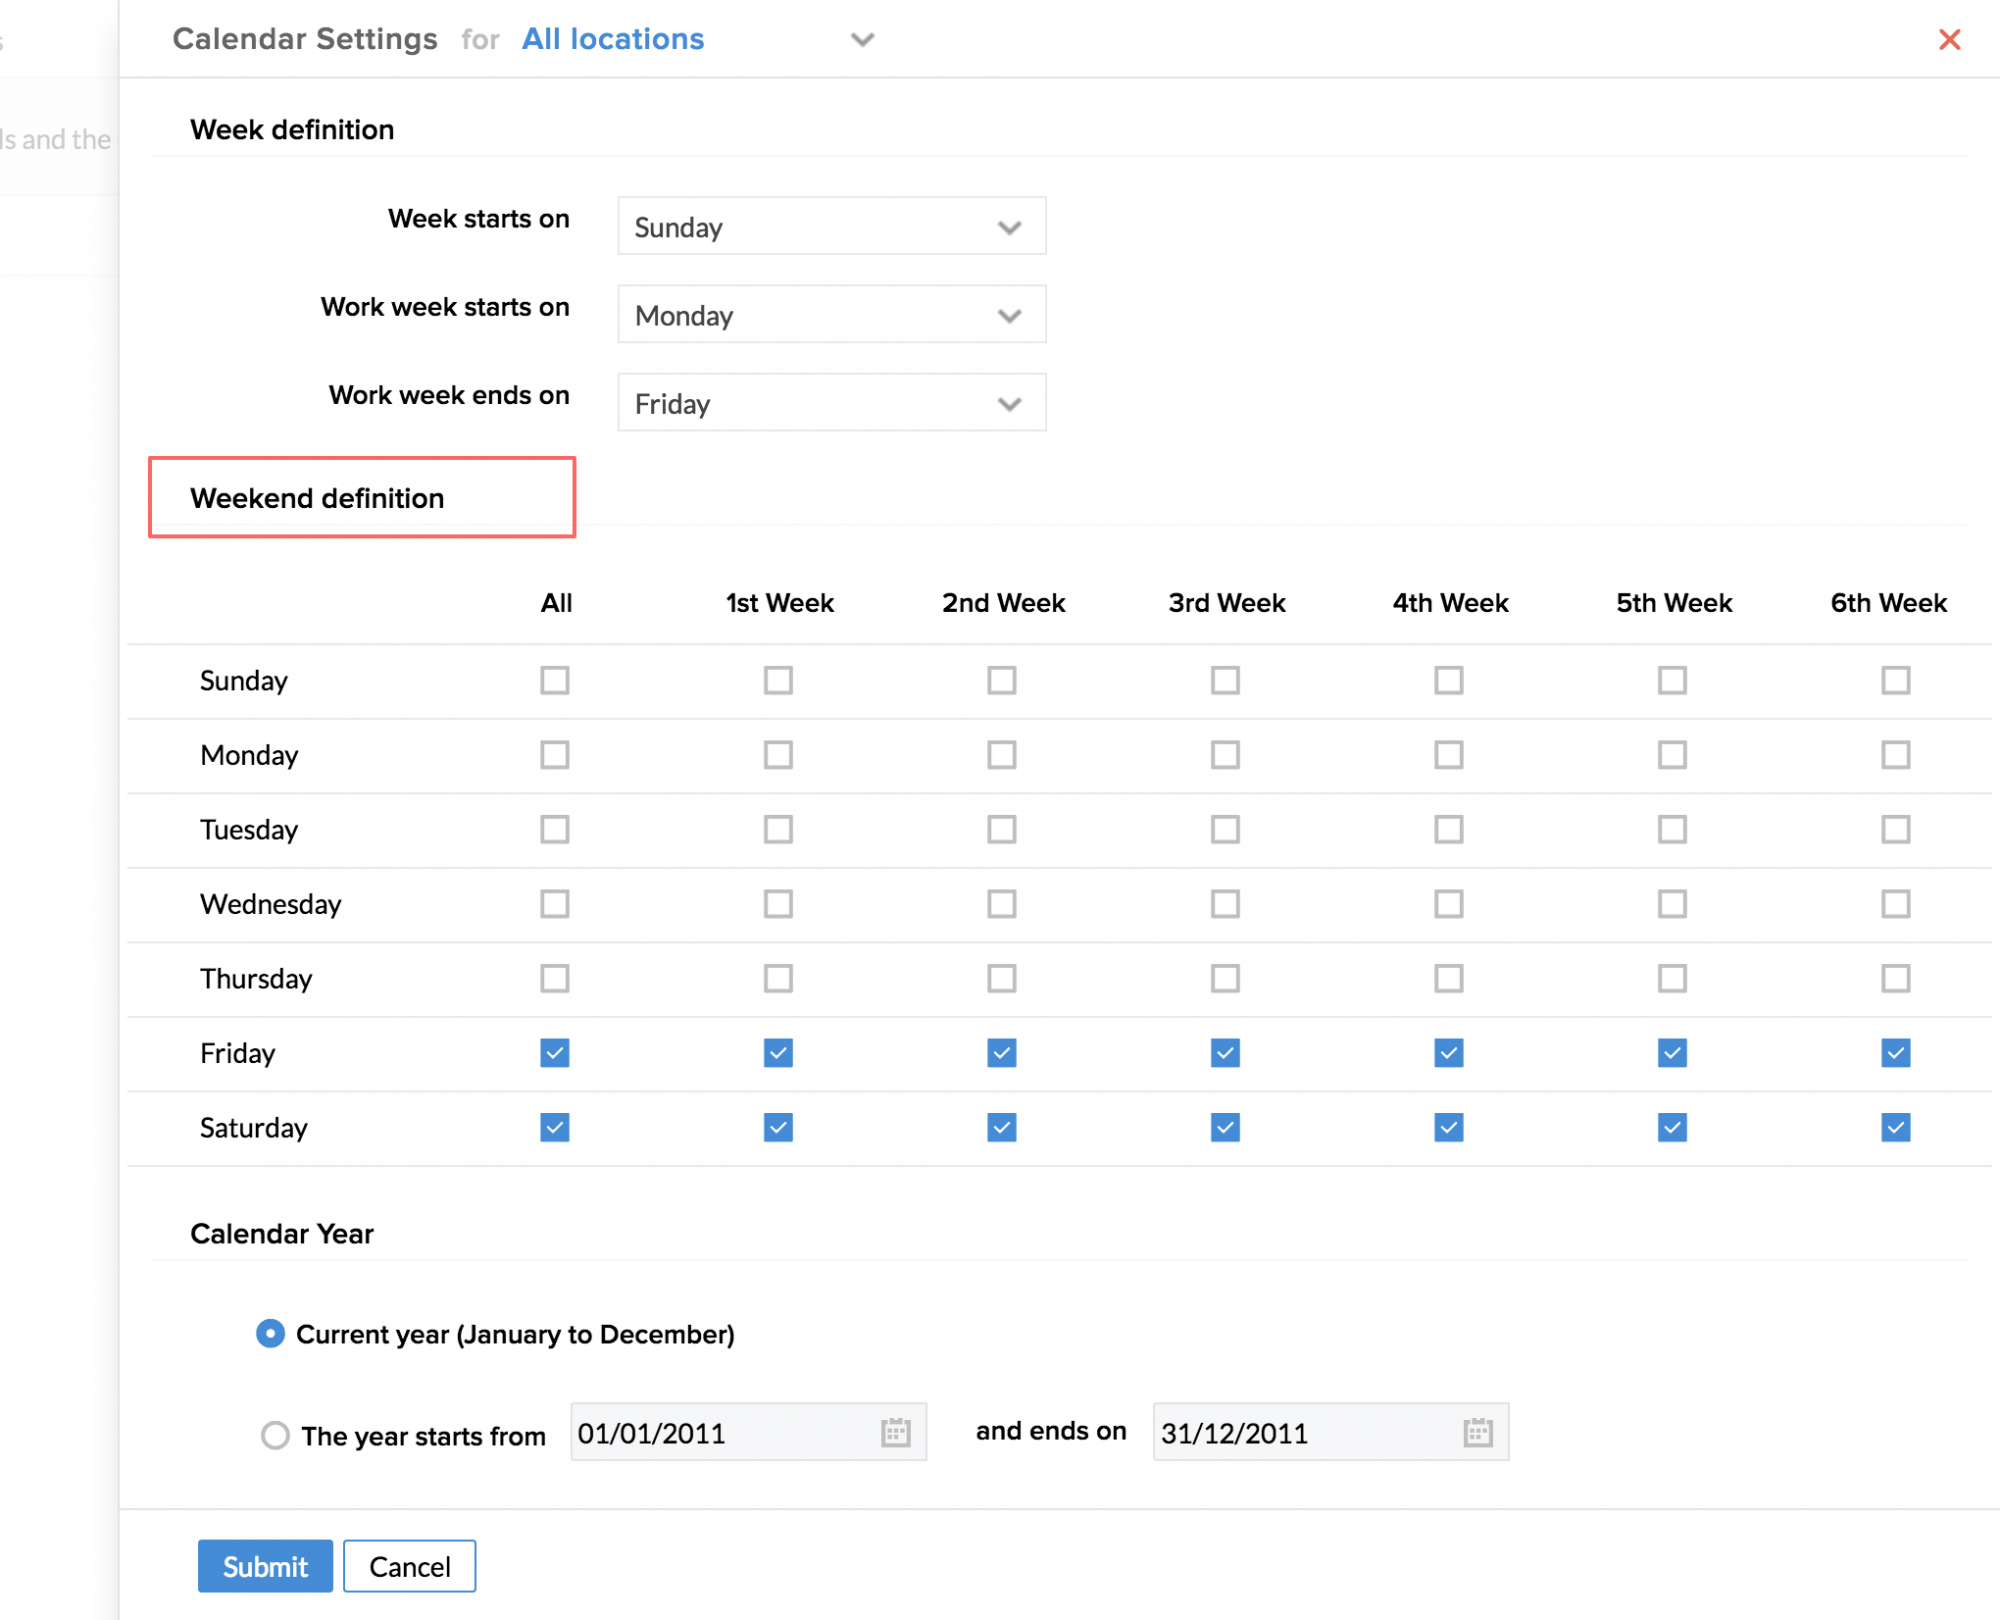
- Click Update
Calendar Year Settings
This setting lets you define your calendar year settings. You can either choose the current year as Jan-Dec or define the calendar year.
- Go to Settings (gear icon) > Organization > Holiday Calendar > Calendar Settings
- Select Current year if you want the January to December format
- If you would like to define the year, select the Year Start From option and give the start and the end date

- Click Update
How can I import or export holidays?
If you have a holiday calendar created already, it is possible for you to import the file directly into your Zoho account. Similarly, you can also export the holiday calendar that you have created.
- To Import, go to Home > Organization > Holiday Calendar
- Click on the ellipsis mark right after the Filter icon
- Click Import
- Select the Location for which you are importing the file. Select All locations, if the calendar you are importing is for all locations
- Select Upload File
- Browse for your file and upload it
Note:Your file should be in .ics format.
Similarly, if you click Export, your calendar gets exported in the .ics format.
- Click Submit
How can I create organization tree?
Organization or Department Tree is automatically created when the "Reporting To" and "Department" field values are set properly.
When you click on an Employee's name under Setup (gear icon) > Organization > Employee, you can see the 'Reporting to' and 'Department' when you click on the Employee's name.
Note: While importing the list of Reporting To, please ensure you give the emp id of the manager and not just the first name and last name.
How can I change the theme of my account?
On your home page, you will have the option (ellipsis mark) to change your theme, as shown in the image below:
