
Files
Where can I save important Company Policy files for employees to view them?
In any organization, there are few files like the company handbook or HR policies which should be available for the ready perusal of the employees. These files can be stored under the Files tab. There are two categories - the Company Files and HR Files.
Company Files are for the Files like Employee Handbook, Policy Documents of your organization etc, while HR Files are for confidential documents of employees.
To add Company Files, follow the steps given below
- From your home page, go to Files > Files > Add
- Select the file you would like to add. You can either upload the file from your desktop or from cloud
Note: The list of supported services are given below.
- Zoho Docs
- GDrive
- Dropbox
- One Drive
- Box
- Evernote
- Give a name for the File
- Select the Location or select All
- Check the 'Allow Download' option if needed
- Give a description if needed
- Under Category, select the category or add a new category
- Check the box if you would like to notify your employees through email about this file

- Click Submit
How can I classify the files according to the purpose?
You can classify your files under different categories. Follow the steps given below to add a new category:
When you upload a file under Company Files or HR files, the categories which you have created here will get listed. You can choose the desired one.
Alternatively, you can follow the steps given below to do this:
- From your home page, go to Files > Settings > Add category

- Give a name for the category
The Category gets added instantly.
What is the difference between Company files and HR files?
Company files are common files that are shared throughout the organization based on the locations. HR Files are those files which are for the view of specific employees or specific roles or for the HR team to maintain as a confidential file for an employee without the employee having any access to the file.
I need to upload offer letter to my employees. How do I do it?
You can set permission for a specific employee to view a file if you add a file as an HR File.
- From your home screen, go to Files > Files > HR Files > Add
- Upload the offer letter from your desktop or from Cloud
Note: The list of supported services are given below.
- Zoho Docs
- GDrive
- Dropbox
- One Drive
- Box
- Evernote
- Enter the File name as offer letter
- Select the employee name from the dropdown if you have chosen 'Employee Based'
- Check the 'Hide from Employee' if you would like to have the file away from the view of the employee
- Check the option 'Share this to Reporting Manager' if you would like the Reporting Manager needs to access the file
- Give a description if required
- Select the category under Category
- Click 'Notify through email' if you would like to have a notification sent
- If you are choosing 'Role Based' instead of 'Employee Based', you can select the Role from the drop down

- Click Submit
I would like to upload the Performance review file of all employees for the perusal of the HR team and Reporting Manager alone. Is this possible?
Importing multiple HR files at one go helps you address this. Usually, during Performance Reviews, the proceedings of an appraisal meeting are documented. These documents are for the view of the HR and the reporting manager. You can have this file imported for all employees at one go. Follow the steps given below.
- From your Self-service page, go to Files > HR Files
- Click on the Import icon and upload the document
Note: All the documents can be compressed into .zip file and uploaded. You have to ensure that the files are in the format - filename_empid. Files thus imported will get saved as HR file for the respective employee's Files tab under HR Files.

- Give a File Name
- Select 'Employee Based' under File Permission View
- Check the 'Hide from Employee' and 'Share this to Reporting Manager' boxes
- Give a description if needed
- Select a category or multiple categories from the drop down.You can also add a new category
- Check the box 'Notify through email' if needed
- Click Submit
The file now gets saved as HR file for the respective employee and can be seen only by the HR and the Reporting manager.
Note: In case, if you have selected multiple categories under 'Categories', all the files imported will be placed under all the selected categories.
I would like employees to see the leave policy when they apply leave. Is this possible?
Yes. This is possible. You can include a 'Notes' field and include the URL to the Leave Policy in this field. When an employee views this field, he/she will be able to view the Leave Policy on the same page itself. Follow the steps given below to do this.
- From your home page, go to Settings (Gear icon) > Forms and Tabs > Forms > Leave
- Drag and drop a 'Notes' field from the left side and add your text - for eg. In this case, the text can be 'Click here to read the leave policy'

- From your home page, go to Files > Company Files
- Hover the mouse over the Leave policy and click on 'Copy file URL'
- Now go back to the Leave form and in the Notes field, select the word you would like to hyperlink. In this case, you can hyperlink the word 'here' of the text 'Click here to read the leave policy'
- Click on the hyperlink icon on the top bar and insert the copied file url here

Once this is done, when an employee applies for leave, he/she will be able to view the leave policy right on the same page as shown in the image below.

There is also a print option, if the employee wants to print the Leave policy.
I want to edit the details of the file that I've uploaded. Will the notification be sent to employees when I edit the file?
Yes. Every time there is an edit done, a notification will be sent correspondingly via email.
Is it possible to have restriction created for accessing the file cabinet?
Enabling IP restriction for the file cabinet can help you restrict anyone from accessing this module from anywhere beyond the IP address mentioned. Follow the steps given below to do this.
- From your home page, go to Settings (Gear icon) > User Access Control > Allowed IPs
- Click on 'Add IP restriction'
- Give a From and To IP address to define the range
- Under Modules, select 'Files'
- Under Applicable for, make a selection from the options like Roles, Departments, Designation etc


- Click Save
Note: When Configuring IP restrictions, we always recommend using Static IP Addresses as the Dynamic IP Address gets refreshed in every 72 hours. Hence please check with your ISP to get a Static Public IP address to implement the same in Zoho People. Please do let us know at support@zohopeople.com for any further assistance.
Apart from IP Restriction, Geo restriction is created in order to restrict access to the file cabinet from outside a geographical range.
The restriction thus created is applicable for any action in the file cabinet like adding/viewing/editing/deleting/downloading etc. This is also applicable for any action like adding/editing etc of new categories for files.
Follow the steps given below to create this restriction.
- From your home page, go to Settings (Gear Icon) > User Access Control > Geo Restriction
- Click on 'Add Geo Restriction'
- Click 'Share Location' on the left top corner pop up
- Give a name
- Under 'Applicable For', make selection from options like Roles, Departments, Designations etc
- Under 'Modules', select Files. (You can also select the other modules based on your need)
You will be able to see your current location by default.
- Use the Search tab to search for the starting location of your range
- Use the drawing tool (choosing from a variety of shapes like circle, rectangle, polygon etc) bar at the right hand side to select the range
- Click on the 'Show My Location' icon to come back to current location

![]() Tip : Use the delete layers icon in the drawing tool bar to delete a selection that has been made erroneously. Click Save after deleting and use the shapes to define your range again.
Tip : Use the delete layers icon in the drawing tool bar to delete a selection that has been made erroneously. Click Save after deleting and use the shapes to define your range again.
- Click Submit
![]() Using IP restriction, you can only define a particular IP address from which employees can access the modules. However, using geo restriction, you can define a range (in location) within which the modules can be accessed.
Using IP restriction, you can only define a particular IP address from which employees can access the modules. However, using geo restriction, you can define a range (in location) within which the modules can be accessed.
Note: You can enable both IP restrictions and geo restriction for your organization and make them applicable for employees based on the need.
I would like to restrict employees from downloading a file. Is this possible?
Yes. While adding a file, you can also create this restriction. Follow the steps given below to do this.
To add a file:
- From your home page, go to Files > Files > Company Files
- Click on Add and upload the file
- Un-check the 'Allow download' box to restrict users from downloading the file

- Enter other details like Category etc and click Submit
Note: This restriction can be created only for Company Files.
Is it possible to have a confidential file added for an employee without it being shared to anyone?
Some HR files are meant to be for the view of the HR department alone and not even for the view of the employee. These files can be saved by following the steps given below.
- From your home page, go to Files > Files > HR Files > Add
- Upload the file
- Under 'File View Permission', select 'Employee Based'
- Select the employee whose file you would like to save
- Check the 'Hide from employee'

- Give a Category and click Submit
The file will be accessible only to the administrators.
Is it possible for only reporting managers to view a file that is uploaded for an employee?
Yes. This is possible.
- From your home page, go to Files > Files > HR Files > Add
- Select the file that needs to be uploaded
Note: The list of supported services are given below.
- Zoho Docs
- GDrive
- Dropbox
- One Drive
- Box
- Evernote
- Select Employee based and choose the employee name from the dropdown
- Check the box 'Hide from employee'
By checking this box, you can prevent the employee from viewing the file that is uploaded.
- Check the box 'Share this to Reporting manager' to enable reporting manager to see the file
- Give a description if needed
- Select a category
- Check Notify through email if you want notification to be sent to the reporting manager

- Click Submit
How can I view the Company Files of a particular location alone?
Follow the steps given below.
- From your home page, go to File Cabinet > Files > Company Files
- Click the filter and under 'Work Location', select required location

- Hit Search
You will be able to see the Company files pertaining to that location only.
Is it possible to set an expiry date for Company Files?
Yes. While adding a company file, you can set a 'Valid Until' date after which, the file will expire. This can be used while adding company policies which need to be revised periodically. Follow the steps below.
- From your Home, go to Files > Files > Company Files
- Click on 'Add'
- Upload the file from your desktop or cloud
- Provide a file name
- Under 'Location', select 'All' if you would like the file to be accessible to employees of all locations. If you would like the file to be shared with specific locations alone, then select the locations from the drop down
- Select a category or add a new category for the file to be placed under it
- Under 'Valid Until', select the required date. The file will be valid until the date that you select here
- Click on the 'Notify through Email' option, if required
- Click 'Submit'

You have now added a company file that will expire after the selected date.
Is it possible to view only subordinates' files?
Yes. This is possible. Follow the steps given below.
- From your home page, go to Files > Files > HR Files

- Click on the 'All Employee Files' drop down and select Subordinates Files
You will be able to see the files that are for your subordinates alone.
How do I print a file?
- From your home page, go to Files > Files > Company Files/ HR Files
- Click on the file that you would like to print

- On the right top corner, click on the 'Print' icon and get the file printed
How do I view the existing category of files?
- From your home page, go to Files > Settings

You will be able to see the existing categories here. You can also add a new category by clicking on 'New Category'
I would like to share a company file to many locations at a time. Is this possible?
Yes.It is possible to share a company file to multiple locations at a time.Follow the steps given below to do this.
- In your home page, click on Files > Company File
- Click on 'Add File'
- Upload the required file that you would like to share from your desktop or cloud
- Provide a file name
- Select the locations from the 'Locations' dropdown, for which you would like to share the file

- Check on the 'Allow download' option if necessary
- Provide a description
- Select a category, in which you would like to place the file or add a new category
- Check on the 'Notify through Email' option, to notify employees of the selected locations about this new company file addition
- Click 'Submit'
Now you have added a file that will be accessible to members of the selected, multiple locations as seen in the image below.

Note: It is possible to edit or delete the file added only if the location administrator is admin for all the selected locations.
![]() Tip : Click here to know more about location administrators
Tip : Click here to know more about location administrators
I would like to place the same file under multiple categories. Is this possible ?
Yes.It is possible to upload the same company file under multiple categories. This would be of help when you have to share some documents like company handbook etc, that need to be placed in different categories at the same time.Follow the steps given below to do this.
- In your home page, click on Files > Company File
- Click on 'Add File'
- Upload the required file that you would like to share, from your desktop or cloud
- Provide a file name
- Select the locations from the 'Locations' dropdown, for which you would like to share the file
- Check on the 'Allow download' option if necessary
- Provide a description
- Select the different categories, from the drop down, under which you would like to place the file

- Check on the 'Notify through Email' option, to notify employees as necessary
- Click 'Submit'
Now you have added a file that will be placed under the selected, multiple categories
Is it possible to share a HR File to people of multiple roles, at a time?
Yes.It is possible to share a HR file to people belonging to many roles in your organizational account, in a single shot. Some sensitive documents need to be role-specific and such documents can be easily shared to people of multiple roles, in no time.
Follow the steps given below to do this.
- In your home page, click on Files > HR Files
- Click on 'Add File'
- Upload the required file that you would like to share from your desktop or cloud.
- Provide a file name
- Select 'Role-based' under 'File Permission View'.i.e The file can be accessed only by users who come under the selected roles
![]() Tip : Tip: Click here to know more on Roles.
Tip : Tip: Click here to know more on Roles.
- Select the particular roles, to whom you would like to share the file

- Provide a description
- Select a category or add new category as required
- Check on the 'Notify through Email' option, if needed
- Click 'Submit'
- Now you have added a file that will be accessible to users of the selected, multiple roles.
I would like to upload the appraisal reports of my employees in a bulk. Is this possible?
Employee-specific files like appraisal reports can be stored under HR files. You can import files in a bulk into HR files. Follow the steps given below to do this.
- From your home page, click on Files > HR Files
- Click on 'Import' near the filter icon
- Add the files, in this case the appraisal reports from desktop or cloud
Note: The file should be a .zip file containing files in the format: file name_emp id
- Provide a description
- Select a category under which you would like to place the imported file or add multiple categories from the drop down. You can also add a new category.
- Check on the 'Notify through Email' option, if required
- Click 'Submit'

Your appraisal reports will be imported into Zoho People's HR files, under their selected categories.
Note: In case, if you have selected multiple categories under 'Categories', all the files imported will be placed under all the selected categories.
Is it possible to export my Files from Zoho People?
Yes. It is possible to export the Company Files and HR Files stored in Zoho People. You can also export Documents, Agreements, and Envelopes also. Follow the steps given below to do this. A link containing the exported files will be sent to your mail address registered in your Zoho People account.
- From your Home Page, Click on File Cabinet > Files
- Click on the Files tab(Company Files, HR Files etc) that you would like to export
- Click on the ellipsis icon and click 'Export'. Your Files will be exported in .zip format.

- Click on the link sent to your mail. The link will take you to a page where you can download your exported files. Ensure that you are logged into Zoho People to perform this action
Note:The link containing the exported files can be accessed only once.
The Administrator of the account can export Company Files, HR Files and other E-signature enabled files like Agreements, Documents and Envelopes.If data permissions have been enabled for any member of your organization, then he or she will be able to export Company Files and HR Files.
Note:In case of Agreements,Documents and Envelopes, the recently modified file gets exported
E Signatures
What is the use of e signature?
An electronic signature is intended to provide a secure and accurate identification method for the signatory to provide a seamless transaction. E signature is imperative when it concerns employment contracts or other important agreements. E signatures are:
- Accurate
- Secured
- Time-saving
- Easy to track and manage
Using Zoho People, you can:
- Have agreements sent to desired recipient(s) for e signature
- Have employee related documents (like Probation confirmation, Salary revision letter etc) sent to a single or a set of employees for e signature
How do I integrate with Adobe Sign?
Follow the steps given below to integrate with Adobe Sign.
- From your home page, go to Settings (gear icon) > Integration > Services
- Click on 'Configure' under Adobe Sign with your Adobe credentials and click 'Authenticate'


- Enter your Adobe credentials again and click 'Sign in'
You will now be integrated with Adobe Sign. In order to revoke the integration, click on 'Revoke'
What are the steps to send agreement for e signature using Adobe Sign?
Follow the steps given below to be able to do this.
- From your home page, go to Files > Files > Agreements
- Click on Send Agreement

- Attach the desired agreement from your desktop or from cloud
Note: The list of supported services are given below.
- Zoho Docs
- GDrive
- Dropbox
- One Drive
- Box
- Evernote
- Under Recipients, enter the email id(s) of the recipient(s)
- If you would like to have a copy of the same agreement sent for the view of someone else, include the email id under Send email copies To
- Give a name for the Agreement
- Enter a message and Last date if needed
- Under Category, select an existing category or add a new category
- Check the Reminder box, if you would like to have a reminder sent
- Check the 'I have to sign the agreement' box, if you would like to have your e signature to be on the agreement
When you chose this, you have two options - My sign - First and Last. Select First, if you would like to have your signature first (i.e - before being sent to the recipient) and select Last, to have your e signature completed after the recipient.Check 'Preview Document' if needed.
- Under 'Preferred Language', Select the language in which the agreement should be in

- Click Send
The agreement will now be sent to the recipient(s) for esignature.
I would like to have probation confirmation letters sent for e signature to a set of employees using Adobe Sign. How can I do this?
In case of mass recruitments, you will come across a situation, where in you will have to send probation confirmation letters for a set of employees at one go.
This should be done in two levels.
1. In your employee form, you will have to first get e signature enabled. Follow the steps given below to do this.
- From your home page, go to Settings (gear icon) > Forms and Tabs > Forms
- Go to the respective form

- Under 'Form Properties' check 'Enable Adobe Sign'
Note: You should also ensure that the form has a file upload field in order to upload the probation confirmation letters for the concerned employees.
![]() Tip :Click here to know how to customize Forms.
Tip :Click here to know how to customize Forms.
2. The next step is to have the probation confirmation letters upload for the respective employees.
- From your home page, go to Organization > Employee
- Click on the employee name to go to the Employee form
- Click on the edit icon and upload the Probation Confirmation Letter from desktop or cloud
- Click Submit
The Probation Confirmation letter gets uploaded for the employee. Follow the same method and upload the letter for other employees too.
3. The next step is to have the Probation Confirmation Letter sent to employees for e signature.
Follow the steps given below to do this.
- From your home page, go to Organization > Employee
- Select the employees for whom the Probation confirmation letter should be sent for e signature

- Click on 'Send Agreement to the selected recipients for e signature'
- Select the File to be sent
Note: The drop down will display the agreements that are available for the selected records. These agreements (whether they are created as a Form or as any other file) are uploaded to the Employee Form by creating a File upload field.
- Under 'Recipients', select the email Id to which the agreement should be sent
Note: In case there are more than one email ID fields in the employee form, you can select the one which is relevant by choosing from this drop down.
- Enter details for other fields like 'Send email copies To', 'Agreement Name', 'Message', 'Last Date', 'Category' etc
- Check the Reminder box, if you would like to have a reminder sent
- Check the 'I have to sign the agreement' box, if you would like to your e signature to be on the agreement
When you chose this, you have two options - My sign - First and Last. Select First, if you would like to have your signature first (i.e - before being sent to the recipient) and select Last, to have your e signature completed after the recipient.
- Check 'Preview Document' if needed
- Under 'Preferred Language', Select the language in which the agreement should be in
- Click Send
The Probation Confirmation document will now be sent to the recipient(s) for e signature. Once the signed copy is received, the agreement will be updated in the record automatically.
To view the agreement details:
- From your home page, go to Organization > Employee
- Click on the ellipsis icon on the left side of the employee name

- Select Agreement details

You will be able to see the agreement details.
I would like to send offer letters to a set of candidates for e signature using Adobe Sign. How do I do this?
You need to first create a form with details like candidates' name, email id etc. Once this form is created, you can select the candidates' names and send them the offer letter at one go.
Follow the steps given below to create the form.
- From your home page, go to Settings (gear icon) > Forms and Tabs > Forms
- Click Add New Form
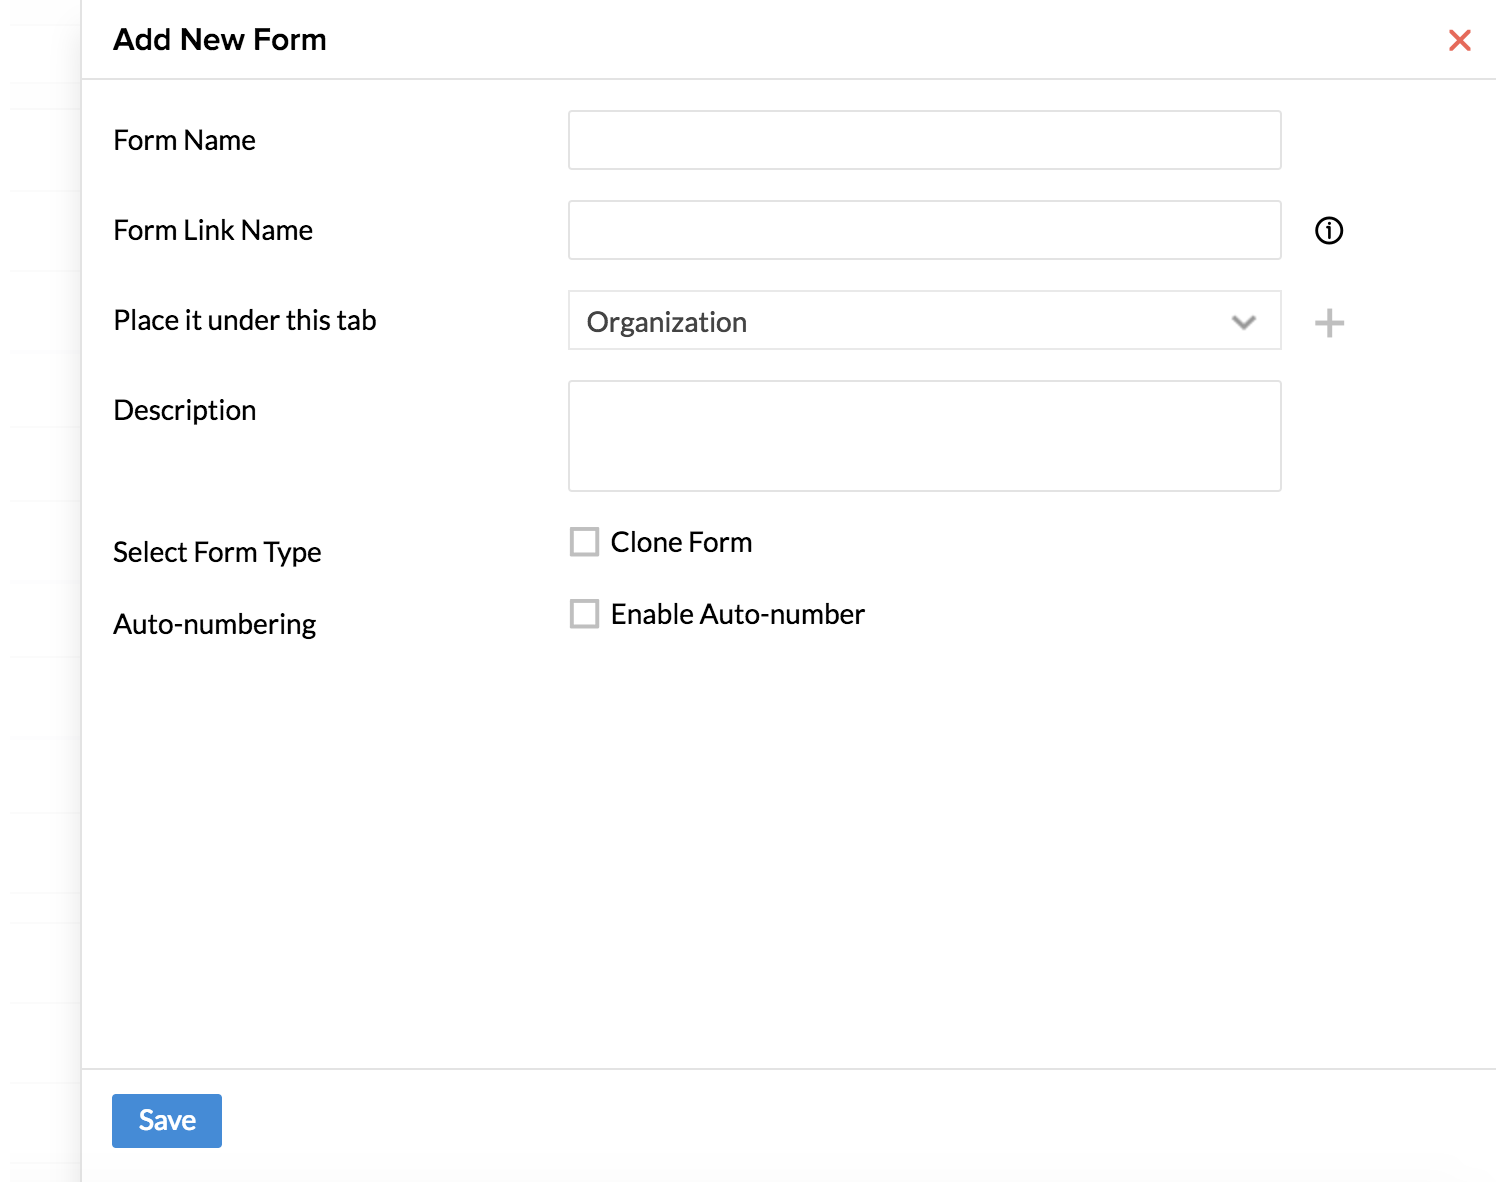
- Give a name for eg - Candidates List and place it under any tab of your wish
- Drag and drop fields for Name (Single Line), email id (email id field) and offer letter upload (File Upload field)

Note: Ensure that you have checked the 'Enable Adobe Sign' box under Form Properties.
Now you have created a form wherein, you can add the list of candidates by clicking on 'Add Record' in the Candidates list form from the tab where you have listed the form.

Once this is done, you can send the offer letter to the desired set of candidates.
Follow the steps given below to do this.
- From your home page, go to the tab where you have the form 'Candidates List' listed
- Select the candidates to whom you need to send the offer letter

Note: You can either attach the offer letter from the form or from the mail merge template. If you have already uploaded the Offer letter in the records, then you can simply click on 'Form' and select the respective 'File upload' field in the form. You can also have the offer letter template generated with the help of mail merge. In this case, you can select 'Mail Merge' under 'From' and select the mail merge template that you would like to use.
![]() Tip : Click here to know how to use Mail Merge Template
Tip : Click here to know how to use Mail Merge Template
- Click on 'Send Agreement'
- Attach the offer letter
- Under 'Recipients', select the email Id field to which the agreement should be sent


Note: In case there are more than one email ID fields in the offer letter form, you can select the one which is relevant by choosing from this drop down.
- Under 'Agreement', select the agreement (Offer letter)
Note: The drop down will display the agreements that are available for the selected records. You can select the agreement/document that you need to send - in this case, the Offer Letter.
- Enter details for other fields like 'Send email copies To', 'Agreement Name', 'Message', 'Last Date', 'Category' etc
- Check the Reminder box, if you would like to have a reminder sent
- Check the 'I have to sign the agreement' box, if you would like to your e signature to be on the agreement
When you chose this, you have two options - My sign - First and Last. Select First, if you would like to have your signature first (i.e - before being sent to the recipient) and select Last, to have your e signature completed after the recipient.
Once the agreement is signed, it will get automatically updated in the record.
The video below explains Adobe Sign integration with Zoho People along with the use cases.
How can I download the signed copy of the agreement?
- From your home page, go to Files > Files > Agreement
- Click on the download icon of the agreement which you want

The agreement gets downloaded.
How can I delete an agreement?
- From your home page, go to Files > Files > Agreement
- Click on the delete icon of the agreement that you would like to delete
The agreement gets deleted once you click 'Confirm'.
How can I integrate with DocuSign?
DocuSign provides electronic signature technology and Digital Transaction Management services for facilitating electronic exchanges of contracts and signed documents.
To integrate Docu Sign with Zoho People:
- From your home page, go to Settings (Gear icon) > Integration > Services
- Under DocuSign, click on 'Configure'
- Enter your DocuSign credentials

You are now integrated with DocuSign. In order to revoke the integration, click on 'Revoke'
What are the steps to send agreement for e signature using DocuSign?
Follow the steps given below to be able to do this.
- From your home page, go to Files > Files > Envelopes
- Click on Send Envelope
- Attach the desired agreement from your desktop or from cloud
Note: The list of supported services are given below.
- Zoho Docs
- GDrive
- Dropbox
- One Drive
- Box
- Evernote
- Under Recipients, enter the email id(s) of the recipient(s)
- If you would like to have a copy of the same agreement sent for the view of someone else, include the email id under Send email copies To
- Enter a message if needed
- Under Category, select an existing category or add a new category
- Check the Reminder box, if you would like to have a reminder sent
If you want a reminder sent, you can also mention the number of days after which you want the reminder to be sent and also the frequency in which it should be sent.
- Check the 'Expiry' box and give the expiry date
- Under Notify recipient(s), give the number of days before the expiry date on which you would like to notify employees about the expiry of the agreement
- Click Send

You will be taken to the DocuSign panel wherein you can view the Recipients, document name and all other details listed.
- Drag and place the signature field in the document that needs to be sent. Drag and drop other required fields from the left side
- To add or delete recipients, click on the recipient’s drop down
- Click ‘Edit Recipients’
- Click on the close ‘x’ icon to delete or click on ‘Add Recipients’( left bottom corner) to add new recipients
- Click ‘Done’
- Alternatively, you can also edit recipients and documents by clicking on the ellipsis icon(right top) near the ’Send’ Button
- Click 'Send'
Your envelope has been successfully sent for e-signature using DocuSign.
I would like to have probation confirmation letters sent for e signature to a set of employees using DocuSign. How can I do this?
This should be done in three levels.
1. In your employee form, you will have to first get e signature enabled. Follow the steps given below to do this.
- From your home page, go to Settings > Forms and Tabs > Forms > Employee Form
- Under 'Form Properties', check 'Enable Docusign'

Note: You should also ensure that the form has a file upload field in order to upload the probation confirmation letters for the concerned employees.
![]() Tip : Click here to know how to customize Forms.
Tip : Click here to know how to customize Forms.
2. The next step is to go to the respective records and upload the confirmation letter for the employees.
- From your home page, go to Organization > Employee
- Click on the employee name to go to the Employee form
- Click on the edit icon and upload the Probation Confirmation Letter from desktop or cloud
- Click Submit
3. The next step is to have the Probation Confirmation Letter sent to employees for e signature.
Follow the steps given below to do this.
- From your home page, go to Organization > Employee
- Select the employees for whom the Probation confirmation letter should be sent for e signature
- Click on 'Send Envelope' to the selected recipients for e signature'
- Select the File to be sent
Note: The drop down will display the agreements that are available for the selected records. These agreements are uploaded to the Employee Form by creating a File upload field.
- Under 'Recipients', select the email Id to which the agreement should be sent
Note: In case there are more than one email ID fields in the employee form, you can select the one which is relevant by choosing from this drop down.
- Enter details for other fields like 'Send email copies To', 'Message', 'Category' etc
- Check the Reminder box, if you would like to have a reminder sent
- Check 'Expiry' and give the expiry date along with date for expiry notification to be sent (if needed)
- Click Send

The Probation Confirmation document will now be sent to the recipient(s) for e signature. Once the signed copy is received, the confirmation document will be updated in the record automatically.
To view the agreement details:
- From your home page, go to Files > Files > Envelopes
- Click on the respective envelope to view it and to see other details like Sender name, Date etc
I would like to send offer letters to a set of candidates for e signature using DocuSign. How do I do this?
You need to first create a form with details like candidates' name, email id etc. Once this form is created, you can select the candidates' names and send them the offer letter at one go.
Follow the steps given below to create the form.
- From your home page, go to Settings (gear icon) > Forms and Tabs > Forms
- Go to the respective form - In this case, the Employee form.
- Under 'Form Properties' check 'Enable DocuSign'
Now you have created a form wherein, you can add the list of candidates by clicking on 'Add Record' in the Candidates list form from the tab where you have listed the form. Once this is done, you can send the offer letter to the desired set of candidates.
Follow the steps given below to do this.
- From your home page, go to Settings (gear icon) > Forms and Tabs > Forms
- Click Add New Form
- Give a name for eg - Candidates List and place it under any tab of your wish
- Drag and drop fields for Name (Single Line), email id (email id field) and offer letter upload (File Upload field)
- From your home page, go to the tab where you have the form 'Candidates List' listed
- Select the candidates to whom you need to send the offer letter
- Click on 'Send Envelope'
- Attach the offer letter
- Under 'Recipients', select the email Id field to which the offer letter should be sent
Note: In case there are more than one email ID fields in the offer letter form, you can select the one which is relevant by choosing from this drop down.
- Enter details for other fields like 'Send email copies To', 'Message', ''Category' etc
- Check the Reminder box, if you would like to have a reminder sent and the set
- Check the 'Expiry' box and give the expiry date
- Under Notify recipient(s), give the number of days before the expiry date on which you would like to notify employees about the expiry of the offer letter
- Click Send

The offer letter will now be sent to the recipient(s) for esignature.
What are the steps to integrate with Zoho Sign?
If you have an active account in Zoho Sign, follow the steps below to integrate.
- From your home page, go to Settings (gear icon) > Integration > Services
- Click on 'Enable' under Zoho Sign
Your Zoho People account has now been integrated with Zoho Sign.
Note: An active account in Zoho Sign is necessary for this integration.
If you do not have an account in Zoho Sign, follow these steps to integrate.
- From your home page, go to Settings (gear icon) > Integration > Services
- Click on 'Enable' under Zoho Sign
You will be taken to the Sign up page of Zoho Sign inorder to create a new Zoho Sign account
- Type in your organization's name and click on 'Save and Proceed'

Your new Zoho Sign account has been created.
You will be re-directed to the Zoho People's integrations page.You can find your Zoho People account to be automatically integrated with Zoho Sign.

What are the steps to send a document using Zoho Sign?
- From your home page go to Files > Files > Documents
- Click on 'Send Document'
- Upload the respective file to be sent for e-signature
- Type in the the email id(s) of the recipient(s), under Recipients
- Provide the email Ids of those, to whom you would like to send a copy of the document under 'Send email copies to'
- Type in the subject of the Document to be sent
- Enter a message if you would like to have a note to be added along with the document
- Under Category, select an existing category or add a new category
- Check the Reminder box, if you would like to have a reminder sent
- Set an Expiry date if needed

- Click 'Send'
A new Zoho Sign panel will open, wherein you can view the recepients, document name and all other details listed
- Click on the add icon(+) to add any more recepients or delete icon(-) to remove mail IDs of recipients

Note: It is not possible to interchange the sender of the document and the viewer of the marked copy in the Zoho Sign panel.
- The message incase if you have typed any would be automatically populated as 'Notes' , and the given subject as 'Description'. Click 'Continue'

The Zoho Sign panel with the uploaded document will open
- Drag and place the signature field in the document that needs to be sent. Drag and drop other required fields from the right side

- Click on 'Send'(right top)
- Confirm the details to be sent by clicking on 'Confirm'
You have successfully sent the document for e-signature using Zoho Sign.
What are the supported file formats to send a document using Zoho Sign?
Zoho Sign is supportive of the following file formats:
- jpg
- jpeg
- doc
- docx
- png
- off
- rtf
- dots
- txt
- tex
- saw
Please ensure that the document you upload falls under any one of these file formats.
I would like to send probation confirmation letters to a set of employees using Zoho Sign. What are the steps to do this?
To do this,the e-signature field should have been enabled in the respective form here the Employee form
- From your home page, go to Settings (gear icon) > Forms and Tabs > Forms
- Go to the respective form - In this case, the Employee form
- Under 'Form Properties' check 'Enable Zoho Sign'

Note: The form should have a 'File upload' and Email ID field to enable the e-signature option
To send the letter to the respective employees,
- From your home page, go to Organization > Employee
- Select the employees for whom the Probation confirmation letter should be sent for e signature
- Click on 'Send Document' to the selected recipients for e signature
- Select the File to be sent
- Under 'Recipients', select the email Id to which the file should be sent
- Fill in details like 'Send email copies To', 'Message' etc
- Pick from an existing category or create a new category if required
- Check the Reminder box, if you would like to have a reminder sent
- Check 'Expiry' and give the expiry date along with date for expiry notification to be sent

- Click Send
The Probation confirmation letter with e-signature option enabled will be sent to the selected set of employees.
I would like to send work certificate for a particular employee. How can I do this employing Zoho Sign?
You can have your employee conduct certificate/work certificate stored under HR files in the files module.
To send the conduct certificate/work certificate from HR files,
- Go to Files > Files > HR files
- Select the work certificate file by checking the box icon at the left side

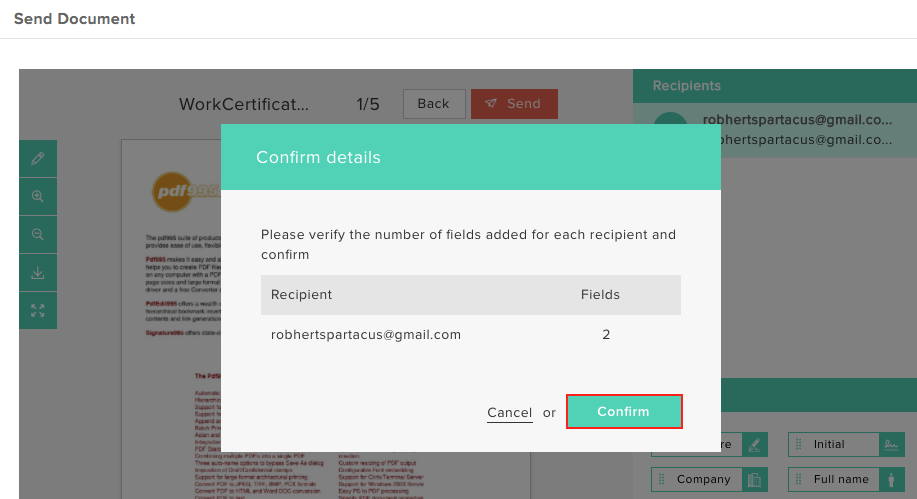
- To send the document for e-signature, click on the 'Send document' (blue box icon).You will find the selected file to be listed automatically
- Fill in details like recepients, subject, message etc
- Pick a category or create a new category if required
- Set a reminder and expiry date
- Click 'Send'
A new Zoho Sign panel will open, wherein you can view the recepients, document name and all other details listed.

- Click on the add icon(+) to add any more recepients or delete icon(-) to remove mail IDs of recipients
- Type in a note if necessary
- Click 'Continue'

The Zoho Sign panel with the uploaded document will open.
- Drag and place the signature field in the document that needs to be sent
- Drag and drop other required fields from the right side

- Click on 'Send'(right top)
- Confirm the details to be sent by clicking on 'Confirm'
You have successfully sent the HR file for e-signature using Zoho Sign.
I would like to send a letter generated from Mail Merge for e-sign using Zoho Sign. Is this possible?
Yes. Follow the steps given below to do this.
- From your home page, go to Organization > Employee
- Select the employees to whom you need to send the letter for e-sign
- Click on 'Send Document'

- Under 'Send From', select 'Mail Merge'
- Select the respective template from the drop down
- Fill in other details. Click Send

How can I revoke the integration with Zoho Sign?
It is not possible to revoke the integration once done with Zoho Sign.
One of the users has been made admin for the Asset form. What category should he/she be selecting when the contract for assets is sent for e signature?
While sending a document for e-signature, it is mandatory to select a category. As a HR administrator, you can create a category called 'General' under Files > Settings, or add this cateogry while the contract is being sent for e signature. However, an user who is the admin of the form (In this case, the Asset form) because he/she has been made admin for this form through Admin operations settings, will not be able to add a new category since he/she is not the administrator of the Files module. In cases, where the HR admin has added the 'General' category, the user can send the contract under this category. In cases where the HR admin has not added a category 'General', this gets auto populated for the user when he/she sends the contract from the form for e signature.
Steps to send the contract for e signature are given below.
- From your Self-service page, go to the respective form - in this case, the Exit form
- Select the record of the employee to whom the No due certificate should be sent and click on 'Send Envelope'

- Select the file from the options in the drop down (The list will be of the file upload fields in the form) and recipients
- Enter other details like Envelope Name, Subject, Message etc
- Under 'Category', the category called 'General' will get populated automatically
- Set Reminder and Expiry date if needed
- Click Send

Note: The 'General' category cannot be deleted even by the Administrator. It is also not possible to edit this category or add another category with the same name as 'General'.