Timesheets
Jobs:
Adding Jobs and logging time for them helps in keeping a track of work done by employees. Generally, jobs are associated with Projects which are in turn associated with Clients of the organization. Having said that, it is also possible to add a job without associating it to a Project. Given below are the steps to add a job.
- From your home page, go to Time Tracker > Projects/Jobs > Jobs

Note: This Hours is the sum of the individual estimated hours that you have given for each employee. Hence, it is important to know that Hours here, refers to the total number of estimated hours to complete this job.

- Give a Rate per hour and Description if needed
- Attach any files that you would like to add pertaining to the job. You can either add a file from your desktop or from the Cloud.
Note: The list of supported services are given below.
- Zoho Docs
- GDrive
- Dropbox
- One Drive
- Box
- Evernote
- Check the Reminder box, if you would like a reminder to be set for the job
Note: When you check the Reminder box, you will have an email automatically sent to you due to the workflows that are configured. You can see this workflow under Setup (gear icon) > Automation > Workflows under the name 'Job Reminder'.
 Tip : You have to ensure that the status of this workflow is enabled.

- Under Billable status, select Billable or Non-Billable depending on the nature of the job
- Click Submit
You have now created a job and you can see it when you click Time Tracker > Projects/Jobs > Jobs.
 You can also add job while you log time. Click here to know more.
If you have not created your Job on the system, you can also do it while time logging is done.
- From your home page, go to Time Tracker > Time Logs
- Select the Project from the dropdown
- From the Select Job dropdown, click on Add Jobs
- Enter the Job name and other details

The Job gets added now.
This is not mandatory. Jobs can be created without being associated with any Project.
Importing jobs is an easier method of getting all your jobs onto the system. This helps you save time spent by adding each and every job manually. You can also import jobs that are assigned to multiple users. Follow the steps given below.
- From your home page, go to Time Tracker > Project/Jobs > Jobs
- Click the import icon at the right corner of the page

- Click upload file
- Browse the file from your system and get it uploaded
Note: The file should be in .xls or .xlsx .csv format for the upload to be done.

- Map the fields and click Next
Your jobs will now get imported onto the system and you will be able to see them along with the users assigned if you go to Projects/Jobs > Jobs
Tip: Permissions should be configured in the Jobs form to Import data. Click here to know how to set permissions.
Note:
- The file that you upload should have the employee id and not the employee name
- The employee ids should be separated with a semi-colon
- "Hours" should be separated with a semi-colon - the hours thus added will get mapped with the corresponding assignee. I.e - the first value under Hours will be mapped to the first assignee. If the hours column (in the file that is imported) is empty, then the hours will be taken as zero automatically.
How can I export jobs?
Follow the steps given below to export jobs.
- From your home page, go to Time Tracker > Projects/Jobs > Jobs
- Click on the Export icon and Check Include Tabular Section Data if required

The list of jobs will get exported.
Note:
- Export can be done only in .xls/.csv/.tsv formats
- All the fields of the form including custom fields will be exported
- Export will be based on the values in the filter
Sometimes, you may come across a need to edit the job that you have created.
- From your home page, go to Time Tracker > Projects/Jobs > Jobs
- Hover your mouse over the job and click on the edit icon(pencil icon)
- Edit the job as required and click Save

Tip: Get to know about conditions under which edit job works. Click here.
Editing a job is possible only under two conditions
- The one who is trying to edit the job should either be the administrator or job owner (creator of the job)
- In the Job form (Settings (gear icon) > Forms and Tabs > Forms > Jobs), edit permissions should have been configured for the particular role as shown in the images below


Your jobs will be listed under the Jobs tab. When you want to change the status of a job, go to the Status column of the job and click the tick icon. The status will get changed from In-Progress to Completed.

Tip : If you would like to re-open a completed job, use the filter at the right corner, select 'Completed' from the Job Status dropdown and hit search. You will be able to the completed jobs and the status can be changed.
Yes. You will be able to sort jobs based on their Start and End date.
- From your home page, go to Time Tracker > Projects/Jobs > Jobs
- Use the Up arrow and the Down arrow under Start Date and End date to sort the Jobs in ascending or descending order

You can also sort Jobs, Projects and Clients in Ascending or descending order using the Up arrow and the down arrow in the Job Name, Project Name and the Client Name column.
You can create a custom view to the Jobs list to view the fields that you have created in the Jobs form.
Follow the steps given below to do this.
- From your home page, go to Time Tracker > Projects/Job > Job
- Click on the Job drop down and select 'Create View'
- Give a name for the view and set permissions as required
- Under 'Select Columns', select the fields that you need and use the arrow to drop the selected fields in the next box for the view to be created
- Under 'Criteria', you can create a criteria using the fields of the job form and its related forms
For eg. If your view should include only Jobs which are in the in-progress status in your view, you can set the condition here.
- Under the Field Name in Criteria, select Status from the list
- Under 'Condition', select In-Progress

This way the view will show only the jobs that are in the In-Progress status.
Now, you have created a view to display the jobs based on the fields that you have chosen.
You can make use of the filter to view this. Follow the steps given below.
- From your home page, go to Time Tracker > Projects/Job > Job
- Click on the filter
- Under 'Projects', select the Project and under 'Job Status', select 'In-Progress

- Under 'Assigned to', select 'All Users' and hit Search
You will be able to see the jobs that are in-progress for the selected Project.
While adding a job, you can have it assigned to Departments. This means that when someone becomes a member of the Department, he/she gets automatically assigned to the job. The members of the Department can choose the job and log time for it. Once the member starts logging time for the job, he/she becomes the assignee for the job.
- From your home page, go to Time Tracker > Projects/Jobs > Job
- Click on 'Add Job'
- Under 'Assignees', go to users and select the Users and under Department, select the Department
- Enter other details like Rate per hour, Billable Status etc if needed
- Click Submit
Now the job has been assigned to the Department. Anyone who is tagged to the Department will be able to log time for this job and the ones who log time for the job will become assignees for that job.
Note:
- When a member logs time for a job, he/she automatically becomes an Assignee for the job and becomes an User for the Project
- The permission to add a Job or a Project will be based on the permission given for these forms - for eg, if the permission to add a job (for self and sub ordinates) is restricted to a reporting manager, then under Users, the Reporting Manager will be able to see only his/her name along with the sub ordinates name(s)
- The permission to add Departments to Jobs/Projects will be with the Administrator(s) and the all-locations admin assigned for the data part of time tracker module under Admin Operations tab. (Settings > User Access Control > Permissions > Admin Operations)
To assign Jobs to departments,
- From your home page, go to Time Tracker > Projects/Jobs > Jobs
- Select the Jobs that you would like to assign to Departments
- Click on 'Map Departments' at the top
- Select the department names that you would like to map
- Click on 'Map Departments'

The selected jobs have been mapped to the departments.
While adding a job, under Assigness, you can select more than one employee using the check box. After a job is added, you may have the necessity to assign more users to that job. In this scenario, you can follow the steps given below.
Here, you can search for employees and map them to the job
- From your home page, go to Time Tracker > Projects/Jobs
- Check the job that you would like to assign
- Click the Users icon of the job for which you want to assign more users
- Click Assign users
- Use the search option to add the users and click Map


This option also works when you would like to map more than one job to one or more assignees.
Check the jobs that need to be mapped and click on Map Assignees

Note: If the job selected is associated with a Project, then only the Project Users can be assigned to the job. The mapping of other users will be skipped.
Follow the steps given below when you want to delete more than one job at one go.
- From your home page, go to Time Tracker > Projects/Jobs
- Select the Jobs that need to be deleted
- Click Delete

The selected jobs will get deleted.
Note: Jobs can be deleted only by the Administrator or the Job Owner (Creator of the Job).
The time logs that were already created will retain the billable status as they were while time was logged. If the status needs to be changed, then it can be done by editing the time log manually by the user.
The time logs that were created using Timers will be impacted as explained below:
- Scenario 1 - When a user resumes the timer of a job, (the Billable status of which is changed later on) the Billable status change will not get reflected. In this case, the Billable status should be changed manually while editing the log.
- Scenario 2 - When a user logs time using Timer for a job (the Billable status of which is changed later on), as a new log then the Billable status will be as per the changed status.
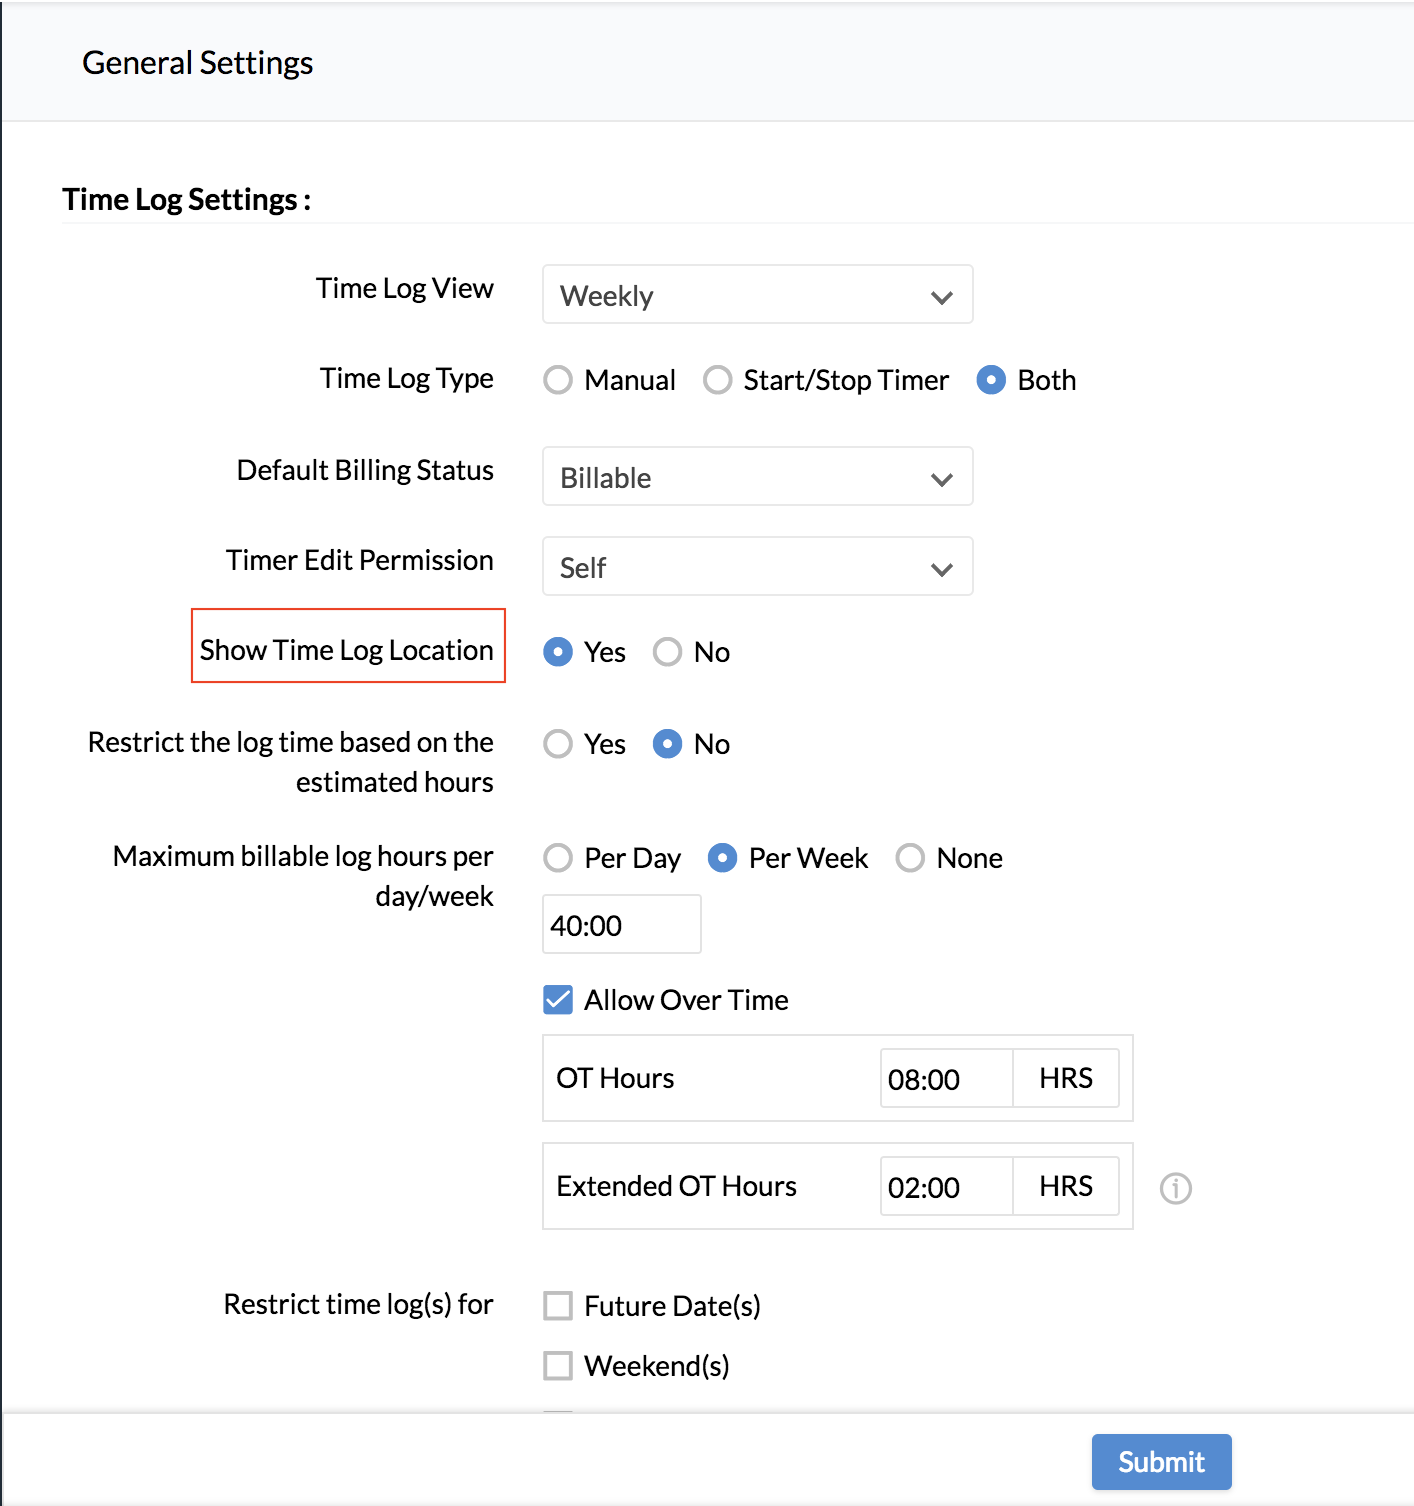
Yes, this it is possible to restrict users from viewing the time log location by choosing 'No' under General Settings > Show Time Log Location.
Once you have created a job with the billable status as Billable, the time logs created for this job will be created only as Billable time logs. The billable status of the job will change only when you edit the job and change the billable status again. In other words, the user will not be able to change the billable status of the job while logging time.
Follow the steps given below to edit the billable status of a job.
- From your home page, go to Time Tracker > Projects/Jobs > Jobs

- Go to the Job that you would like to edit and click the edit button (the pencil icon at the right end of the row)

- Change the status of the job under 'Billable status'
- Click Submit
No. This is not a mandatory field. You can create a job even without having a billable status. However, this option will help you restrict the users from changing the billable status of the job while logging time.

Projects:
Projects are assignments that employees work on. Follow the steps given below to create a Project.
- From your home page, go to Time Tracker > Projects/Jobs > Projects

- Click Add Project
- Enter Project name
- Select Client name from the drop down
Tip: Click here to know how to add a Client

- Click Choose from CRM if you would like to pick a client from your list of clients in CRM
- If you are picking a client from CRM, select from the options like Lead, Accounts, Contact and Potential
There is an option to Add a CRM client directly here. Click Add, Enter the details and click Submit. The CRM client that you have added here will get pushed to CRM automatically.
- Enter other details as required

You can add a Project while logging time. Click on the 'Add Project' option in the Select Project drop down when you log time (Time Tracker > Time Logs), enter the required details and have the Project added.
You can associate a Project to a job directly from the Projects tab.
- From your home page, go to Time Tracker > Projects/Jobs > Projects
- Under 'Jobs' click on 'Add Jobs'

- Enter the details and click Save
Note: If there are no jobs associated with this Project already, you will be able to see a + icon. Clicking on this icon will provide you the 'Add Job' option, using which you can add a job to the Project.
To assign a Project to a Department,
- Frome your home page, go to Time Tracker > Projects/Jobs > Projects
- Click on 'Add Project'
- Under Project Users, go to Users, select the Project Users and under Department, select the Department(s)

- Enter other details as required and click Submit
If there are jobs mapped with Projects, then the Users and Departments that are mapped to the Project will only be shown as Assignees for the Jobs, from which you can make the selection if needed.
Use Case:
Scenario I:
Consider this scenario for a better understanding. Assume you are adding a Project - 'Customer Training' and tagging the Departments called 'User Education' and 'Technical Support'. So, it means that any member who belongs to the User Education team and the Technical Support team can log time for this Project's jobs. However, if you want to specifically assign this job to a couple of members of the User Education team and the Technical Support team, then you can select them as Project Users. Assume that you are selecting A, B and C from User Education Team and D, E from the Technical Support team as users for this Project.
Now assume you have two jobs to be added. 1. To provide in premise training 2. To provide training at client's location.
While adding these jobs, under Department, you will be able to see User Education and Technical Support listed already because the Project is already mapped to these Departments. Under Users, you will see the Project Users (i.e - Users A, B, C, D and E). You can decide to select A and D for job1 and other three users B, C and E while adding job 2.
Scenario II:
Consider the same scenario with some change. Assume you are adding a Project - 'Customer Training' to the Department 'User Education' and 'Technical Support'. When you add a job to this Project, you can have the User Education team mapped to the job. However, if you want only a couple of members of the Technical Support team to be mapped to the job, then you do not have to select them under the Department. You have already added Technical Support team members as users for the Project. So, the same list of users will be displayed as Users of the Job. You can simply pick the ones who you want to be assigned to this job.
In a nutshell, the Departments and Users chosen while adding a Project will reflect while adding Jobs for that Project. If you need to assign a Job to a Department, then the Project (if any) should also be assigned to that Department.
Note:
- When a member logs time for a job, he/she automatically becomes an Assignee for the job and becomes an User for the Project
- The permission to add a Job or a Project will be based on the permission given for these forms - for eg, if the permission to add a job (for self and sub ordinates) is restricted to a reporting manager, then under Users, the Reporting Manager will be able to see only his/her name along with the sub ordinates name(s)
- The permission to add Departments to Jobs/Projects will be with the Administrator(s) and the all-locations admin assigned for the data part of time tracker module under Admin Operations tab. (Settings > User Access Control > Permissions > Admin Operations)
To map multiple Projects to Department(s):
- Go to Time Tracker > Projects/Jobs > Projects
- Select the Projects that need to be mapped
- Click on Map Department(s)
- Select the Department(s) to be mapped

- Click on 'Map Department(s)'
The selected Projects will get mapped to Department(s) chosen.
In cases where you have to map many users to many projects, follow the steps listed below.
- From your home page, go to Time Tracker > Projects/Jobs
- Select the Projects that you would like to map
- Click on Map users

- Select the users who you would like to map and click Submit
Follow the steps given below to import projects that have many users assigned.

- From your home page, go to Time Tracker > Projects/Jobs > Projects
- Click the Import icon at the right corner of the page
- Click Upload File to upload the file from your system
Note: Your file should be in .xls or .xlsx or .csv format

- Map the fields and click next
Now, you will be able to see all your projects imported into the system when you go to Projects/Jobs > Projects.
Tip: Permissions should be configured in the Projects form for Importing data. Click here to know how to set permissions.
Note:
- The file which you import should have the employee id and not the employee name for the users who are assigned to the projects
- Employee ids should be separated by a semi-colon
Follow the steps given below to export Projects.
- From your home page, go to Time Tracker > Projects/Jobs > Projects
- Click on the Export icon and Check Include Tabular Section Data if required
- Click Export
The list of Projects will get exported.
Note:
- Export can be done only in .xls/.csv/.tsv formats
- All the fields of the form including the custom fields will be exported
- Export will be done based on the values in the filter
Follow the steps given below when you want to delete more than one job at one go.
- From your home page, go to Time Tracker > Projects/Jobs > Projects
- Select the Projects that need to be deleted
- Click Delete

The selected Projects will get deleted.
Note: Projects can be deleted only by the Administrator or the Project Owner (Creator of the Project).
Clients:
If an organization wants to track time for work done for their clients, Time Tracker is the best option. In Time Tracker, Jobs are done for Projects which are associated to Clients. So, getting Clients added in to the system is very important. Follow the steps given below to add a Client to your system.
- From your home page, go to Time Tracker > Projects/Jobs > Clients

- Click Add Client
- Enter values for the mandatory fields like Client Name, Currency etc
Note: If there are bills to be generated for a particular client, the currency that is defined here will be used. Click here to know how to generate a bill.
- Under Billing Method, select Hourly Job Rate or Hourly User Rate
Note:
- The bill will be generated depending on the option that you choose here. If you select Hourly Job Rate, then the bill will be generated based on the Rate per hour that you define when you create Job (Time Tracker > Project/Jobs > Add Job > Rate Per Hour).
- If you select Hourly User Rate here, then the bill will be generated based on the Rate you define for the user which you have defined under Payroll settings (Time Tracker > Settings > Payroll Settings > Add user Rate)

The client is now created on your system and Projects can be associated to this client.
If you have a Zoho CRM account, you can also import CRM clients into Zoho People. Follow the steps given below.
- From your home page, go to Time Tracker > Projects/Jobs
- Click on the ellipsis icon at the right corner of the page and click on Import from CRM


- In the drop down, make a selection from the options,Lead, Account, Contact and Potential
- Select the customer names and click Submit
Your CRM clients are now imported into your Zoho People account.
The Import option helps you add many Clients into your Zoho People account at one go. Follow the steps given below to know how do this.
- From your home page, go to Time Tracker > Projects/Jobs > Clients
- Click the ellipsis icon at the right corner and select Import
- Click Upload File and select the file to be uploaded
- Map the fields and click Next
Your Client list will get imported into your Zoho People account now.
Note: If the currency given in the file that is to be imported does not match with any of the currencies listed while the Client was added, then the default currency that has been given in the Billing Settings will only be considered.
The file imported should be in .xls or .xlsx or .csv format
Follow the steps given below to export Clients.
- From your home page, go to Time Tracker > Projects/Jobs > Clients
- Click on the Export icon
- Check Include Tabular Section Data if required and click Export
Note:Export can be done only in .xls/.csv/.tsv formats
There are two ways in which you can add your CRM clients into Zoho People.
1. While adding a Project, there are two options in which you will be mapping the Project to a Client.
- You can choose an existing Client from the dropdown or from CRM by clicking on 'Choose From CRM'
- You can also add a CRM Client directly here, using the Add option. Enter the Client's details and click Submit to get the Client added into your Zoho People account.

2. The second method of adding a CRM client is using the Import option
- Go to Time Tracker > Projects/Jobs > Clients
- Click the ellipsis icon and select Import from CRM

- Select the Clients from the respective CRM Module, using the dropdown
- Click Submit
Follow the steps given below when you want to delete more than one job at one go.
- From your home page, go to Time Tracker > Projects/Jobs > Clients
- Select the Clients that need to be deleted
- Click Delete

The selected Clients will get deleted.
In general, employees will not be able to see the Clients tab. You need to set permissions for an employee to be able to view the Clients tab. Follow the steps given below.
- From your home page, go to Settings (gear icon) > User Access Control > Permissions > Admin Operations
- Click the Add user icon
- Select the User from the drop down
- Under the Time Tracker, check the option 'Data'

The selected user will now be able to access the Clients tab.
Time Logging:
There are two ways in which Time can be logged.
Manual Method:
There are three ways of logging time manually.
1. Using 'Log Time' option
- From your Home page, go to Time Logs > Log Time

- Enter other details as required
- Select Job Name.
You can also add a new job here by clicking Add Jobs.
- Select the date as required
- Under Hours, you can either select Hours and enter the number of hours or select Start & End and enter the time there
- Click Save

2. The next method of logging time manually is by entering time in the Daily, Weekly and Monthly time logs.
Tip: Click here to know how to use Daily, Weekly and Monthly logs.
3. The third method of logging time manually is by Importing time logs.

Tip: Click here to know how to import logs.
Automatic method Using Timer:
Timers can also be used to log time. You can use the Timer in two ways.
1. Given below are the steps for the first method.
- From your home page, go to Time Tracker > Time Logs
- Select the Job for which you need to log time
- Enter other details as required
- Click on the Timer to start recording time
- Click Save

You can also pause the timer and resume it when you continue work on the same job.
2. The second method of using Timers is explained below.
- From your home page, go to Time Tracker > TIme Logs
- Click on Log Time
- Select details as required
- Click Start Timer
- Click Save
Time logging will get started for this job and you can see the Timer running in the List View.
Note for Timer:
- You can add notes while the Timer is running by clicking on the Notes icon. This cannot be done after the Timer is stopped.
- You can use the Timer only when you log time for the current date. Similarly, you can resume or pause the timer only for the current day.
Logging time using Timer can also be done from the Calendar View. Click here to know how.
Note for Time Logging:
- Though there are two methods to log time, the method of logging depends on the Settings configured under Time Tracker > Settings > General Settings > Time Log Type. Time Logging can be done only based on the option chosen here.
- The Billing Status of the job depends on the status chosen under Time Tracker > General Settings > Default Billing Status
Using the daily/weekly/monthly log, you can log time manually. This helps in scenarios where you need to log more than one time log per day or when you want to log many time logs in a week.
- From your home page, go to Time Tracker > Time Logs
- Click the Log time dropdown

- Select daily/weekly/monthly log
- Use the drop downs to make your selection appropriately
- Enter the number of hours and click Submit


Note:
- Daily/weekly/monthly logs will display the time logs (logged manually and through timer) that are Billed, Approved, Rejected or Pending for approval in the 'Read-only'mode.
- You can view/edit existing time logs or use the + icon to add new logs
- You can navigate to previous or future day's log by using the left and right arrow in the daily log
- In the weekly/monthly log, you can navigate to previous or future weeks' logs by using the left and right arrow keys
Tip: You can also enable or disable fields of the daily/weekly/monthly log according to your need.Click here to see how.
There are two ways in which you can add multiple time logs at a stretch
1. Importing Time Logs - Importing Time logs makes it easy for you to add time log for any date. Once the file is imported, the time log will be updated in the respective date. Follow the steps given below to import time logs.
- From your home page, go to Time Tracker > Time Logs
- Click on the ellipsis icon and select Import

- Click Import File, browse the file from your system and upload it
Note: The file should be in .xls or .xlsx or .csv format.

- Map the fields and click next
The imported time logs will now show when you go to Time Tracker > Time Logs under the respective date of the log.
2. Daily, Weekly and Monthly Time Logs - You can add more than one time log at a time by making use of the Monthly, Weekly and Daily logs. You will be able to add more than one log to a particular day and add multiple time logs to a week. Click here to know more.
Once the time logs are created, they can be exported easily. Follow the steps given below.
- From your home page, go to Time Tracker > Time Logs
- Click the ellipsis icon at the right corner
- Select Export
- Select the format (.xls or .csv) in which you would like to export to be done

- From your home page, go to Time Tracker > Time Logs
- Search for the employee using the Search tab
- Click the filter and click Advanced
- Under Views, select Last month and under Approval Status, select Approved
- Hit Search

Note: You can also make use of the Filter option in the Calendar View to refine your search based on parameters like Clients, Projects etc
- From your home page, go to Time Tracker > Time Logs
- Search for the employee using the Search tab
- Click the filter and click on Advanced to see more options to filter the time logs
- Hit Search
Yes. You can log time in Calendar View just like how you log it in List view. Follow the steps given below to do the same.
- From your home page, go to Time Tracker > Time Logs > Calendar View
- Hover your mouse over the date to see the + icon at the left corner

Note: Timer can be started only for current date.
- Select the job and the time logging type (Hours/Start& End time/Timer)
- Select the Billable status of the job
- Click Submit
You can view the time logs for a particular day by clicking the ellipsis icon which is on the right bottom corner of the date.
Note:
- Time Logging depends on the Settings configured under Time Tracker > Settings > General Settings > Time Log Type. Time Logging can be done only based on the option chosen here.
- The Billing Status of the job depends on the status chosen under Time Tracker > General Settings > Default Billing Status
Yes. This is possible. Follow the steps given below.
- From your home page, go to Time Tracker > Time logs > Calendar View
- Click on the time log that needs to be edited

- Click on the Edit icon(pencil icon) to make changes
- Click Save
Note: Hours logged using Timers cannot be edited.
To edit a time log, click on the edit icon, make the changes and Save it. To edit the hours captured by the Timer, follow the steps given below.
- From your home page, go to Time Tracker > Time Logs
- Click the Hours
- Click the edit icon (pencil icon) next to the Start and the end time

- Edit the hours and click Save
You will be able to see the hours edited. You can also delete an interval using the delete icon.
Note: In order to edit the timer, permissions need to be set under Settings (Time Tracker > Settings > General Settings > Timer Edit permission).
Time logs which are already sent for approval and logs that are already billed cannot be edited or deleted.
- From your home page, go to Time Tracker > Time Logs
- Select the Time logs that should be deleted and click Delete
Note: Irrespective of the view selected under Settings (Time Tracker > Settings > General Settings > Time Log View), you will be able to delete the logs of only one particular day at one go, using the multi select option.
Yes. You can do this by following the steps given below.
- From your home page, go to Time Tracker > Reports >Time Log Report
- In the employee search tab, select 'All Users'
- Click the filter and under User/Employee Profile, select 'Users'
- Click the Advanced option and under 'Approval Status', select 'Rejected'

- Under 'Billable Status', select, All and click Search
You will be able to see the rejected time logs of all users.
A timelog can be in unapproved status due to the following reasons.
- Pending for Approval
- In Draft
- Rejected by the Approver
- Not sent for Timesheet creation
Using filters in Time Tracker, you will be able to filter out the timelogs which fall under any of these categories. Follow the steps given below to track this.
- From your home page, go to Time Tracker > Time Logs
- Use the Advanced filter to filter jobs based on Approval status

- Select Un-Approved from the dropdown
This pulls out the list of timelogs that are in 'Unapproved' status.
Geo tracking is done for the time logs thereby helping you see the location from where time tracking is done. To view location, follow the steps given below.
- From your home page, go to Time Tracker > Time Logs
- The location icon next to the hours column of the time log, gives you the location from where time logging has been done
Note: For time logs that are done using timers, click on the hours of the time log to see the location/list of locations from where the timer has been run.
With the help of the 'Clone' option, you will be able to Clone the previous day's or previous week's or previous month's time logs.
Follow the steps given below to do this.
- From your home page, go to Time Tracker > Time Logs > List View > Log Time drop down
- Click on Monthly Log and click on 'Clone Previous Month's Logs'

You will be able to see the time logs of the previous month replicated. You can add more time logs to this or edit the replicated time logs before Submitting them.
The 'Reset' option helps you clear the time logs before they are Submitted.
Note 1: The Settings that you have configured under Time Tracker > Settings > General Settings > Daily/Weekly/Monthly Logs Customization will be applicable for the cloned logs as well. For eg. If you had disabled the description, Work Item etc, then the Cloned time logs will not include this data.
Note 2: In case of Monthly logs, the 'Clone' option will replicate the dates according to the previous month. For example, if you Clone the time logs of May in the month of June, then the Cloned time logs will be for the period of 1-30 days only, though there might be time logs for 31 May as well.
Timesheets:
A time sheet is a collection of one more time logs. As a first step to create a timesheet, you need to have time logs created.
The image given below, shows the steps involved in having a timesheet created.

There are two ways in which you can create a timesheet. Given below are the steps to submit a timesheet.
1. In the List View and Calendar View of your Time Tracker, at the right bottom corner you will be able to see an icon which says 'Not Submitted'. This has the list of time logs that are not submitted for approval. When you click on this, you will be able to see the timesheet creation page. If you go from the list view page, your timesheet creation page will display the logs of the current day or current week as per what you have define in the Settings page (Time Tracker > Settings > General Settings > Time Log Settings > Time Log view).
If you go from the Calendar View page, your timesheet will display the logs of the entire month.
2. You can also choose to create timesheet by clicking on Time Tracker > Timesheets > Create Timesheet
All timelogs created in the current week or month (according to the option chosen in the configuration page) will get displayed.
Note: If there are no time logs for the period (current day or month), then you will be taken to the criteria page before the timesheet creation page. Here, you will be able to choose the period for which there are time logs available for timesheet creation.
Once you have collated all the timelogs, click Submit
Your timesheet will be displayed under Timetracker > Timesheets > My Timesheets.
If approvals are configured, then the timesheets will go to the approver. Otherwise, you can see the timesheet with the status 'Draft' under My timesheets. Even if there are approvals configured, you can choose to keep your timesheets in 'Draft' until the time you want to submit them. To do this, you need to uncheck the box 'Send for Approval'.
Note: The rate that is used in the timesheet is based on the rate per hour defined for the particular user.
Tip: Click here to know how to define the rate per hour for a user.
You also have another option where you can schedule timesheets to go for approvals automatically.
- From your home page, go to Timetracker > Settings > Scheduler settings
- Enter the details
- Under Applicable for, make the selection as required from the drop down options available

The timesheets will go for approval automatically at the time chosen in the scheduler. If Approvals are not configured, the Timesheets will remain in Draft.
Take a look at this webinar which shows you how to create a Timesheet on Zoho People.
Depending on the nature of your business and your organizational policy, as an administrator, you can either retain the timesheet creation permission to yourself or enable users and Reporting Managers to create Timesheet. Follow the steps given below to grant permission to users or Reporting Managers to create timesheets.
- From your home page, go to Time Tracker > Settings
- Under Time sheet creation settings, go to Time sheet creator
- Select the desired role from the drop down

The number of time logs displayed while creating timesheets is dependant on two factors as listed below.
1. In the configurations page, (Time Tracker > Settings > General Settings > Timesheet Creation Settings), if you chose to Exclude jobs without clients, then the time logs which you have created for jobs that are not associated with clients will not get listed.
2. In the configurations page (Time Tracker > Settings > General Settings > Timesheet Creation Settings > Billable Status), if you have chosen the billablestatus as Billable, then, the time logs that are created for jobs with Billable status will only get listed.
For all your time logs to get listed, the option of including time logs without clients and including time logs with both Billable and Non-Billable status should be enabled.
- From your home page, go to Time Tracker > Timesheets
- Select the Timesheets that should be deleted
- Click Delete
Note:Users can only delete the timesheets that are in the Drafts.
- From your home page, go to Time Tracker > Timesheets
- Click on the timesheet to edit the Name, Description and to change the attachment if any
- The hours can be edited by clicking on the edit icon(pencil icon) which appears when you hover the mouse over the timelog
- Click Submit
Note: A timesheet can be edited by the users only when it is in Draft. Even as an administrator, you will not be able to edit a timesheet which is in Pending Approval/Approved/Partially Approved status.
- From your home page, go to Time Tracker > Timesheets
- Click on My Timesheets to see the timesheets that are created by you and your subordinates
Follow the steps given below to do this.
- From your home page, go to Time Tracker > Timesheets > My Approvals
- Click the filter
- Under 'User/Employee Profile', select Ex-Employee

- Under 'Status', select 'Pending' and hit Search
You will be able to see the timesheets of ex-employees that have to be approved.
Yes. This is possible. Follow the steps given below to do this.
- From your home page, go to Time Tracker > Timesheets > My Timesheets
- Click on the filter and under User/Employee Profile, select 'Users', under 'Timesheet For', select 'All Users'
- Under Status, select 'Pending' and hit Search

You will be able to see the timesheets of all users that are pending for approval.
Using 'Audit history' option, you will be able to see the history of a timesheet including edits, right from the time of creation until the time of approval of the timesheet. Follow the steps given below to view the audit history.
- Go to the respective timesheet
- Click on the 'audit history' icon on the right top corner
You will be able to see the history of the timesheet. You can also print this history by clicking on the print icon.


- From your home page, go to Time Tracker > Timesheets
- Click on the timesheet that needs to be printed
- Click the ellipsis icon at the right corner of the page

Note: You can only print one timesheet at a time.
Yes. The timesheets that you create using Zoho People are compliant with the standards that are defined by the DCAA. Click here to know more.
Bill Generation:
Bills are generated for the timelogs in order to track the budget spent on specific Clients. The image below shows the steps involved in creating a bill.

Tip: Visit the links given below to know how to create a Client, Job and Project on the system.
Once you have created Clients, Jobs and Projects on the system, follow the steps given below to generate a bill.
- From your home page, go to Time Tracker > Reports > Billing
- Click Generate Bill
- Enter details like client name, project name, Date range etc for which the bill has to be generated
- Click Next
The bill gets displayed.
- Give a due date for the bill and click Submit

You can either push the bill to Zoho Books or Zoho Invoice or mail the bill to your client. You can also push the bill as an invoice to QuickBooks.
Tip : Click here to know in detail.
Note: If you are pushing the bill to Zoho Invoice, you will have to select the right Organization from the list of organizations you have created in Invoice. Once selected, all your bills will be pushed only to this organization account.
- From your home page, go to Time Tracker > Settings > Payroll settings
- Click Add user rate
- Select the Username
- Enter the Rate Per Hour
Note: The currency for this rate will be based on the location of the employees if they are assigned to locations. Location based currencies are added under Time Tracker > Settings > Billing Settings > Currency.
You can use the + icon to add more locations and assign currencies accordingly. In cases where location is not defined, the rate per user will be applicable as per what is defined as the default currency of the organization.

Bills can be generated in any of the currencies that are listed by your organization.
- From your home page, go to Time Tracker > Settings > Billing Settings
- Click Edit settings
You will be able to edit the currency.
Note: If you have not chosen a currency while adding the Client, then, the currency that you select here (in Billing Settings) will be used to generate the bill for the Client.

- From your home page, go to Time Tracker > Settings
- Click Billing Settings tab
- Click Edit settings
- Under Tax Name, give a name
- Under Tax Percent, define the percentage
- Click the + icon to add another row

Only two forms of the Time track can be customized which are Projects and Jobs.
- From your home page, go to Setup (gear icon) > Forms and Tabs > Forms
- Click on either Projects or Jobs form, based on your need
- Use the drag and drop editor to customize the form

Approvals
- From your home page, go to Time Tracker > Settings > Approvals Settings
- Enter Name of the Approval and set criteria if needed
Approvals
You can either configure approver or allow the system to auto approve or auto reject the record based on the criteria requirements.
Follow the steps given below to configure an approver:
In the first tab, there are various options like Reporting to, department lead, out of which, you can select one.
Note: Since Time Tracking is done for Projects, you also have the option to create approval based on the Project Manager. While choosing the Approver, you can select Project Manager from the drop down to have the timesheets approved only by the respective Project Manager.
There is also an option where an employee can select the approver while adding the record. Approvals can be set up to five levels of Reporting To.
Under message, there are system options for you to select. Based on your selection, the email will go to the respective person.
Approver - If you select this option, the email will go to the Approver who is configured.
Team mail id of the person performing this action - If you select this option, the follow-up email will be sent to the Team mail id of the person who submitted the approval request.
Person performing this action - If you select this option, the email will be sent to the person who sent the request for approval.
Reporting Manager of login user - If you select this option, the email will be sent to the reporting manager of the person who submitted the approval request.
Other than this, there are lists of Users, Roles, and Departments from which you can select the recipient of the email.

- Click Save once you are done
Note: In the absence of Approval configuration, the data that is shown under Time Logs(both List View and Calendar View) as well as in the Reports will be filtered based on the parameters chosen in the other filters. The Approval Status filter will remain passive since there is no Approval configuration done.
It is possible to disable the approvals that have been configured by making use of the enable/disable options for each Approval configuration under Settings > Approval Settings
- From your home page, go to Time Tracker > Settings > Scheduler settings > Add Schedule
- Enter the details
- Under Applicable For, select the options as required

This scheduler will collate the Timesheets and push it for approval automatically at the time that is selected.
- From your home page, go to Time Tracker > Timesheets > My Approvals
This will show you the list of timesheets that have been sent for your approval.
- From your home page, go to Time Tracker > Timesheets > My Approvals
- Select the timesheets that you would like to approve/reject and click Approve/Reject
- Enter comments if any and select Approve or Reject
In this scenario, the employee should create a new log and submit is as another timesheet. He/She cannot include it as part of the existing timesheet.
When an entire timesheet is rejected, the employee can go to the Timesheet, make changes in the timesheet by making use of the edit icon(pencil icon) wherever required and click submit to submit the timesheet again for approval.
Restrictions
While adding a job, you can add the number of hours for completion of the job. It is also possible to restrict logging of time beyond the estimated hours that you define here.
- From your Home page, go to Time Tracker > Settings
- Under General Settings, go to Time Log settings
- Click Yes, if you would like to restrict the log time based on the estimated hours
Note: The estimated hours is what you give for each assignee when a job is created. By making use of this option in Settings, you will be able to prevent employees from logging more hours than what is given as estimated hours for them.

In order to maintain consistency in the number of hours worked, you may need to have a fixed time defined for work done on each day. This is possible through Time Tracker. Follow the steps given below.
- From your home page, go to Time Tracker > Settings > Time Log Settings
- Under Maximum log hours per day/week, select 'Per Day' and enter the number of hours you would like to fix

Similarly, you can also fix maximum working hours for a week. This setting will restrict employees from logging in more time than what is fixed by the organization for a day/week.
Note: You can set a maximum of 24hours per day and a maximum of 168 hours (24 * 7) per week
- From your home page, go to Time Tracker > Settings > General Settings
- Under Time Log settings, go to Timer Edit Permission
- Select Admin or Reporting Manager if you would like to restrict your employees from editing the timer hours
- Select Reporting Manager or Admin based on who needs to have the access to edit the timer

When timelogs are created, you can have the billing status set to default as per your need. Follow the steps given below.
- From your home page, go to Time Tracker > Settings > General Settings
- Under Default Billing Status, select Non-Billable

Once this setting is done, the timelogs that are logged with automatically be logged under the billing status as Non-Billable.
Note: This status can be edited by the one who is logging time in both the List View and the Calendar View while time logging is done.
In the list view, you can have the logs of the day/week/month displayed based on the Settings that you configure. Follow the steps given below to set Monthly view as your default view.
- From your home page, go to Time Tracker > Settings > General Settings
- Under Time Log View, select Monthly

Now, the default view of your time logs will show you the logs of the entire month.
Out of the two ways of Time Logging (Manual and Automatic), you can choose the method in which you want employees to log time. Follow the steps given below.
- From your home page, go to Time Tracker > Settings > General Settings
- Under Time Log settings, go to Time Log type
- Select Manual

Now, your employees will not be able to log time using Timers.
Due to the fact that Jobs can be created without being associated to a Client, it is obvious that the Time Logs created can be for Jobs that are not associated to any Clients. However, when these logs are collated for Timesheet creation, you have the option to exclude jobs that are not mapped to any Clients. Follow the steps given below.
- From your home page, go to Time Tracker > Settings > General Settings
- Under Timesheet Creation Settings, go to Client
- Check the box "Exclude Jobs without Clients"

The Timelogs that are created with stand-alone Jobs will not be included while Timesheets are created.
When Time is logged, you can decide if you want only the Billable logs to be sent for approval. This will help in scenarios where you have both billable and non-billable logs but need only billable logs to be approved. Follow the steps given below.
- From your home page, go to Time Tracker > Settings > General Settings
- Under Timesheet Creation Settings, go to Billable Status
- Select Billable

According to your organizational needs, you may want to grant the permission to create timesheets with the Reporting Manager. This is possible using Time Tracker Settings. Follow the steps given below.
- From your home page, go to Time Tracker > Settings > General Settings
- Under Timesheet Creation Settings, go to Timesheet Creator

- Select Reporting Manager from the drop down and click Submit
Once this is done, only Reporting Managers will be able to create Timesheets.
Note: In the drop down there are other options like Self and Admin using which permissions can be granted to all users or granted only to the Administrator.
In the Daily and the Weekly log, you have the option to enable and disable fields based on your need. Follow the steps given below.
- From your home page, go to Time Tracker > Settings > Daily/Weekly/Monthly logs customization
- Disable the Project Name field

Now, you will not be able to see the Project Name displayed in the Daily/Weekly/Monthly logs.
While creating Approvals for Timesheets (Time Tracker > Settings > Approval Settings > Add Approval), under "Configure Approver", you can have the Project Manager selected, as shown in the image below.

If this option is selected, then the Timesheets will only go to the respective Project Managers for Approvals.
Learn how to create Approvals for Timesheets. Click here.
Using a scheduler, you can have reminder sent to members of specific departments to submit their timesheet for approval. Follow the steps given below.
- From your home page, go to Time Tracker > Settings > Reminder Settings > Add Reminder
- Enter the details like name
- Under 'Type', select whether the reminder should be set for Time Logs or for Timesheets
- Under Frequency, set the frequency at which you would like to have the reminder sent
- Under Applicable for, go to the first section(Roles) and select Team Member from the options
- Go to the next section (Departments) and select the desired department


Once this configuration is done, the Team Members of the department that you have chosen will receive a reminder at the time and frequency(Daily/Weekly/Monthly) that you have given in the scheduler.
Follow the steps given below to enable overtime.
- From your home page, go to Time Tracker > General Settings > Time Log Settings
- Under Maximum billable log hours per day/week, check Per Day or Per Week option

You will see the 'Allow Overtime' option. Check this box to enable overtime.
Note: You will not see the overtime option if you do not set maximum billable log hours for a day/week.
When overtime is enabled, the maximum billable hours allowed to be logged for a day or week will be inclusive of the overtime hours.
Under Payroll Settings, you can define a rate for general hours of work and a different rate for overtime hours. Follow the steps given below.
- From your home page, go to Time Tracker > Settings > Payroll Settings
- Click 'Add Employee Rate'
- Select the employee from the dropdown
- Enter Rate Per Hour
- Under OT Rate Per Hour, enter the rate

The OT rate that you define under the Payroll settings will be used while payment is processed and you can see this under the Payroll report.

Here, the billable amount will be calculated with billable hours and the rate per hour given. Similarly, overtime amount will be calculated based on the OT hours and the OT rate per hour.
Note: Overtime should be enabled for the OT hours to be captured in the report.
Under the Payroll Settings, you can retain the overtime amount as zero. This way, you will be able to see the overtime hours captured under the Payroll report. However, you will not see any amount recorded for overtime.
In the Settings, if you had enabled overtime, and set 8 hours as the maximum billable log hours and 1 hour as allowed overtime hours, then only 8 hours will be shown as the total billable hours.

The extra 1 hour will be shown under overtime in the payroll report. In case you have set allowed overtime hours as 30minutes, then in the payroll report, you will be able to see only a maximum of 30mts(0.30) as OT hours.
Yes. This is a two step process.
1. First you need to set OT hours and Extended OT hours under Settings. Follow the steps given below.
- From your home page, go to Time Tracker > Settings > General Settings
- Under Time Log Settings, check 'Allow Overtime'
- Under OT hours, enter the Overtime hours and under Extended OT Hours, enter the value. In this step, you are fixing the number of hours that you would like to consider as Overtime and the number of hours you would like to consider as Extended Overtime
In this scenario, you need to enter 2 under overtime hours and 3 under extended overtime hours. This will help you fix different rates for these two fields, under Payroll Settings.

2. Next, you have to fix the rates for OT Hours and extended OT hours under Payroll Settings.
- From your home page, go to Time Tracker > Settings > Payroll Settings
- Click 'Add Employee Rate'
- Select the employee from the dropdown and enter the Rate per Hour
- Similarly, enter the OT rate per hour and extended OT rate per hour

In this case, the rate that you would like to fix for the first 2 hours of OT should be specified under 'OT Rate per hour' and the rate that you are going to fix for the next 3hours should be entered under 'Extended OT Rate per hour'. Once this is done, the rates will be calculated as follows:
- Total OT rate = OT Rate per hour x OT hours mentioned in Settings
- Total Extended OT rate = Extended OT Rate per hour x Extended OT hours mentioned in Settings
If the week is from Wednesday to Tuesday, then your monthly report will end with half of the week's details captured. In such cases, billable hours will be calculated based on the average hours per day.
Lets consider this scenario.
- Week is from Wednesday to Tuesday
- Month ends on Thursday
Hence, the monthly report will end with Thursday . The total number of billable log hours of Wednesday and Thursday (for the last week of the month) will be calculated as Average hours per day x 2.
The average hours per day can be calculated from the maximum billable log hours set for a week under General Settings. (Maximum billable log hours per week divided by 7)
The remaining hours of that week (Friday - Tuesday) will be captured in the next month and will be calculated as average hours per day x 5. The same is applicable for overtime hours also.
You can create this restriction under the Settings tab. Follow the steps given below
- From your home page, go to Time Tracker > Settings > General Settings
- Under Time Log Settings, go to Restrict Time Logs for and select 'Weekend(s)' and 'Holiday(s)'

Now, the user cannot log time on holidays or weekends. You can also create restrictions for other options like Future Dates, Unpaid Leave etc
Note: 1.The system will calculate holidays and weekends for the user based on the settings that you have done under Organization > Calendar Settings . I.e- if an user belongs to location - Chennai, then his/her weekends/holidays will be based on what settings you have defined for Chennai location.
2. Shift based weekends and holidays will override location based weekends and holidays configured if any
Yes. Employees who avail half a day leave will be able to log time for the other half of the day depending on the hours you set in Attendance > Settings > Minimum hours required for a day.
User Settings lets you configure Time Log settings that are specific to particular User(s). This comes to use when you would like to set permissions to certain users alone, different from the rest of the organization.
To add settings,
- From your Home, go to Time Tracker > Settings > User Settings > Add Settings
- Provide a name for the settings that you would like to configure
- Select a particular User or multiple Users. The settings will be applicable to the user(s) selected here

Follow the same steps as you do while configuring General Settings for Time Tracker. The setting defined here will reflect only for the particular Users selected.
Reports:
Time Tracker report helps you extract different types of reports based on your need.
- From your home page, go to Time Tracker > Reports > Jobs Report
- Use the employee search tab and search for the employee whose report you would like to extract
- Click on the Filter, go to the Jobs drop down and select the Job for which you need the report
- Hit Search

You will be able to view a report with the total number of estimated hours against the total number of actual hours of work done for the particular job.
The Jobs Report can give you this details. Follow the steps given below.
- From your home page, go to Time Tracker > Reports > Job Report
- Click the Filter icon and select 'All Users & Employee Profiles' under User/Employee Profile
- Under the Clients dropdown, select the desired Client name
- Under Job status, select Completed and hit Search

You will be able to see a report with Completed jobs of the Client that you have chosen.
- Click on the ellipsis icon and select Print to get a print of this report
Follow the steps given below to get this report.
- From your home page, go to Time Tracker > Reports > Job Report
- Click the filter icon and select 'All Users & Employee Profiles' under 'User/Employee Profile'
- Under Jobs, select the desired job
- Under Billable Status, select 'Billable'
- Click Advanced and under Approval Status, select "Approved"
- Hit Search

You will be able to see the desired report.
Note:The Approval status filter will be applicable only if Approvals are configured. In the absence of Approval configuration, the data pulled out will be based on the other parameters chosen and not on the Approval status.
- Click on the ellipsis icon and select the Export option to export this report
Note: Export should be done only in .xls or .csv format.
Follow the steps given below to extract this report.
- From your home page, go to Time Tracker > Reports > Time Log Report
- In the dropdown for the User name, select "All Users"
- Click the Filter icon and go to Search Type
- Select the "Custom" option from the dropdown
- Under Date Range, select the period for which you need the report
- Under Jobs, select the Job for which you need the report generated
- Select the options under other fields like Jobs Status, Clients etc as per your need and hit Search

You will be able to see the hours spent on the job that you have chosen for the period that you need.
The Payroll report helps you see these details. Follow the steps given below.
- From your home page, go to Time Tracker > Reports > Payroll Report
- Click on the Filter
- Under Search type, select Custom and give the desired date range
- Under Employee Name dropdown, select 'All Users'

You will be able to see a report with the amount to be paid for all employees for your desired period of time.
Note: You will be able to see the detailed report date wise if you click on individual rows of the report.
Note:You can prevent any edits being made to the time logs/timesheets of the past,by the user, by configuring a pay period.
Tip : Click here to know how to configure a pay period
The Client Report helps you extract these details. Follow the steps given below.
- From your home page, go to Time Tracker > Reports > Client Report

You will be able to see the Billable and Non billable hours Client wise.
- Click on the ellipsis icon and select "Download as PDF"
Timesheets in Zoho People: Enables you to log time and generate timesheets for various recorded jobs. The generated timesheets can be later sent for approval, used for billing purpose and the data can also be used for payroll processing.
Timesheets in Zoho Projects:Lets you log and track time spent on a task, record actual hours against your projects which enable you to identify slipping deadlines and gain insight about the time spent, which helps to maximize billable and minimize non-billable hours.
Timesheets in Zoho Books: Helps you to quickly enter the hours spent on a project task, bill your clients accurately and sort, search and track your timesheets by project, task or staff and to stay in total control of your project timesheets.
Certain files contain sensitive information that needs to stay private when they get exported. Such files can be encrypted with a password. The exported file will be accessible only with the password sent to your mail ID and hence ensures a secure export. Follow the steps given below to do this.
For instance, if you would like to export the Payroll Report of your employees secured with a password, password protection for exporting should be enabled in the first place. To do this,

- From your Home page, go to Time Tracker > Settings > General Settings
- Under Export Settings, click on 'Enable password protection'
- Click 'Submit'
Now to export the file, in this case, The Payroll report,

- Go to Time Tracker > Reports > Payroll Report
- Click on the ellipsis icon > Export
- Select the desired format and click 'Export'
The file will get exported in the chosen format which can be accessed with a password sent to your mail.
Note: If formats .xls, .csv and .tsv are selected, the file gets exported as a .zip file
